centos搭建单机伪分布式MongoDB集群_mongodb-src-程序员宅基地
centos搭建单机伪分布式MongoDB集群
一、实验任务要求
使用一台虚拟机搭建伪分布式的MongoDB集群。集群有六台机器,分成六个副本集,S1,S2,S3,S4,S5,S6,每个副本集分三个节点。同一副本集中的节点有一个主节点,两个从节点,从节点的数据与主节点一致;OS为mongos进程(路由服务器);C为config server(配置服务器),设置了三个配置服务器。熟悉使用MongoDB的增删改查操作。
1.安装与配置
(1)首先,从官网上下载好安装包解压到opt文件夹,命名为mongodb
tar -zxvf /home/syp/mongodb-src-r4.2.6.tar.gz
配置环境变量
vi /etc/profile
export PATH=$PATH:/opt/mongodb/bin
source /etc/profile
(2)设计配置MongoDB集群
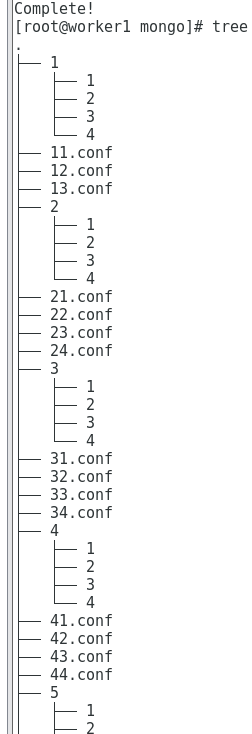
新建一个文件夹用来存放配置文件以便我们进行启动集群,这里我在opt文件夹下新建了mongo文件夹,在这个文件夹下又新建了6个文件夹,分别代表不同的机器,每个机器的文件夹下有几个进程就配置几个文件夹用来存储数据。这里的设计如下图:

接下来我们要对这些进程配置启动文件,命名为数字的文件为数据分片的配置文件,命名为C的文件为配置分片的配置文件,命名为OS的配置文件为路由服务器进程的配置文件。这三者的配置文件所要配置的地方有所不同,下面以数据分片的修改为例,对配置不同的地方加以注释。这些文件均放在刚才我们配置的第一级目录下以便启动。
(3)配置文件的修改
接下来我以配置数据分片的配置文件为例,配置1号机器下的1号进程。
修改日志文件路径:path: /opt/mongo/1/1/mongod.log

修改db文件存储目录的路径:dbPath: /opt/mongo/1/1

修改进程文件路径:pidFilePath: /opt/mongo/1/1/mongod.pid

端口号配置为之前设计好的端口:port: 9011

bindIp修改为0.0.0.0

副本集修改为设计时的名字

集群角色:clusterRole: shardsvr(代表存储数据)如果是配置文件则为configsvr

这样我们就配置好一个进程的配置文件了,但是注意一定要按照上面的格式去编辑配置文件,像sharding之后要有冒号,角色clusterRole要有缩进,代表clusterRole是sharding的一个子参数,同样shardsvr前面也要有空格,这是yum的语法格式。这些只是为了方便我们启动节点,也可以启动时加这些参数,但那样就过显繁琐。
重复以上步骤配置所有进程的配置文件,主要需要改的地方,一是路径,二是端口,三是角色。
但对于OS配置文件需要注意,因为OS就是个路由服务器,无存储,无副本:存储去掉

副本去掉

注意告诉路由配置信息在哪(可任选一个配置副本的路径)

最后配置完毕,文件夹下的结构应该是这样:

(4)启动mongodb并进行分组


使用ps aux|grep mongod查看一下进程,显示如上表示成功。
接下来按照之前设计进行分组:
mongo --port 9011
cfg={
    _id:"S1", members:[{
    _id:0,host:'192.168.43.101:9011'}, {
    _id:1,host:'192.168.43.101:9021'}, {
    _id:2,host:'192.168.43.101:9031'}]};
rs.initiate(cfg)

显示如上,则表示成功。同样步骤完成所有的分组。
(5)启动并连接mongos
mongos -f os.conf

mongo --port 9014

告诉mongos我们刚才的分片情况
sh.addShard("S1/192.168.43.101:9011")
sh.addShard("S2/192.168.43.101:9022")
sh.addShard("S3/192.168.43.101:9033")
sh.addShard("S4/192.168.43.101:9043")
sh.addShard("S5/192.168.43.101:9053")
sh.addShard("S6/192.168.43.101:9063")
使用sh.status()命令查看分片情况

以上MongoDB就配置完成了,接下来我们熟悉使用一下这个数据库。
2.熟悉使用
(1)创建新的数据库并进行操作
use admin 转换到admin数据库下面

我们现在想建个数据库,并让我的集群为他服务,则要
db.runCommand({
    enableSharding:"stumis"})
db.runCommand({
    shardCollection:"stumis.students",key:{
    "_id":"hashed"}})

可以发现我们的数据库多了一个stumis数据库,并对他启动了数据分片的功能。然后我创建这个数据库下的students集合(文档数据库中多个文档构成集合,没有表的概念),针对id用hash的方式做分片。
(2)对新建数据库stumis进行操作
首先要转换到stumis数据库下,use stumis

Mongodb支持JavaScript语言,可采用编程方式对数据库进行操作,我们使用for循环向数据库插入数据。

注意语法,可以看出操作十分类似SQL,向students集合中插入多个学生文档,有姓名和年龄属性。
看一下插入结果情况:
db.students.find()

查看一下分片情况db.status()

可以发现数据库stumis的集合students进行了分片,每个S上存了两块。
查询年龄小于20的学生
db.students.find({
    age: {
    $lt: 20}}).pretty()

将查询结果按年龄倒序排序
db.students.find({
    age: {
    $lt: 20}}).pretty().sort({
    "age":-1})

综上,通过一系列设计与实验,搭建好了mongodb数据库,搭建的过程感觉上确实很麻烦,但是,搭建完成后的使用十分便捷,不仅感受到了文档数据库相对其他数据库而言,灵活查询操作的强大功能,又拥有JavaScript编程式的操作支持。
将数据分片的配置文件给出样例:
# mongod.conf

# for documentation of all options, see:
#   http://docs.mongodb.org/manual/reference/configuration-options/

# where to write logging data.
systemLog:
  destination: file
  logAppend: true
#!!!
  path: /opt/mongo/1/1/mongod.log

# Where and how to store data.
storage:
#!!!
  dbPath: /opt/mongo/1/1
  journal:
    enabled: true
#  engine:
#  wiredTiger:

# how the process runs
processManagement:
  fork: true  # fork and run in background
#!!!
  pidFilePath: /opt/mongo/1/1/mongod.pid  # location of pidfile
  timeZoneInfo: /usr/share/zoneinfo

# network interfaces
net:
#!!!
  port: 9011
#!!!
  bindIp: 0.0.0.0  # Enter 0.0.0.0,:: to bind to all IPv4 and IPv6 addresses or, alternatively, use the net.bindIpAll setting.


#security:

#operationProfiling:

replication:
#!!!
  replSetName: S1

sharding:
#!!!
  clusterRole: shardsvr

## Enterprise-Only Options

#auditLog:

#snmp:
将OS路由配置文件样例给出如下:
# mongod.conf

# for documentation of all options, see:
#   http://docs.mongodb.org/manual/reference/configuration-options/

# where to write logging data.
systemLog:
  destination: file
  logAppend: true
#!!!
  path: /opt/mongo/1/4/mongos.log

# Where and how to store data.
#storage:
#!!!
#  dbPath: /opt/mongo/1/4
#  journal:
#    enabled: true
#  engine:
#  wiredTiger:

# how the process runs
processManagement:
  fork: true  # fork and run in background
#!!!
  pidFilePath: /opt/mongo/1/4/mongos.pid  # location of pidfile
  timeZoneInfo: /usr/share/zoneinfo

# network interfaces
net:
#!!!
  port: 9014
#!!!
  bindIp: 0.0.0.0  # Enter 0.0.0.0,:: to bind to all IPv4 and IPv6 addresses or, alternatively, use the net.bindIpAll setting.


#security:

#operationProfiling:

#replication:
#!!!

sharding:
#!!!
  configDB: C/192.168.10.101:9024
## Enterprise-Only Options

#auditLog:

#snmp:
将操作流程命令给出如下:
1、规划

1:1、5、6、os
2:1、2、6、c
3:1、2、3、c
4:2、3、4、c
5:3、4、5
6:4、5、6

2、创建配置文件和目录

3、启动mongod
mongod -f 11.conf
mongod -f 12.conf
mongod -f 13.conf
mongod -f 21.conf
mongod -f 22.conf
mongod -f 23.conf
mongod -f 24.conf
mongod -f 31.conf
mongod -f 32.conf
mongod -f 33.conf
mongod -f 34.conf
mongod -f 41.conf
mongod -f 42.conf
mongod -f 43.conf
mongod -f 44.conf
mongod -f 51.conf
mongod -f 52.conf
mongod -f 53.conf
mongod -f 61.conf
mongod -f 62.conf
mongod -f 63.conf

4、分组
mongo --port 9011
cfg={
    _id:"S1", members:[{
    _id:0,host:'192.168.43.101:9011'}, {
    _id:1,host:'192.168.43.101:9021'}, {
    _id:2,host:'192.168.43.101:9031'}]};
rs.initiate(cfg)

mongo --port 9022
cfg={
    _id:"S2", members:[{
    _id:0,host:'192.168.43.101:9022'}, {
    _id:1,host:'192.168.43.101:9032'}, {
    _id:2,host:'192.168.43.101:9041'}]};
rs.initiate(cfg)

mongo --port 9033
cfg={
    _id:"S3", members:[{
    _id:0,host:'192.168.43.101:9033'}, {
    _id:1,host:'192.168.43.101:9042'}, {
    _id:2,host:'192.168.43.101:9051'}]};
rs.initiate(cfg)

mongo --port 9043
cfg={
    _id:"S4", members:[{
    _id:0,host:'192.168.43.101:9043'}, {
    _id:1,host:'192.168.43.101:9052'}, {
    _id:2,host:'192.168.43.101:9061'}]};
rs.initiate(cfg)

mongo --port 9053
cfg={
    _id:"S5", members:[{
    _id:0,host:'192.168.43.101:9053'}, {
    _id:1,host:'192.168.43.101:9062'}, {
    _id:2,host:'192.168.43.101:9012'}]};
rs.initiate(cfg)

mongo --port 9063
cfg={
    _id:"S6", members:[{
    _id:0,host:'192.168.43.101:9063'}, {
    _id:1,host:'192.168.43.101:9013'}, {
    _id:2,host:'192.168.43.101:9023'}]};
rs.initiate(cfg)

mongo --port 9024
cfg={
    _id:"C", members:[{
    _id:0,host:'192.168.43.101:9024'}, {
    _id:1,host:'192.168.43.101:9034'}, {
    _id:2,host:'192.168.43.101:9044'}]};
rs.initiate(cfg)

5、启动并连接mongos

mongos -f os.conf
mongo --port 9014

6、增加分片

sh.addShard("S1/192.168.43.101:9011")
sh.addShard("S2/192.168.43.101:9022")
sh.addShard("S3/192.168.43.101:9033")
sh.addShard("S4/192.168.43.101:9043")
sh.addShard("S5/192.168.43.101:9053")
sh.addShard("S6/192.168.43.101:9063")

7、启动数据分片功能
use admin
db.runCommand({
    enableSharding:"stumis"})
db.runCommand({
    shardCollection:"stumis.students",key:{
    "_id":"hashed"}})

8、批量插入数据
use stumis

for(var i=1; i<=100; i++) {
     db.students.insert( {
    name:"S"+i,age:i});}

9、查看分片效果
sh.status()
智能推荐
while循环&CPU占用率高问题深入分析与解决方案_main函数使用while(1)循环cpu占用99-程序员宅基地
文章浏览阅读3.8k次,点赞9次,收藏28次。直接上一个工作中碰到的问题,另外一个系统开启多线程调用我这边的接口,然后我这边会开启多线程批量查询第三方接口并且返回给调用方。使用的是两三年前别人遗留下来的方法,放到线上后发现确实是可以正常取到结果,但是一旦调用,CPU占用就直接100%(部署环境是win server服务器)。因此查看了下相关的老代码并使用JProfiler查看发现是在某个while循环的时候有问题。具体项目代码就不贴了,类似于下面这段代码。while(flag) {//your code;}这里的flag._main函数使用while(1)循环cpu占用99
【无标题】jetbrains idea shift f6不生效_idea shift +f6快捷键不生效-程序员宅基地
文章浏览阅读347次。idea shift f6 快捷键无效_idea shift +f6快捷键不生效
node.js学习笔记之Node中的核心模块_node模块中有很多核心模块,以下不属于核心模块,使用时需下载的是-程序员宅基地
文章浏览阅读135次。Ecmacript 中没有DOM 和 BOM核心模块Node为JavaScript提供了很多服务器级别,这些API绝大多数都被包装到了一个具名和核心模块中了,例如文件操作的 fs 核心模块 ,http服务构建的http 模块 path 路径操作模块 os 操作系统信息模块// 用来获取机器信息的var os = require('os')// 用来操作路径的var path = require('path')// 获取当前机器的 CPU 信息console.log(os.cpus._node模块中有很多核心模块,以下不属于核心模块,使用时需下载的是
数学建模【SPSS 下载-安装、方差分析与回归分析的SPSS实现(软件概述、方差分析、回归分析)】_化工数学模型数据回归软件-程序员宅基地
文章浏览阅读10w+次,点赞435次,收藏3.4k次。SPSS 22 下载安装过程7.6 方差分析与回归分析的SPSS实现7.6.1 SPSS软件概述1 SPSS版本与安装2 SPSS界面3 SPSS特点4 SPSS数据7.6.2 SPSS与方差分析1 单因素方差分析2 双因素方差分析7.6.3 SPSS与回归分析SPSS回归分析过程牙膏价格问题的回归分析_化工数学模型数据回归软件
利用hutool实现邮件发送功能_hutool发送邮件-程序员宅基地
文章浏览阅读7.5k次。如何利用hutool工具包实现邮件发送功能呢?1、首先引入hutool依赖<dependency> <groupId>cn.hutool</groupId> <artifactId>hutool-all</artifactId> <version>5.7.19</version></dependency>2、编写邮件发送工具类package com.pc.c..._hutool发送邮件
docker安装elasticsearch,elasticsearch-head,kibana,ik分词器_docker安装kibana连接elasticsearch并且elasticsearch有密码-程序员宅基地
文章浏览阅读867次,点赞2次,收藏2次。docker安装elasticsearch,elasticsearch-head,kibana,ik分词器安装方式基本有两种,一种是pull的方式,一种是Dockerfile的方式,由于pull的方式pull下来后还需配置许多东西且不便于复用,个人比较喜欢使用Dockerfile的方式所有docker支持的镜像基本都在https://hub.docker.com/docker的官网上能找到合..._docker安装kibana连接elasticsearch并且elasticsearch有密码
随便推点
Python 攻克移动开发失败!_beeware-程序员宅基地
文章浏览阅读1.3w次,点赞57次,收藏92次。整理 | 郑丽媛出品 | CSDN(ID:CSDNnews)近年来,随着机器学习的兴起,有一门编程语言逐渐变得火热——Python。得益于其针对机器学习提供了大量开源框架和第三方模块,内置..._beeware
Swift4.0_Timer 的基本使用_swift timer 暂停-程序员宅基地
文章浏览阅读7.9k次。//// ViewController.swift// Day_10_Timer//// Created by dongqiangfei on 2018/10/15.// Copyright 2018年 飞飞. All rights reserved.//import UIKitclass ViewController: UIViewController { ..._swift timer 暂停
元素三大等待-程序员宅基地
文章浏览阅读986次,点赞2次,收藏2次。1.硬性等待让当前线程暂停执行,应用场景:代码执行速度太快了,但是UI元素没有立马加载出来,造成两者不同步,这时候就可以让代码等待一下,再去执行找元素的动作线程休眠,强制等待 Thread.sleep(long mills)package com.example.demo;import org.junit.jupiter.api.Test;import org.openqa.selenium.By;import org.openqa.selenium.firefox.Firefox.._元素三大等待
Java软件工程师职位分析_java岗位分析-程序员宅基地
文章浏览阅读3k次,点赞4次,收藏14次。Java软件工程师职位分析_java岗位分析
Java:Unreachable code的解决方法_java unreachable code-程序员宅基地
文章浏览阅读2k次。Java:Unreachable code的解决方法_java unreachable code
标签data-*自定义属性值和根据data属性值查找对应标签_如何根据data-*属性获取对应的标签对象-程序员宅基地
文章浏览阅读1w次。1、html中设置标签data-*的值 标题 11111 222222、点击获取当前标签的data-url的值$('dd').on('click', function() { var urlVal = $(this).data('ur_如何根据data-*属性获取对应的标签对象