Spring Boot :模版引擎 Thymeleaf 渲染 Web 页面_springboot thymeleaf渲染对应网页-程序员宅基地
1. 什么是 Thymeleaf ?
虽然我们目前拥有许多十分优秀的前端框架,例如: Vue 、 React 等,非常适用于前后端分离的场景,前端可以独立部署成为服务,前后端从物理上完全进行隔离,降低程序耦合度。但是 Spring Boot 官方依然为我们提供了模版引擎用于一些无需前后端分离的场景。 Thymeleaf 是新一代的模板引擎,在 Spring Boot 中,官方推荐使用 Thymeleaf 来做前端模版引擎。打开 https://start.spring.io/ 可以看到,在当前Spring Boot 的版本中( 2.1.8.RELEASE ), 官方提供的模版引擎有以下几种:
Thymeleaf
FreeMarker
Mustache
Groovy
Spring Boot 建议使用这些模版引擎,而并不推荐我们继续使用 JSP 。
Thymeleaf 具体特性如下:
(了解源码可+求求: 1791743380)
Thymeleaf 在有网络和无网络的环境下皆可运行,即它可以让美工在浏览器查看页面的静态效果,也可以让程序员在服务器查看带数据的动态页面效果。这是由于它支持 html 原型,然后在 html 标签里增加额外的属性来达到模板+数据的展示方式。浏览器解释 html 时会忽略未定义的标签属性,所以 Thymeleaf 的模板可以静态地运行;当有数据返回到页面时,Thymeleaf 标签会动态地替换掉静态内容,使页面动态显示。
Thymeleaf 开箱即用的特性。它提供标准和 Spring 标准两种方言,可以直接套用模板实现 JSTL、 OGNL表达式效果,避免每天套模板、改 Jstl、改标签的困扰。同时开发人员也可以扩展和创建自定义的方言。
Thymeleaf 提供 Spring 标准方言和一个与 SpringMVC 完美集成的可选模块,可以快速的实现表单绑定、属性编辑器、国际化等功能。
2. 快速入门
这里我们先正常构建一个 Spring Boot 工程: spring-boot-thymeleaf ,在 pom.xml 文件中引入 Thymeleaf 的相关依赖,如下:
<dependency>
    <groupId>org.springframework.boot</groupId>
    <artifactId>spring-boot-starter-thymeleaf</artifactId>
</dependency>
工程的配置文件 application.yml 如下:
server:
  port: 8080
spring:
  application:
    name: spring-boot-thymleaf
  thymeleaf:
    # 关闭thymeleaf缓存 开发时使用 否则没有实时画面
    cache: false
    # 检查模板是否存在,然后再呈现
    check-template-location: true
    # Content-Type value.
    servlet:
      content-type: text/html
    # 启用MVC Thymeleaf视图分辨率
    enabled: true
    # Template encoding.
    encoding: UTF-8
    # 关闭严格模式
    mode: LEGACYHTML5
    # Prefix that gets prepended to view names when building a URL.
    prefix: classpath:/templates/
    # Suffix that gets appended to view names when building a URL.
    suffix: .html
  mvc:
    # 指定静态资源处理路径
    static-path-pattern: /static/**
    view:
      suffix: .html
有关 thymeleaf 都写明了注释,这里需要注意的有以下几点:
spring.thymeleaf.mode :这里是配置当前模版的解析模式的,默认值为 HTML ,这时会开启严格模式,所有的 HTML 必须有头有尾,很多地方并不符合我们平时的书写习惯,这里最好关闭严格模式。
spring.thymeleaf.cache :这里是 thymeleaf 的缓存,在平时的练习中最好关闭,否则页面修改后刷新浏览器将会无效,而在生产环境中,视具体的业务场景而定。
spring.mvc.static-path-pattern :这里是配置我们静态资源的路径,一般默认是配置 /static/** 路径,这里用于存放我们的 js 、 css 、图片等静态资源。
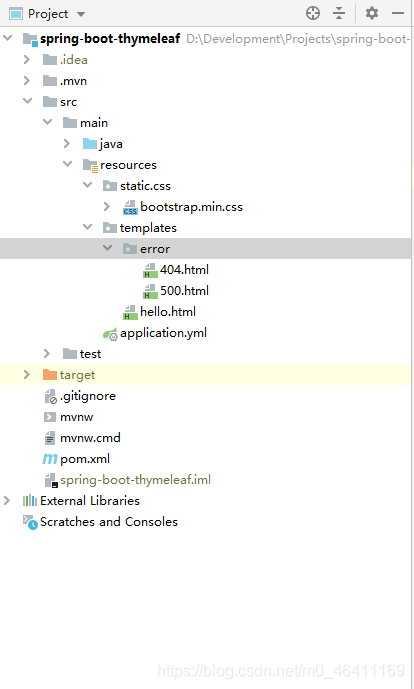
配置通用 404 和 500 页面,直接在 templates\error 创建对应页面即可,这里可以看一下 Spring Boot 错误页面转发的源码 org.springframework.boot.autoconfigure.web.servlet.error.DefaultErrorViewResolver,如下:
@Override
public ModelAndView resolveErrorView(HttpServletRequest request, HttpStatus status, Map<String, Object> model) {

    ModelAndView modelAndView = resolve(String.valueOf(status.value()), model);
    if (modelAndView == null && SERIES_VIEWS.containsKey(status.series())) {

        modelAndView = resolve(SERIES_VIEWS.get(status.series()), model);
    }
    return modelAndView;
}

private ModelAndView resolve(String viewName, Map<String, Object> model) {

    String errorViewName = "error/" + viewName;
    TemplateAvailabilityProvider provider = this.templateAvailabilityProviders.getProvider(errorViewName,
            this.applicationContext);
    if (provider != null) {

        return new ModelAndView(errorViewName, model);
    }
    return resolveResource(errorViewName, model);
}
可以看到这里会根据当前的状态响应码转发到对应的页面,路由为 error/** 。笔者这里简单创建两个错误页面,如图:
创建测试 Controller ,如下:
@Controller
public class HelloController {


    @GetMapping("/hello")
    public String hello(HttpServletRequest request) {

        // 构建测试数据
        Map<String, Object> map = new HashMap<>();

        UserModel userModel = new UserModel();
        userModel.setId(1L);
        userModel.setName("Spring Boot");
        userModel.setAge(18);

        map.put("user", userModel);

        List<CourseModel> list = new ArrayList<>();

        for (int i = 0; i < 2; i++) {

            CourseModel courseMode = new CourseModel();
            courseMode.setId((long) i);
            courseMode.setName("Spring Boot:" + i);
            courseMode.setAddress("课程地点:" + i);
            list.add(courseMode);
        }

        map.put("list", list);

        map.put("flag", true);

        request.setAttribute("data", map);
        return "hello";
    }
}
在此注册测试类中,进行数据初始化并输出至页面。
Thymeleaf 默认的模板路径 src/main/resources/templates ,只需要在这个这个路径下编写模版文件即可。
Thymeleaf 模版文件如下:
<!DOCTYPE html>
<html xmlns="http://www.w3.org/1999/xhtml"
      xmlns:th="http://www.thymeleaf.org">
<head>
    <meta charset="UTF-8">
    <meta name="viewport" content="width=device-width, initial-scale=1, shrink-to-fit=no">
    <title>Hello Spring Boot</title>
    <link rel="stylesheet" th:href="@{/static/css/bootstrap.min.css}">
</head>
<body>
<div class="container">
    <div>用户信息:</div>
    <table class="table table-dark">
        <thead>
        <tr>
            <th scope="col">#</th>
            <th scope="col">姓名</th>
            <th scope="col">年龄</th>
        </tr>
        </thead>
        <tbody>
        <tr>
            <th scope="row" th:text="${data.user.id}"></th>
            <td th:text="${data.user.name}"></td>
            <td th:text="${data.user.age}"></td>
        </tr>
        </tbody>
    </table>
    <div>课程信息:</div>
    <table class="table table-dark">
        <thead>
        <tr>
            <th scope="col">#</th>
            <th scope="col">课程名称</th>
            <th scope="col">课程地点</th>
        </tr>
        </thead>
        <tbody>
        <tr th:each="course, iterStat : ${data.list}">
            <th scope="row" th:text="${course.id}"></th>
            <td th:text="${course.name}"></td>
            <td th:text="${course.address}"></td>
        </tr>
        </tbody>
    </table>

    <div th:if="${data.flag == true}">如果 flag 为 true 你将可以看到这行字:)</div>

</div>

</body>
</html>COPY
Thymeleaf 部分常用 th 标签如下:

关键字	功能介绍	案例
th:id	替换id	<input th:id="'xxx' + ${collect.id}"/>
th:text	文本替换	<p th:text="${collect.description}">description</p>
th:utext	支持html的文本替换	<p th:utext="${htmlcontent}">conten</p>
th:object	替换对象	<div th:object="${session.user}">
th:value	属性赋值	<input th:value="${user.name}" />
th:with	变量赋值运算	<div th:with="isEven=${prodStat.count}%2==0"></div>
th:style	设置样式	th:style="'display:' + @{(${sitrue} ? 'none' : 'inline-block')} + ''"
th:onclick	点击事件	th:onclick="'getCollect()'"
th:each	属性赋值	tr th:each="user,userStat:${users}">
th:if	判断条件	<a th:if="${userId == collect.userId}" >
th:unless	和th:if判断相反	<a th:href="@{/login}" th:unless=${
    session.user != null}>Login</a>
th:href	链接地址	<a th:href="@{/login}" th:unless=${
    session.user != null}>Login</a> />
th:switch	多路选择 配合th:case 使用	<div th:switch="${user.role}">
th:case	th:switch的一个分支	<p th:case="'admin'">User is an administrator</p>
th:fragment	布局标签,定义一个代码片段,方便其它地方引用	<div th:fragment="alert">
th:include	布局标签,替换内容到引入的文件	<head th:include="layout :: htmlhead" th:with="title='xx'"></head> />
th:replace	布局标签,替换整个标签到引入的文件	<div th:replace="fragments/header :: title"></div>
th:selected	selected选择框 选中	th:selected="(${xxx.id} == ${configObj.dd})"
th:src	图片类地址引入	<img class="img-responsive" alt="App Logo" th:src="@{/img/logo.png}" />
th:inline	定义js脚本可以使用变量	<script type="text/javascript" th:inline="javascript">
th:action	表单提交的地址	<form action="subscribe.html" th:action="@{/subscribe}">
th:remove	删除某个属性	<tr th:remove="all"> 1.all:删除包含标签和所有的孩子。2.body:不包含标记删除,但删除其所有的孩子。3.tag:包含标记的删除,但不删除它的孩子。4.all-but-first:删除所有包含标签的孩子,除了第一个。5.none:什么也不做。这个值是有用的动态评估。
th:attr	设置标签属性,多个属性可以用逗号分隔	比如 th:attr="src=@{/image/aa.jpg},title=#{logo}" ,此标签不太优雅,一般用的比较少。
3. 测试
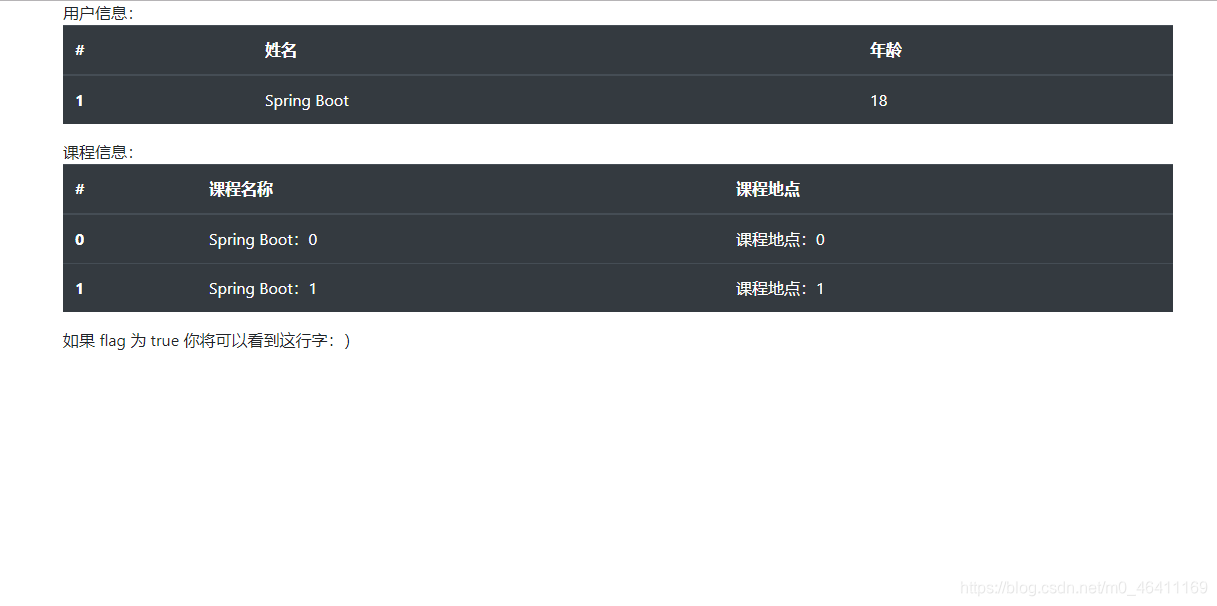
启动当前工程,打开浏览器访问路径: http://localhost:8080/hello ,结果如图:
智能推荐
c# 调用c++ lib静态库_c#调用lib-程序员宅基地
文章浏览阅读2w次,点赞7次,收藏51次。四个步骤1.创建C++ Win32项目动态库dll 2.在Win32项目动态库中添加 外部依赖项 lib头文件和lib库3.导出C接口4.c#调用c++动态库开始你的表演...①创建一个空白的解决方案,在解决方案中添加 Visual C++ , Win32 项目空白解决方案的创建:添加Visual C++ , Win32 项目这......_c#调用lib
deepin/ubuntu安装苹方字体-程序员宅基地
文章浏览阅读4.6k次。苹方字体是苹果系统上的黑体,挺好看的。注重颜值的网站都会使用,例如知乎:font-family: -apple-system, BlinkMacSystemFont, Helvetica Neue, PingFang SC, Microsoft YaHei, Source Han Sans SC, Noto Sans CJK SC, W..._ubuntu pingfang
html表单常见操作汇总_html表单的处理程序有那些-程序员宅基地
文章浏览阅读159次。表单表单概述表单标签表单域按钮控件demo表单标签表单标签基本语法结构<form action="处理数据程序的url地址“ method=”get|post“ name="表单名称”></form><!--action,当提交表单时,向何处发送表单中的数据,地址可以是相对地址也可以是绝对地址--><!--method将表单中的数据传送给服务器处理,get方式直接显示在url地址中,数据可以被缓存,且长度有限制;而post方式数据隐藏传输,_html表单的处理程序有那些
PHP设置谷歌验证器(Google Authenticator)实现操作二步验证_php otp 验证器-程序员宅基地
文章浏览阅读1.2k次。使用说明:开启Google的登陆二步验证(即Google Authenticator服务)后用户登陆时需要输入额外由手机客户端生成的一次性密码。实现Google Authenticator功能需要服务器端和客户端的支持。服务器端负责密钥的生成、验证一次性密码是否正确。客户端记录密钥后生成一次性密码。下载谷歌验证类库文件放到项目合适位置(我这边放在项目Vender下面)https://github.com/PHPGangsta/GoogleAuthenticatorPHP代码示例://引入谷_php otp 验证器
【Python】matplotlib.plot画图横坐标混乱及间隔处理_matplotlib更改横轴间距-程序员宅基地
文章浏览阅读4.3k次,点赞5次,收藏11次。matplotlib.plot画图横坐标混乱及间隔处理_matplotlib更改横轴间距
docker — 容器存储_docker 保存容器-程序员宅基地
文章浏览阅读2.2k次。①Storage driver 处理各镜像层及容器层的处理细节,实现了多层数据的堆叠,为用户 提供了多层数据合并后的统一视图②所有 Storage driver 都使用可堆叠图像层和写时复制(CoW)策略③docker info 命令可查看当系统上的 storage driver主要用于测试目的,不建议用于生成环境。_docker 保存容器
随便推点
网络拓扑结构_网络拓扑csdn-程序员宅基地
文章浏览阅读834次,点赞27次,收藏13次。网络拓扑结构是指计算机网络中各组件(如计算机、服务器、打印机、路由器、交换机等设备)及其连接线路在物理布局或逻辑构型上的排列形式。这种布局不仅描述了设备间的实际物理连接方式,也决定了数据在网络中流动的路径和方式。不同的网络拓扑结构影响着网络的性能、可靠性、可扩展性及管理维护的难易程度。_网络拓扑csdn
JS重写Date函数,兼容IOS系统_date.prototype 将所有 ios-程序员宅基地
文章浏览阅读1.8k次,点赞5次,收藏8次。IOS系统Date的坑要创建一个指定时间的new Date对象时,通常的做法是:new Date("2020-09-21 11:11:00")这行代码在 PC 端和安卓端都是正常的,而在 iOS 端则会提示 Invalid Date 无效日期。在IOS年月日中间的横岗许换成斜杠,也就是new Date("2020/09/21 11:11:00")通常为了兼容IOS的这个坑,需要做一些额外的特殊处理,笔者在开发的时候经常会忘了兼容IOS系统。所以就想试着重写Date函数,一劳永逸,避免每次ne_date.prototype 将所有 ios
如何将EXCEL表导入plsql数据库中-程序员宅基地
文章浏览阅读5.3k次。方法一:用PLSQL Developer工具。 1 在PLSQL Developer的sql window里输入select * from test for update; 2 按F8执行 3 打开锁, 再按一下加号. 鼠标点到第一列的列头,使全列成选中状态,然后粘贴,最后commit提交即可。(前提..._excel导入pl/sql
Git常用命令速查手册-程序员宅基地
文章浏览阅读83次。Git常用命令速查手册1、初始化仓库git init2、将文件添加到仓库git add 文件名 # 将工作区的某个文件添加到暂存区 git add -u # 添加所有被tracked文件中被修改或删除的文件信息到暂存区,不处理untracked的文件git add -A # 添加所有被tracked文件中被修改或删除的文件信息到暂存区,包括untracked的文件...
分享119个ASP.NET源码总有一个是你想要的_千博二手车源码v2023 build 1120-程序员宅基地
文章浏览阅读202次。分享119个ASP.NET源码总有一个是你想要的_千博二手车源码v2023 build 1120
【C++缺省函数】 空类默认产生的6个类成员函数_空类默认产生哪些类成员函数-程序员宅基地
文章浏览阅读1.8k次。版权声明:转载请注明出处 http://blog.csdn.net/irean_lau。目录(?)[+]1、缺省构造函数。2、缺省拷贝构造函数。3、 缺省析构函数。4、缺省赋值运算符。5、缺省取址运算符。6、 缺省取址运算符 const。[cpp] view plain copy_空类默认产生哪些类成员函数