移动开发技术:APP门户页面设计与开发_移动门户系统设计-程序员宅基地
技术标签: java android studio
一:目标
设计一个app的门户框架,需要实现3-4个tab切换效果
在任一tab页中实现列表效果
二:技术说明
目标一需要的技术为:Activity、Xml、Fragment
Activity:Activity类是Android应用的关键组件,而Activity的启动和组合方式则是该平台应用模型的基本组成部分。在编程范式中,应用是通过main()方法启动的,而Android系统与此不同,它会调用与其生命周期特定阶段相对应的特定回调方法来启动Activity实例中的代码。
Xml:安卓开发中Xml文件和Java文件是一同存在的。我们可以把Java理解为创建对象和定义对象的方法,而Xml文件则是和使用者的可视化交互(即UI界面)。Xml包括了以下的交互功能:动画视频、图片(透明度、大小、位置)、布局、按钮、文字显示、主题、菜单等。
Fragment:Fragment是一种可以嵌入在Activity当中的UI片段,用来组建Activity界面的局部模块, 也可以说一个Actiivty界面可以由多个Fragment组成,其行为与Activity很相似,,有自己对应的布局(包含具体的View),,它有自己的生命周期,接收自己的输入事件,并且可以从运行中的activity中添加或移除
目标二需要使用Recycleview
Recycleview:RecycleView是Android开发中的一个视图组件,用于展示大量数据集合的列表或网格。它是ListView的升级版本,提供了更好的性能和灵活性。
三:代码解析
界面设计

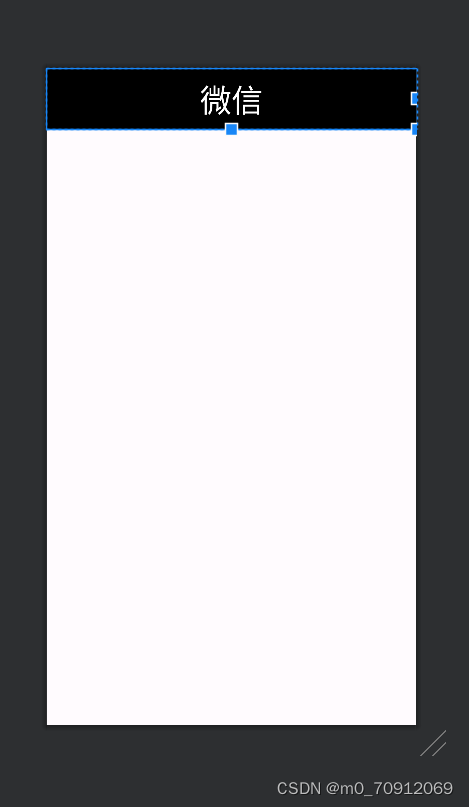
主界面分为上中下三个部分,底部由4个tab页面组成,用4个fragment.xml以实现不同页面的切换。头部用top.xml一个文件完成对上方页面的设计,最后用一个activity_main.xml完成对各个布局文件的整合
top.xml
用 android:text设置文本内容,用 android:textColor设置文本颜色,android:gravity用来设置view中的内容相对于view本身的对齐方式,调整好文本区域和字体大小即可,代码如下
<?xml version="1.0" encoding="utf-8"?>
<LinearLayout xmlns:android="http://schemas.android.com/apk/res/android"
    android:layout_width="match_parent"
    android:layout_height="match_parent">

    <TextView
        android:id="@+id/textView"
        android:layout_width="0dp"
        android:layout_height="68dp"
        android:layout_weight="1"
        android:gravity="center"
        android:shadowColor="#FFFFFF"
        android:text="微信"
        android:background="@color/black"
        android:textColor="@color/white"
        android:textSize="35dp" />
</LinearLayout>
预览效果
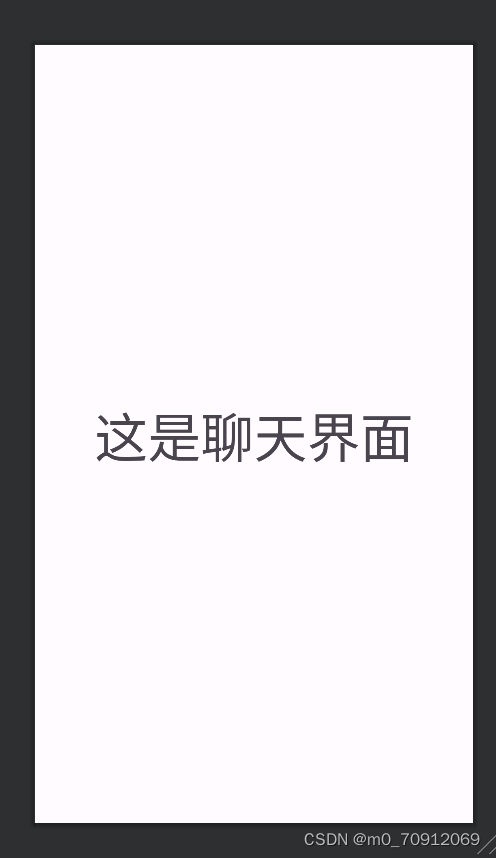
fragment.xml
其他页面与本页面类似,代码也类似
<?xml version="1.0" encoding="utf-8"?>
<FrameLayout xmlns:android="http://schemas.android.com/apk/res/android"
xmlns:tools="http://schemas.android.com/tools"
android:layout_width="match_parent"
android:layout_height="match_parent"
tools:context=".Fragment1">
<!-- TODO: Update blank fragment layout -->
<TextView
android:id="@+id/textView2"
android:layout_width="wrap_content"
android:layout_height="wrap_content"
android:layout_weight="1"
android:layout_gravity="center"
android:gravity="center"
android:textSize="50dp"
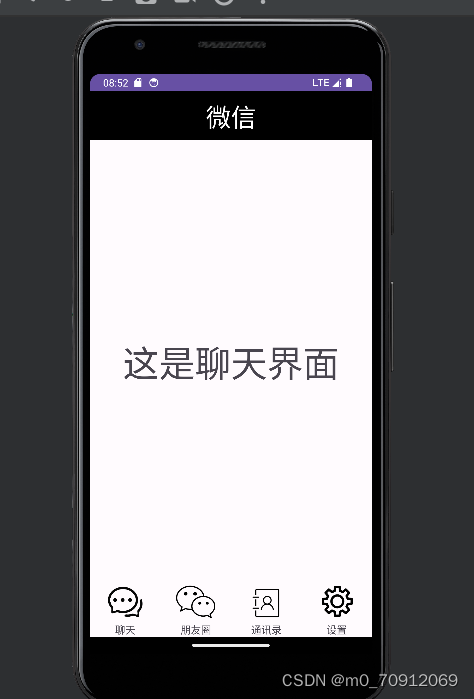
android:text="这是聊天界面" />
</FrameLayout>预览效果
选定一个页面实现列表效果
重新设计其中一个fragment.xml文件
<?xml version="1.0" encoding="utf-8"?>
<LinearLayout xmlns:android="http://schemas.android.com/apk/res/android"
    xmlns:app="http://schemas.android.com/apk/res-auto"
    android:layout_width="match_parent"
    android:layout_height="match_parent">

    <androidx.recyclerview.widget.RecyclerView
        android:id="@+id/recycleView"
        android:layout_width="match_parent"
        android:layout_height="match_parent"
        app:layout_constraintBottom_toTopOf="parent"
        app:layout_constraintEnd_toStartOf="parent"
        app:layout_constraintStart_toEndOf="parent"
        app:layout_constraintTop_toBottomOf="parent"
        app:layout_constraintVertical_bias="0.489"
        />
</LinearLayout>
预览效果

新建一个item.xml用于设计此页面布局格式
<?xml version="1.0" encoding="utf-8"?>
<LinearLayout xmlns:android="http://schemas.android.com/apk/res/android"
    android:layout_width="match_parent"
    android:layout_height="wrap_content">

    <TextView
        android:id="@+id/textView44"
        android:layout_width="match_parent"
        android:layout_height="match_parent"
        android:layout_weight="1"
        android:gravity="center"
        android:text="TextView"
        android:textColor="@color/black"
        android:textSize="20sp" />
</LinearLayout>
bottom.xml
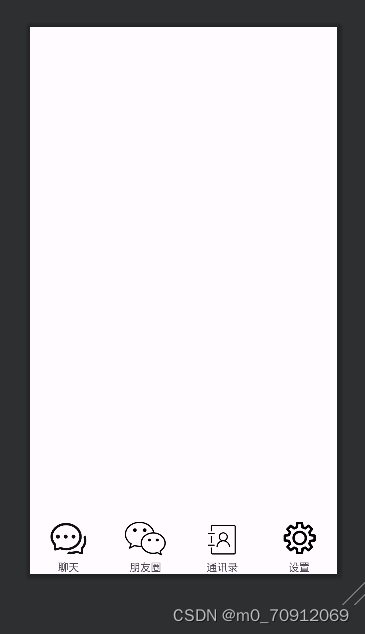
用bottom.xml设计底部按钮栏,将需要的图片复制到drawble文件下

<?xml version="1.0" encoding="utf-8"?>
<LinearLayout xmlns:android="http://schemas.android.com/apk/res/android"
    android:layout_width="match_parent"
    android:layout_height="wrap_content"
    android:layout_gravity="bottom"
    android:orientation="horizontal">

    <LinearLayout
        android:id="@+id/layout1"
        android:layout_width="wrap_content"
        android:layout_height="match_parent"
        android:layout_weight="1"
        android:gravity="center"
        android:orientation="vertical">

        <ImageView
            android:id="@+id/imageView3"
            android:layout_width="match_parent"
            android:layout_height="55dp"
            android:src="@drawable/bottom_1" />

        <TextView
            android:id="@+id/textView33"
            android:layout_width="match_parent"
            android:layout_height="wrap_content"
            android:gravity="center"
            android:text="聊天" />

    </LinearLayout>

    <LinearLayout
        android:id="@+id/layout2"
        android:layout_width="wrap_content"
        android:layout_height="match_parent"
        android:layout_weight="1"
        android:gravity="center"
        android:orientation="vertical">

        <ImageView
            android:id="@+id/imageView1"
            android:layout_width="match_parent"
            android:layout_height="55dp"
            android:src="@drawable/bottom_3" />

        <TextView
            android:id="@+id/textView11"
            android:layout_width="match_parent"
            android:layout_height="wrap_content"
            android:gravity="center"
            android:text="朋友圈" />

    </LinearLayout>

    <LinearLayout
        android:id="@+id/layout3"
        android:layout_width="wrap_content"
        android:layout_height="wrap_content"
        android:layout_weight="1"
        android:gravity="center"
        android:orientation="vertical">

        <ImageView
            android:id="@+id/imageView2"
            android:layout_width="match_parent"
            android:layout_height="55dp"
            android:src="@drawable/bottom_2" />

        <TextView
            android:id="@+id/textView22"
            android:layout_width="match_parent"
            android:layout_height="wrap_content"
            android:gravity="center"
            android:text="通讯录" />

    </LinearLayout>


    <LinearLayout
        android:id="@+id/layout4"
        android:layout_width="wrap_content"
        android:layout_height="wrap_content"
        android:layout_weight="1"
        android:gravity="center"
        android:orientation="vertical">

        <ImageView
            android:id="@+id/imageView4"
            android:layout_width="match_parent"
            android:layout_height="55dp"
            android:src="@drawable/bottom_4" />

        <TextView
            android:id="@+id/textView44"
            android:layout_width="match_parent"
            android:layout_height="wrap_content"
            android:gravity="center"
            android:text="设置" />

    </LinearLayout>

</LinearLayout>
用imageview设计导入图片的格式,其中用 android:src="@drawable/bottom_4"导入需要用到的图片
预览效果
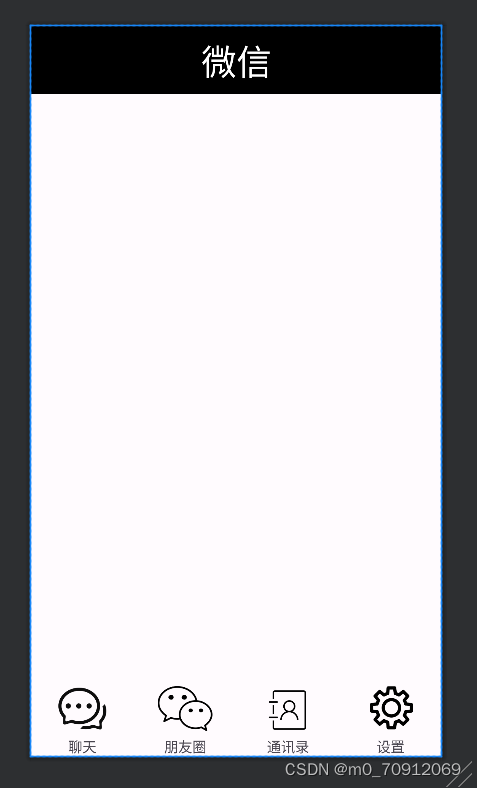
activity_main.xml
其他页面设计好后再用一个xml文件将其他页面整合,用一个content将top和bottom放入上方和下方
<?xml version="1.0" encoding="utf-8"?>
<LinearLayout xmlns:android="http://schemas.android.com/apk/res/android"
    xmlns:app="http://schemas.android.com/apk/res-auto"
    xmlns:tools="http://schemas.android.com/tools"
    android:layout_width="match_parent"
    android:layout_height="match_parent"
    android:orientation="vertical"
    tools:context=".MainActivity">


    <include
        layout="@layout/top"
        android:layout_width="match_parent"
        android:layout_height="wrap_content" />

    <FrameLayout
        android:id="@+id/content"
        android:layout_width="wrap_content"
        android:layout_height="match_parent"
        android:layout_gravity="center"
        android:layout_weight="3" />

    <include
        layout="@layout/bottom"
        android:layout_width="match_parent"
        android:layout_height="wrap_content" />
</LinearLayout>
预览效果
java文件
首先用四个fragment文件分别连接对应的fragment.xml文件
各个文件代码类似
package com.example.myapplication;

import android.os.Bundle;

import androidx.fragment.app.Fragment;

import android.view.LayoutInflater;
import android.view.View;
import android.view.ViewGroup;

public class Fragment1 extends Fragment {

    public View onCreateView(LayoutInflater inflater, ViewGroup container,
                             Bundle savedInstanceState) {
        // Inflate the layout for this fragment
        return inflater.inflate(R.layout.fragment_blank1, container, false);
    }
}
修改其中一个fragment
package com.example.myapplication;
import android.annotation.SuppressLint;
import android.content.Context;
import android.os.Bundle;
import android.view.LayoutInflater;
import android.view.View;
import android.view.ViewGroup;
import androidx.fragment.app.Fragment;
import androidx.recyclerview.widget.LinearLayoutManager;
import androidx.recyclerview.widget.RecyclerView;
import java.util.*;
public class Fragment2 extends Fragment {
Context context;
List list;
RecyclerView recyclerView;
Myadapter myadapter;
@SuppressLint("MissingInflatedId")
@Override
public View onCreateView(LayoutInflater inflater, ViewGroup container,Bundle savedInstanceState) {
View view = inflater.inflate(R.layout.fragment_blank2, container, false);
context = view.getContext();
recyclerView = view.findViewById(R.id.recycleView);
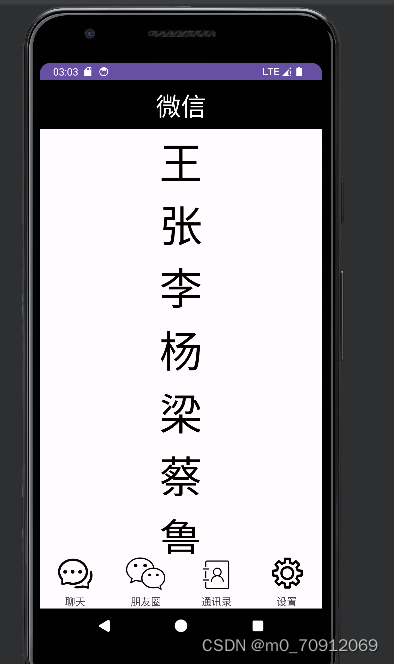
List<String> contacts = new ArrayList<>();
contacts.add("王");
contacts.add("张");
contacts.add("李");
contacts.add("杨");
contacts.add("梁");
contacts.add("蔡");
contacts.add("鲁");
contacts.add("蒋");
contacts.add("富");
contacts.add("陈");
contacts.add("刘");
Myadapter myadapter = new Myadapter(contacts, getContext());
recyclerView.setAdapter(myadapter);
LinearLayoutManager manager = new LinearLayoutManager(context);
manager.setOrientation(LinearLayoutManager.VERTICAL);
recyclerView.setLayoutManager(manager);
return view;
}
}通过findViewById找到对应的recycleview组件,通过list创建一个对象,将需要的东西存储在其中,再创建一个myadapter对象将数据传给适配器
Myadapter
package com.example.myapplication;

import android.content.Context;
import android.view.LayoutInflater;
import android.view.View;
import android.view.ViewGroup;
import android.widget.TextView;

import androidx.annotation.NonNull;
import androidx.recyclerview.widget.RecyclerView;

import java.util.List;
import java.util.zip.Inflater;

public class Myadapter extends RecyclerView.Adapter<Myadapter.Myholder> {
    List<String> list1;
    Context context1;

    public Myadapter(List list, Context context){
        context1=context;
        list1=list;
    }
    @NonNull
    @Override
    public Myholder onCreateViewHolder(@NonNull ViewGroup parent, int viewType) {
        View view=LayoutInflater.from(context1).inflate(R.layout.item,parent,false);
        Myholder myholder=new Myholder(view);
        return myholder;
    }


    @Override
    public void onBindViewHolder(@NonNull Myholder holder, int position) {
        holder.textView.setText(list1.get(position));

    }

    @Override
    public int getItemCount() {
        return list1.size();

    }
    class Myholder extends RecyclerView.ViewHolder{
        TextView textView;

        public Myholder(@NonNull View itemView) {
            super(itemView);
            textView=itemView.findViewById(R.id.textView44);
        }
    }
}
onCreateViewHolder(),用于连接到item.xml文件。再通过list1获取到应该显示的数据,以便将数据正常显示出来
MainActivity
package com.example.myapplication;

import androidx.appcompat.app.AppCompatActivity;
import androidx.fragment.app.Fragment;
import androidx.fragment.app.FragmentManager;
import androidx.fragment.app.FragmentTransaction;

import android.os.Bundle;
import android.view.View;
import android.widget.LinearLayout;

public class MainActivity extends AppCompatActivity implements View.OnClickListener {
    Fragment1 fragment;
    FragmentManager fm;
    FragmentTransaction ft;
    Fragment fragment1, fragment2, fragment3, fragment4;
    LinearLayout linearLayout1, linearLayout2, linearLayout3, linearLayout4;

    @Override
    protected void onCreate(Bundle savedInstanceState) {
        super.onCreate(savedInstanceState);
        setContentView(R.layout.activity_main1);
        linearLayout1 = findViewById(R.id.layout2);
        linearLayout2 = findViewById(R.id.layout3);
        linearLayout3 = findViewById(R.id.layout1);
        linearLayout4 = findViewById(R.id.layout4);
        fm = getSupportFragmentManager();
        fragment1 = new Fragment1();
        fragment2 = new Fragment2();
        fragment3 = new Fragment3();
        fragment4 = new Fragment4();
        innitial();
        fragmentshow(fragment1);
        ft = fm.beginTransaction();
        linearLayout1.setOnClickListener(this);
        linearLayout2.setOnClickListener(this);
        linearLayout3.setOnClickListener(this);
        linearLayout4.setOnClickListener(this);

    }

    private void fragmenthide() {
        ft = fm.beginTransaction()
                .hide(fragment1)
                .hide(fragment2)
                .hide(fragment3)
                .hide(fragment4);
        ft.commit();
    }

    private void fragmentshow(Fragment fragment) {
        fragmenthide();
        ft = fm.beginTransaction()
                .show(fragment);
        ft.commit();
    }

    private void innitial() {
        FragmentTransaction ft = fm.beginTransaction()
                .add(R.id.content, fragment1)
                .add(R.id.content, fragment2)
                .add(R.id.content, fragment3)
                .add(R.id.content, fragment4);
        ft.commit();
    }
    @Override
    public void onClick(View view) {
        fragmenthide();
        if (view.getId() == R.id.layout2) {
            fragmenthide();
            fragmentshow(fragment1);
        }
        if (view.getId() == R.id.layout3) {
            fragmenthide();
            fragmentshow(fragment2);
        }
        if (view.getId() == R.id.layout1) {
            fragmenthide();
            fragmentshow(fragment3);
        }
        if (view.getId() == R.id.layout4) {
            fragmenthide();
            fragmentshow(fragment4);
        }

    }
}
其中编写了fragmentshow和fragmenthide函数用于各个页面的打开和隐藏,再编写onclick函数,用getId连接对应的页面,使点击时能出现对应页面
最终效果
智能推荐
CDC系列(二)、Maxwell_v1.27.1 监控MySQL操作日志实时同步到Kafka_当启动多个maxwell,需要为每个实例配置不同的client_id 字符串型-程序员宅基地
文章浏览阅读2.4k次。在上一篇我们介绍了CDC工具,以及Canal的集群安装和使用,本篇我们来讲解另一个CDC工具:Maxwell。和Canal一样,Maxwell也是将自己伪装成MySQL的slave节点,通过监控MySQL的binlog来将数据操作日志同步到kafka等消息队列中供异构数据源使用。本篇我们会介绍Maxwell的安装和使用。和Canal一样,一定要至少准备一个MySQL库用于Maxwell的管理库存放状态信息以及用来监控的MySQL库,监控到的binlog导出到kafka,因此也需要准备kafka_当启动多个maxwell,需要为每个实例配置不同的client_id 字符串型
利用Ajax来实现地区三级联动_ajax数组实现省市区三级联动-程序员宅基地
文章浏览阅读60次。基于jQ-Ajax的三级联动前言:利用Ajax来实现一个地区的三级联动,用Java代码来读json文件,先eclipse做一个简单的,最基础的。(json我用的jackson来解析,也可用fastjson-阿里巴巴的等还有很多)提供代码,思路之类的,注释也没有自己去想去琢磨出来的思路好first:首先先要熟悉json文件,并要想好利用什么类型去解析,这是最难的,最好找一个没人的地方戴上耳机(对于初学)我是用maven来做的用到的jar坐标 : redis.clients jedis _ajax数组实现省市区三级联动
Redis和Jedis简介以及Redis事物_redis和jedis关系-程序员宅基地
文章浏览阅读421次。Redis简介:关系型数据库是基于关系表的数据库,最终会将数据持久化到磁盘上,而nosql数据库是基于特殊的结构,并将数据存储到内存的数据库。从性能上而言,nosql数据库要优于关系型数据库,从安全性上而言关系型数据库要优于nosql数据库,所以在实际开发中一个项目中nosql和关系型数据库会一起使用,达到性能和安全性的双保证。Redis的注意事项:redis是一种高级的key-value的存储系统其中的key是字符串类型,尽可能满足如下几点:key不要太长,最好不要超过1024个字节,这不仅会_redis和jedis关系
java map putall 覆盖_Java HashMap putAll() 方法-程序员宅基地
文章浏览阅读2.6k次。putAll() 方法将指定所有的键/值对插入到 HashMap 中。语法putAll() 方法的语法为:hashmap.putAll(Map m)注:hashmap 是 HashMap 类的一个对象。参数说明:m – 包含插入到 HashMap 的映射关系返回值不返回任何值。实例以下实例演示了 putAll() 方法的使用:import java.util.HashMap;class Main ..._java map putall 覆盖
ubuntu14.04安装CUDA8.0-程序员宅基地
文章浏览阅读114次。ubuntu安装CUDA因为深度学习需要用到CUDA,所以写篇博客,记录下自己安装CUDA 的过程。1 安装前的检查安装CUDA之前,首先要做一些事情,检查你的机器是否可以安装CUDA。1.1 检查你的gpu是否是可以安装CUDA 的运行如下命令:$ lspci | grep -i nvidia1这个是我的机器的返回结果:01:00.0 VGA...
Promise与async和await的总结_promiseresult await-程序员宅基地
文章浏览阅读132次。Promise语法上 Promise 是一个构造函数Promise 构造函数:Promise (excutor)()Promise.prototype.thenPromise.prototype.catchPromise.allSettled:不管数组中的 Promise 是否成功或失败 都会执行完全部成功就调用resolve,失败调用reject //实例化 Promise 对象 const p = new Promise(function(resolve, reject)_promiseresult await
随便推点
Linux命令行配置网络(有线网络,无线网络)// Debian_linux 有线网卡无线网卡 路由设置-程序员宅基地
文章浏览阅读5k次,点赞3次,收藏25次。Debian Linux配置网络环境。//有线网卡//无线网卡_linux 有线网卡无线网卡 路由设置
Android图书馆选座系统课程设计_android的图书馆座位预定系统可行性分析-程序员宅基地
文章浏览阅读5.4k次,点赞14次,收藏111次。项目时间:2020年6月大专二年级的安卓课程设计项目亮点:2D可视化的编辑地图项目简要:管理员编辑图书馆楼层的2D地图,学生在图书馆2D地图上选座。用户管理:登录、注册、修改个人信息、更改头像 。楼层管理:添加、修改、编辑、删除楼层地图、保存为模板 。模板管理:修改、删除、生成为楼层地图 。选座管理:查询座位、我的座位、修改座位 。知识点:application+sqlite+canvas+碎片+re_android的图书馆座位预定系统可行性分析
tomcat配置文件结构-程序员宅基地
文章浏览阅读85次。cd /export/servers/tomcat7bin ——Tomcat执行脚本目录conf ——Tomcat配置文件lib ——Tomcat运行需要的库文件(JARS)logs ——Tomcat执行时的LOG文件temp ——Tomcat临时文件存放目录webapps ——Tomcat的主要Web发布目录(存放我们自己的JSP,SERVLET,类)work ——Tomc..._tomcat主配置文件结构
Linux基础练习题_linux练习题-程序员宅基地
文章浏览阅读3.4k次,点赞7次,收藏41次。linux 基础练习题_linux练习题
IT技术方案书模版_it系统需求方案设计文档模板-程序员宅基地
文章浏览阅读1w次,点赞6次,收藏16次。IT技术方案书模版1 序言简述项目实施的必要性及意义。2 需求分析2.1 技术现状描述用户现有技术应用环境、人员技术状况。2.2 用户需求着重描述用户的目前需求及未来的设想。3 硬件系统技术方案设计3.1 网络方案设计3.1.1 设计原则根据项目具体情况,提出设计原则,应突出可靠性、安全性、高性能、和可管理性四项原则。3.1.2 设计要点强调方案设计过程中技术要点及难_it系统需求方案设计文档模板
docker如何查看容器ip_docker 容器 ip-程序员宅基地
文章浏览阅读5.6k次。docker exec -it xxx sh 进入容器终端cat /etc/hosts 显示ip所在的配置文件_docker 容器 ip