python_one893.app-程序员宅基地
技术标签: python pycharm flask 开发语言
python学习:Python爬虫编程基础5天速成(2021全新合集)Python入门+数据分析_哔哩哔哩_bilibili
python下载:https://www.python.org/downloads/
pycharm下载:https://www.jb51.net/softs/598504.html
链接:百度网盘 请输入提取码
提取码:vof4
Python爬虫编程基础5天速成(2021全新合集)Python入门+数据分析_哔哩哔哩_bilibili

Python爬虫编程基础5天速成(2021全新合集)Python入门+数据分析_哔哩哔哩_bilibili
https://www.jb51.net/softs/758344.html#downintro2
pycharm使用:
调整字体大小:file/settings/font

设置文件注释:file/settings/editor/file and code templates


运行:鼠标右键run 或 右上角运行按钮


py文件注释:
#单行注释


'''
多行注释
多行注释
多行注释
'''
重命名:当前文件,右键,Refactor/Rename/重命名/下方do refactor


字符串加变量:print("这是变量",a)

pycharm最新版如何设置自动换行
pycharm设置自动换行
1.代码编辑区自动换行
对所有文件有效:
(1) File-> Settings-> Editor-> General
(2) 找到Soft Wraps,勾选Soft-wrap files
(3) 在输入框中添加;*.py
时间戳:
Python时间戳的一些使用 - liudemeng - 博客园
import time
time.time()	#当前时间	可转为int类型
nowTime = time.strftime("%Y-%m-%d %H:%M:%S")
变量

当前版本下能用的关键字:python下运行
import keyword
keyword.kwlist

格式符号:


age = 18
print("我的年纪是:%d岁"%age)
print("我的名字是%s,我的国籍是%s"%("小郑","中国"))
print("aaa","bbb","ccc")
print("www","baidu","com",sep=".")
print("hello",end="")
print("world",end="\t")
print("python",end="\n")
print("end")
print("1223------")
print("1279845\n------")
查看变量类型:
a = 10print(type(a))
返回:<class 'int'>
字符串转整型:int(a)


判断语句和循环语句
判断语句:


注意格式规范:


if else
if 条件:
	运行程序
elif 条件:
	运行程序
elif 条件:
	运行程序
else:
	运行程序

#也可以不用else结尾,可以用elif结尾

随机数:
import random   #引入随机库
x = random.randint(0,2) #随机生成[0,2]的随机数,即0,1,2
print(x)

a = ["aaa","bbb","ccc"]
random.choice(a)	#后面括号中可以是一个列表,元组或字符串,返回随机项
#剪刀石头布游戏
print("剪刀0 石头1 布2")
me = int(input("请输入0或1或2"))
import random
rand = random.randint(0,2)

if me ==0:
    me_str = "剪刀"
elif me == 1:
    me_str = "石头"
else:
    me_str = "布"
if rand ==0:
    rand_str = "剪刀"
elif rand == 1:
    rand_str = "石头"
else:
    rand_str = "布"


if me<0 or me > 2:
    print("输入数字不正确,值仅限0,1,2")
    exit()
else:
    if rand==0 or me==0:
        if rand == 0 and me == 2:
            print("你输了")
        elif me == 0 and rand == 2:
            print("你赢了")
        elif rand==0 and me == 0:
            print("平局")
        elif rand > me:
            print("你输了")
        else:
            print("你赢了")
    elif rand>me:
        print("你输了")
    elif rand < me:
        print("你赢了")
    else:
        print("平局")

print("随机数为%d  %s,你输入的数字为%d  %s"%(rand,rand_str,me,me_str))
for循环:
'''
for i in range(5):
    print(i)
'''

'''
#从0开始,每次+3
for i in range(0,10,3):
    print(i)
'''

'''
for i in range(-10,-100,-30):
    print(i)
'''

'''
name = "shanghai"
for i in name:
    print(i, end="\t")
'''

'''
a = ["aa","bb","cc","dd","ee","ff"]
for i in range(len(a)):
    print(i,a[i])
'''
while循环:
'''
i = 0
while i<5:
    print("当前i为:%d"%i)
    print(i)
    i+=1;
'''
'''
# 1-100求和
i = 1
sum = 0
while i<=100:
    sum+=i
    i+=1
print(sum)

sum = 0
for i in range(1,101):
    sum+=i
print(sum)
'''

'''
sum = 0
while sum < 5:
    print("sum%d小于5"%sum)
    sum+=1
else:
    print("sum%d大于或等于5"%sum)
'''

'''
i = 0
while i<10:
    i += 1
    print("-"*30)
    if i == 5:
        continue    #break结束整个while循环;continue跳出本次循环
    print(i)
'''
m1 = 1
while m1<10:
    for m2 in range(1,10):
        x = m1 * m2
        print("%d*%d=%d"%(m1,m2,x), end="   ")
    m1 += 1
    print("\t")
for m in range(1,10):
    for n in range(1,int(m+1)):
        if m > n:
            print("%d*%d=%d"%(m,n,m*n),end="\t")
        elif m == n:
            print("%d*%d=%d"%(m,n,m*n),end="\n")
字符串


转义字符:

字符串
str[n:m]截取从下标n到m个字符
replace替换:"abc".replace("a","b") #bbc str.replace("/r","")替换"/r"为空白字符串
strip去掉前后空格:" bbb ".strip() #bbb
split分割:'a,b,c,d'.split(',') #['a', 'b', 'c', 'd']
count判断出现次数:'ab,c'.count('b,c') #1
字符串截取:python截取字符串后几位-Python学习网


因为会涉及到执行效率的问题,所以需要根据情况灵活使用这两种索引方式截取字符串,比如:想快速获取最后一部分字符串,使用负索引是最快的。
>>> str='0123456789'
>>> print(str[0:3])#截取第一位到第三位的字符
012
>>> print(str[:])#截取字符串的全部字符
0123456789
>>> print(str[6:])#截取第七个字符到结尾
6789
>>> print(str[:-3])#截取从头开始到倒数第三个字符之前
0123456
>>> print(str[2])#截取第三个字符
2
>>> print(str[-1])#截取倒数第一个字符
9
>>> print(str[::-1])#创造一个与原字符串顺序相反的字符串
9876543210
>>> print(str[-3:-1])#截取倒数第三位与倒数第一位之前的字符
78
>>> print(str[-3:]) #截取倒数第三位到结尾
789
>>> print(str[:-5:-3])#逆序截取
96
str = "shanghai"
print(str)
print(str[1])
print(str[0:2]) #[起始位置:结束位置:步进值]
print(str[0:7:2])
print(str[5:])
print(str[:5])
print(str+',你好') #字符串连接,使用“+”
print(str * 3)
print("hello\nshanghai") #使用反斜杠,实现转义字符的功能
print(r"hello\nchengdu") #在字符串前面加r,表示直接显示原始字符串,不进行转义
c = "hello\nchengdu" #已经作为变量了
d = repr(c) #变量禁止转义 'hello\nchengdu'
print("abc".replace("a","b")) #bbc replace替换,将a替换为b
print(" bbb ".strip()) #bbb strip()去掉前后空格


a = '1'
print(type(a))
print(a.isdigit())
#isdigit()作用于字符串,如果直接a=1,a则是int类型,非str类型,会报错
字符转换:
import urllib.parse
# 把中文字符转成ascii码,使用urllib.parse.urlencode, 参数使用字典格式,自动转化
params = {
    'wd' : '中文',
}
result = urllib.parse.urlencode(params)
print(result)
print(urllib.parse.quote('激光')) #%E6%BF%80%E5%85%89


# ASCII转汉字
name = r"\u5509\u5406\u5582"
print(name.encode('ascii').decode('unicode_escape'))

# 汉字转ASCII
name1='唉吆喂'
print(name1.encode('unicode_escape').decode('ascii'))
#namelist = [] #定义一个空的列表
'''
namelist = ["小张", "小王", "小李"]
testlist = [1, "测试"] #列表中可以存储混合类型
print(type(testlist[0]))
print(type(testlist[1]))
print(testlist[0])
print(testlist[1])
'''
namelist = ["小张", "小王", "小李"]
for name in namelist:
print(name)
print(len(namelist)) #len()可以得到列表的长度
length = len(namelist)
i = 0
while i<length:
print(namelist[i])
i+=1

namelist = ["小张", "小王", "小李"]
# [append]
print("----增加前")
for name in namelist:
    print(name)
print("----开始追加")
nametemp = input("请输入添加学生的姓名:") #输入小刘
namelist.append(nametemp)
for name in namelist:
    print(name,end="\t") #小张 小王 小李 小刘
print("----追加结束")

a = [1,2]
b = [3,4]
a.append(b) #将列表当做一个元素,加入到a列表中 [1, 2, [3, 4]]
print(a)
a.extend(b)    #将列表中的每个元素,注意追加到a列表中(即b列表拆开后追加进a) [1, 2, [3, 4], 3, 4] #这里的[3,4]是因为上一步中已经append在后面追加了该元素
print(a)

# 增:  [insert]
a = [0,1,2]
a.insert(1,3)   #将第一个变量表示下标,第二个表示元素(对象)
print(a)    #[0, 3, 1, 2]

# 删
movieName = ["加勒比海盗","骇客帝国","第一滴血","指环王","速度与激情","指环王"]
print('---删除前')
for name in movieName:
    print(name,end="\t")    #加勒比海盗	骇客帝国	第一滴血	指环王	速度与激情
#del movieName[2]  #在指定位置删除某个元素    =>#加勒比海盗	骇客帝国	指环王	速度与激情

# movieName.pop()     #弹出末尾最后一个元素,相当于删除了最后一个元素
movieName.remove("指环王")     #直接删除指定内容的元素,如果有重复的,仅删除第一个,后面的会继续存在
print('---删除后')
for name in movieName:
    print(name,end="\t")

# 改
namelist = ["小张", "小王", "小李"]
print('---修改前')
for name in namelist:
    print(name,end="\t")    #小张	小王	小李
namelist[1] = "小红"
print('---修改后')
for name in namelist:
    print(name,end="\t")    #小张	小红	小李


# 查:[in   not in]
findname = input("请输入你要查找的学生姓名:")
namelist = ["小张", "小王", "小李"]
if findname in namelist:
    print("找到相同名字")
else:
    print("没找到相同名字")

a = ["a","b","c","a","b"]
print(a.index("a",1,3))     #可以查找指定下标范围的元素,并返回找到对应数据的下标,范围区间左闭右开,例[1,3),相当于包括1,不包括3;找不到会报错

# 排序和反转
a = [1,4,2,3]
# a.reverse()     #将列表所有元素反转=>[3, 2, 4, 1]
# a.sort()    #升序排序[1, 2, 3, 4]
a.sort(reverse=True)    #降序排序[4, 3, 2, 1]
print(a)

office = [[],[],[]]
names = ['A','B','C','D','E','F','G','H']
import random
for name in names:
    index = random.randint(0,2)
    office[index].append(name)

for office in office:
    print('办公室中---%s'%office)
    for name in office:
        print('姓名为:%s'%name, end="\t")
products = [['iphone',6888], ['MacPro',14800], ['小米6',2499], ['Coffee',31], ['Book',60], ["Nike",699]]
for i in range(0,len(products)):
    print(i,products[i][0],products[i][1])

i=1
goods_arr = []
while i > 0:
    goods_one = input("请输入商品编号:")
    if goods_one.isdigit() and int(goods_one)<len(products):
        goods_arr.append(goods_one)
    elif goods_one == 'q':
        print("退出中...")
        break
    else:
        print("商品编号不正确")
print(goods_arr)
price = 0
for g in goods_arr:
    g = int(g)
    print("产品编号:%d------%s,------%d"%(g, products[g][0], products[g][1]))
    price += products[g][1]

print("产品数量共计:%d------总价共计%d"%(len(goods_arr), price))
元组

tup1 = ()   #创建空的元组 print(type(tup1))为tuple类型,是元组
tup2 = (50)     #print(type(tup2))为int类型,不是元组
tup3 = (50,)     #print(type(tup3))为tuple类型,是元组
tup4 = (50,60,70)     #print(type(tup4))为tuple类型,是元组
print(type(tup4))


tup1 = ("abc","def",2000,2020,300,444,555)
print(tup1[0])  #abc
print(tup1[-1]) #555    访问最后一个元素
print(tup1[2])  #2000
print(tup1[1:5]) #('def', 2000, 2020, 300)  左闭右开,包含左,不含右,进行切片


# 增(连接)
tup1 = (12,34,56)
tup2 = ("abc","xyz")
tup = tup1 + tup2   #(12, 34, 56, 'abc', 'xyz')
print(tup)

# 删
tup1 = (12,34,56)
del tup1    #删除了整个元组变量,所以之后打印会报错,name 'tup1' is not defined
print("删除后")
print("tup1")


# 改
# tup1 = (12,34,56)
# # tup1[0] = 100   #报错,不允许修改
# print(tup1)


字典

# 字典的定义
info = {"name":"吴彦祖", "age":18}
# print(type(info))   #<class 'dict'>
# print(info["name"]) #吴彦祖
# print(info['sex'])  #直接访问不存在的键会报错
# print(info.get('sex'))  #None   使用get方法,没有找到对应的键,默认返回None
# print(info.get('sex',"女"))  #女  如果不存在,则返回设置的默认值女;如果有该键,比如sex的值为男,则会返回男


info = {"name":"吴彦祖", "age":18}
# 增
# info['id'] = 10010
# print(info["id"])   #10010
# print(info)     #{'name': '吴彦祖', 'age': 18, 'id': 10010}

# 删
# [del]
# print("删除前:%s"%info['name'])    #删除前:吴彦祖
# del info['name']
# print("删除后:%s"%info['name'])    #删除指定键值对后,再次访问会报错,因为把键也给删了,所以这个键不存在,因此会报错
# print("删除前:%s"%info)
# del info
# # print(info)     #删除字典后,再次访问会报错,因为把整个给删了,所以info就不存在,因此会报错
# [clear]清空
# info.clear()
# print("清空后%s"%info) #{}

# 改
# info['age'] = 20
# print(info['age'])  #20

# 查
print(info.keys())  #dict_keys(['name', 'age']) 得到所有的键(列表形式)
print(info.values())    #dict_values(['吴彦祖', 18])   得到所有的值
print(info.items())     #dict_items([('name', '吴彦祖'), ('age', 18)]) 得到所有的项,每个键值对是一个元组


info = {"name":"吴彦祖", "age":18}
#遍历所有的键
for key in info.keys():
    print(key)
#遍历所有的值
for val in info.values():
    print(val)
#遍历所有的键值对
for key,val in info.items():
    print("key=%s,value=%s"%(key,val))


# 使用枚举函数,同时拿到列表中的下标和元素内容
mylist = ["a","b","c","d"]
# print(enumerate(mylist))    #<enumerate object at 0x000001DC9FD93AC0>
for i,x in enumerate(mylist):
    print(i,x)


集合


s = set([1,2,3])
print(s)    #{1, 2, 3}
print(type(s))  #<class 'set'>
函数


# 函数的定义
def printinfo():
print("--------------------")
print(" 人生苦短,我用python ")
print("--------------------")
# 函数的调用
printinfo()
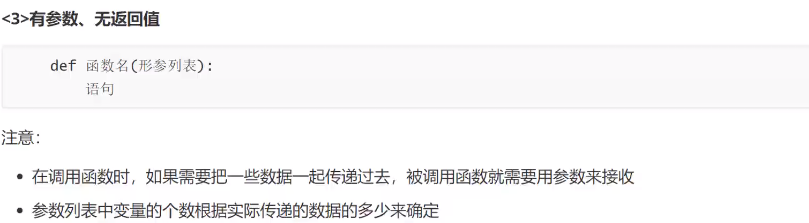
# 带参数的函数
def add2Num(a,b):
c = a+b
print(c)
add2Num(11,22)
# 带返回值的函数
def add2Num(a,b):
return a+b #通过return来返回运算结果
add2Num(11,22) #相当于只是个运算,并没有打印输出,因此什么也没有
print(add2Num(11,22)) #33,打印
# 返回多个值的函数
def divid(a,b):
shang = a//b
yushu = a%b
return shang,yushu #多个返回值用逗号来分隔
shang,yu = divid(5,2) #需要使用多个值来保存返回内容
print("商:%d,余数:%d"%(shang,yu)) #商:2,余数:1
# 打印一条线
def heng():
    print("-------------")

# 根据用户输入的数字,打印对应条数的线
def num(x):
    for i in range(0,x):
        heng()
        i+=1
size = int(input("请输入要打印的条数:"))
num(size)

# 求三个数的和
def sum(a,b,c):
    return (a+b+c)
print(sum(1,2,3))

def svg(a,b,c):
    print(sum(a,b,c)//3)
svg(1,2,3)


# 全局变量和局部变量
def test1():
    a = 300     #局部变量
    print("test1---修改前%d"%a) #300
    a = 100
    print("test1---修改后%d"%a) #100

def test2():
    a = 500     #不同的函数可以定义相同的名字,彼此无关
    print("test2---a=%d"%a) #500


test1()
test2()


a = 50
def test1():
    print(a)     #调用全局变量a 50

def test2():
    print("test2---a=%d"%a) #调用全局变量a 50

test1()
test2()


a = 50
def test1():
    a = 300     #局部变量优先使用
    print("test1---修改前%d"%a) #300
    a = 100
    print("test1---修改后%d"%a) #100

def test2():
    print("test2---a=%d"%a) #没有局部变量,默认使用全局变量 50

test1()
test2()


# 在函数中修改全局变量
a = 50
def test1():
    global a    #声明全局变量在函数中的标识符
    print("test1---修改前%d"%a)    #test1---修改前50
    a = 100
    print("test1---修改后%d"%a)    #test1---修改后100

def test2():
    print("test2---a=%d"%a) #test2---a=100 没有局部变量,默认使用全局变量

test1()
test2()
文件操作

常用:


w模式打开文件并要写入的时候,带着编码格式encoding="utf-8",例:
open("test.txt","w", encoding="utf-8")否则有可能会乱码
f = open("test.txt","w", encoding="utf-8")    #打开文件 w模式(写模式)文件不存在则新建
f.write("hello world, i am here!")  #将字符串写入文件中
f.close()   #关闭文件


# 读 read方法,读取指定的字符,开始时定位在文件头部,每执行一次向后移动指定字符数
f = open('test.txt',"r")
content = f.read(5)
print(content)
content = f.read(5)
print(content)
f.close()


# 读取整个文件
f = open('test.txt',"r")
content = f.readlines() #一次性读取全部文件为列表,每行一个字符串元素
print(content)
# 将整个文件分行
i = 1
for temp in content:
    print("%d:%s"%(i,temp))
    i+=1
f.close()


f = open('test.txt',"r")
content = f.readline()  #每次读一行,每执行一次向后移动光标,下一次读取时从本次结束后读取
print("1:%s"%content)
content = f.readline()
print("2:%s"%content)
f.close()
不常用:


错误与异常

错误类型:例:NameError,IOError
获取所有的错误类型:Exception
# 捕获异常
try:
    print("-----test----1----")
    f = open('123.txt','r') #用只读模式打开了一个不存在的文件,正常是会报错,但在异常里面,因此不会报错
    print("-----test----2----")
except IOError:     #文件未找到,属于IO异常(输入输出异常)
    pass    #捕获异常后,执行的代码


try:
    print(num)
except NameError:   #异常类型想要被捕获,需要一致,即看报错的错误类型
    print("产生错误")

# 捕获多个类型的异常
try:
    print(num)
except (NameError,IOError):   #将可能产生的所有异常类型,都放到下面的小括号中
    print("产生错误")


# 捕获多个类型的异常,并打印出错的异常(此处无123.txt,未定义num,到123.txt就报错了,仅展示无123.txt该错误)
try:
    print("-----test----1----")
    f = open('123.txt','r')
    print("-----test----2----")
    f.close()
    print(num)
except (NameError,IOError) as result:
    print("产生错误")
    print(result)


# 捕获所有异常
try:
    print("-----test----1----")
    f = open('123.txt','r')
    print("-----test----2----")
    f.close()
    print(num)
except Exception as result: #Exception可以承接任何异常
    print("产生错误")
    print(result)


# try。。。。finally  和嵌套
import time
try:
    f = open("test1.txt","r")
    try:
        while True:
            content = f.readline()
            if len(content) == 0:
                break
            time.sleep(2)
            print(content)
    finally:
        f.close()
        print("文件关闭")
except Exception as result:
    print("发生异常")
gushi = """《一剪梅》明唐寅
晓看天色暮看云,
行也思君,坐也思君。
"""
# 创建gushi.txt
def mk():
    try:
        mk = open("gushi.txt", "w", encoding="utf-8")
        try:
            mk.write(gushi)
            print(gushi)
        finally:
            mk.close()
            print("文件关闭")
    except Exception as result:
        print("发生异常")
mk()


# 文件写入
def read():
    try:
        read = open('gushi.txt', 'r', encoding="utf-8")
        try:
            mk = open("copy.txt", "w", encoding="utf-8")
            try:
                content = read.readlines()
                for i in range(0, len(content)):
                    if len(content[i]) == 0:
                        break
                    else:
                        mk.write(content[i])
                        i += 1
            finally:
                mk.close()
                print("关闭copy.txt")
        finally:
            read.close()
            print("关闭gushi.txt")
    except Exception as result:
        print(result)
read()
爬虫

百度指数:页面不存在_百度搜索


python文件调用
#test1文件夹下的t1.py内容
def add(a,b):
    return a+b
#test2文件夹下的t2.py去调用ty.py的add函数
from test1 import t1	#引入t1文件
print(t1.add(3,5))	#调用add函数
from bs4 import BeautifulSoup  #网页解析,获取数据
import re   #正则表达式,进行文字匹配
import urllib.request, urllib.error #指定url,获取网页数据
import xlwt #进行Excel操作
import sqlite3  #进行SQLite数据库操作
print(response.read().decode('utf-8'))#对获取到的网页源码进行utf-8解码测试器:httpbin.org
import urllib.request
import urllib.parse

# 获取一个get请求
response = urllib.request.urlopen("http://www.baidu.com")
print(response.read().decode('utf-8'))  #对获取到的网页源码进行utf-8解码

# 获取一个post请求
data = bytes(urllib.parse.urlencode({"hello":"world"}), encoding="utf-8")
response = urllib.request.urlopen("http://httpbin.org/post",data = data)
print(response.read().decode('utf-8'))

# 超时处理
try:
    response = urllib.request.urlopen("http://httpbin.org/get", timeout=0.01)
    print(response.read().decode('utf-8'))
except urllib.error.URLError as e:
    print("time out")


response = urllib.request.urlopen("http://www.baidu.com")
# print(response.status) #网址为douban.com时返回418状态码:对方已经发现是爬虫
# print(response.getheaders())
print(response.getheader("Server"))


url = "http://httpbin.org/post"
headers = {
    "User-Agent": "Mozilla/5.0 (Windows NT 10.0; Win64; x64; rv:93.0) Gecko/20100101 Firefox/93.0"
}
data = bytes(urllib.parse.urlencode({'name':'aiyaowei'}),encoding="utf-8")
req = urllib.request.Request(url=url, data=data, headers=headers, method="POST")
response = urllib.request.urlopen(req)
print(response.read().decode('utf-8'))


url = "https://www.douban.com"
headers = {
    "User-Agent": "Mozilla/5.0 (Windows NT 10.0; Win64; x64; rv:93.0) Gecko/20100101 Firefox/93.0"
}
req = urllib.request.Request(url=url, headers=headers)
response = urllib.request.urlopen(req)
print(response.read().decode('utf-8'))
获取数据:
import urllib.request
import urllib.parse

def main():
    baseurl = "https://movie.douban.com/top250?start="
    # 1.爬取网页
    datalist = getData(baseurl)
    # 2.逐一解析数据

    # 3.保存数据
    savepath = '.\\豆瓣电影top250.xls'
    # saveData(savepath)


def getData(baseurl):
    for i in range(0,10):
        url = baseurl + str(i*25)
        html = askUrl(url)     #保存获取到的网页源码
        print(html)

def askUrl(url):
    header = {#模拟浏览器头部信息,向豆瓣服务器发送消息
        "User-Agent": "Mozilla/5.0 (Windows NT 10.0; Win64; x64; rv:93.0) Gecko/20100101 Firefox/93.0"
    }#用户代理表示告诉豆瓣服务器,我们是什么类型的机器,浏览器(本质是告诉浏览器,我们可以接收什么水平的文件)
    request = urllib.request.Request(url, headers=header)
    try:
        response = urllib.request.urlopen(request)
        html = response.read().decode('utf-8')
        return html
    except urllib.error.URLError as e:
        if hasattr(e, "code"):
            print(e.code)
        if hasattr(e, "reason"):
            print(e.reason)

main()
BeautifulSoup4将复杂HTML文档转换成一个复杂的树形结构,每个节点都是python对象,所有对象可以归纳为4种:
- Tag
- NavigableString
- BeautifulSoup
- Comment
baidu.html
<!DOCTYPE html>
<!--STATUS OK-->
<html class="sui-componentWrap">
<head>
<meta http-equiv="Content-Type" content="text/html; charset=UTF-8">
<meta http-equiv="X-UA-Compatible" content="IE=edge,chrome=1">
<meta content="always" name="referrer">
<meta name="theme-color" content="#2932e1">
<meta name="description" content="全球领先的中文搜索引擎、致力于让网民更便捷地获取信息,找到所求。百度超过千亿的中文网页数据库,可以瞬间找到相关的搜索结果。">
<link rel="shortcut icon" href="https://www.baidu.com/favicon.ico" type="image/x-icon">
<title>百度一下,你就知道</title>
</head>
<body>
<div id="wrapper" class="wrapper_new">
<div class="s-skin-container s-isindex-wrap"></div>
<div id="head" class="">
<div id="s_top_wrap" class="s-top-wrap s-isindex-wrap">
<div class="s-top-nav"></div>
<div class="s-center-box"></div>
</div>
<div id="s-top-left" class="s-top-left s-isindex-wrap">
<a href="http://news.baidu.com/" target="_blank" class="mnav c-font-normal c-color-t"><!-- 新闻 --></a>
<a href="http://news.baidu.com/" target="_blank" class="mnav c-font-normal c-color-t">新闻</a>
<a href="https://www.hao123.com/" target="_blank" class="mnav c-font-normal c-color-t">hao123</a>
<a href="http://map.baidu.com/" target="_blank" class="mnav c-font-normal c-color-t">地图</a>
<a href="https://live.baidu.com/" target="_blank" class="mnav c-font-normal c-color-t">直播</a>
<a href="https://haokan.baidu.com/?sfrom=baidu-top" target="_blank" class="mnav c-font-normal c-color-t">视频</a>
<a href="http://tieba.baidu.com/" target="_blank" class="mnav c-font-normal c-color-t">贴吧</a>
<a href="http://xueshu.baidu.com/" target="_blank" class="mnav c-font-normal c-color-t">学术</a>
<div class="mnav s-top-more-btn">
<a href="http://www.baidu.com/more/" name="tj_briicon" class="s-bri c-font-normal c-color-t" target="_blank">更多</a>
<div class="s-top-more" id="s-top-more">
<div class="s-top-more-content row-1 clearfix">
<a href="https://pan.baidu.com/" target="_blank" name="tj_wangpan">
<img src="baidu_files/baiduyun2x-e0be79e69e.png">
<div class="s-top-more-title c-font-normal c-color-t">网盘</div>
</a>
<a href="https://zhidao.baidu.com/" target="_blank" name="tj_zhidao">
<img src="baidu_files/zhidao2x-e9b427ecc4.png">
<div class="s-top-more-title c-font-normal c-color-t">知道</div>
</a>
<a href="https://baike.baidu.com/" target="_blank" name="tj_baike">
<img src="baidu_files/baike2x-1fe3db7fa6.png">
<div class="s-top-more-title c-font-normal c-color-t">百科</div>
</a>
<a href="http://image.baidu.com/" target="_blank" name="tj_img">
<img src="baidu_files/tupian2x-482fc011fc.png">
<div class="s-top-more-title c-font-normal c-color-t">图片</div>
</a>
</div>
<div class="s-top-more-content row-2 clearfix">
<a href="http://e.baidu.com/ebaidu/home?refer=887" target="_blank" name="tj_yingxiaotuiguang">
<img src="baidu_files/yingxiao2x-9ce96df36f.png">
<div class="s-top-more-title c-font-normal c-color-t">营销推广</div>
</a>
<a href="https://wenku.baidu.com/" target="_blank" name="tj_wenku">
<img src="baidu_files/wenku2x-f3aba893c1.png">
<div class="s-top-more-title c-font-normal c-color-t">文库</div>
</a>
<a href="https://jingyan.baidu.com/" target="_blank" name="tj_jingyan">
<img src="baidu_files/jingyan2x-e53eac48cb.png">
<div class="s-top-more-title c-font-normal c-color-t">经验</div>
</a>
<a href="http://music.taihe.com/" target="_blank" name="tj_mp3">
<img src="baidu_files/yinyue2x-c18adacacb.png">
<div class="s-top-more-title c-font-normal c-color-t">音乐</div>
</a>
</div>
<div class="s-top-tomore">
<a class="c-color-gray2 c-font-normal" href="http://www.baidu.com/more/" target="_blank" name="tj_more">查看全部百度产品 ></a>
</div>
</div>
</div>
</div>
</div>
</div>
</body>
</html>from bs4 import BeautifulSoup
file = open("./baidu.html",'rb')
html = file.read().decode('utf-8')
bs = BeautifulSoup(html,"html.parser")
# print(type(bs.head)) #<class 'bs4.element.Tag'>
# print(bs.a)
# print(bs.head)
# 1.Tag 标签及其内容,默认拿到它所找到的第一个内容
print(bs.title) #<title>百度一下,你就知道</title>
# 2.NavigableString 标签里的内容
print(bs.title.string) #百度一下,你就知道
print(type(bs.title.string)) #<class 'bs4.element.NavigableString'>
print(bs.a.attrs) #{'href': 'http://news.baidu.com/', 'target': '_blank', 'class': ['mnav', 'c-font-normal', 'c-color-t']}
# 3.BeautifulSoup表示整个文档
print(type(bs)) #<class 'bs4.BeautifulSoup'>
print(bs.name) #[document]
print(bs.attrs) #{}
# 4.Comment 是一个特殊的NavigableString,输出的内容不包含注释符号
print(bs.a.string)
print(type(bs.a.string)) #<class 'bs4.element.Comment'>


Python爬虫编程基础5天速成(2021全新合集)Python入门+数据分析_哔哩哔哩_bilibili
# 文档的搜索
# find_all()
# 字符串过滤:会查找与字符串完全匹配的内容
t_list = bs.find_all("a")

# 正则表达式搜索:使用search()方法来匹配内容
import re
t_list = bs.find_all(re.compile("a"))


# 方法:传入一个函数(方法),根据函数的要求来搜索
def name_is_exists(tag):
    return tag.has_attr("name")
t_list = bs.find_all(name_is_exists)

# 2.kwargs    参数
# t_list = bs.find_all(id="head")
# t_list = bs.find_all(class_=True)
t_list = bs.find_all(href="http://news.baidu.com/")
for item in t_list:
    print(item)
# print(t_list)


# 3.text参数
# t_list = bs.find_all(text="hao123")
# t_list = bs.find_all(text=["hao123","地图",'贴吧'])
import re
t_list = bs.find_all(text = re.compile("\d"))   #应用正则表达式来查找包含特定文本的内容(标签里的字符串)
for item in t_list:
    print(item)


# 4.limit参数
t_list= bs.find_all('a',limit=3)
for item in t_list:
    print(item)


#css选择器
t_list = bs.select('title') #通过标签来查找
t_list = bs.select(".mnav") #通过类名来查找
t_list = bs.select("#s-top-left") #通过类名来查找
t_list = bs.select("a[class='mnav']") #通过属性来查找----这个未找到???
t_list = bs.select("head > title")  #通过子标签来查找
t_list = bs.select(".mnav ~ .c-font-normal")
print(t_list[0].get_text())
正则
正则表达式的常用操作符
\s匹配空格


Re库


建议在正则表达式中,被比较的字符串前面加r,不用担心转义字符的问题
# 正则表达式:字符串模式(判断字符串是否符合一定的标准)
import re

# 创建模式对象
pat = re.compile("AA")  #此处的AA是正则表达式,用来去验证其他的字符串
m = pat.search("CBA")  #search后面的字符串是被校验的内容    None
m = pat.search("CAA")  #<re.Match object; span=(1, 3), match='AA'>左闭右开,包含1,不包含3,正好是AA的坐标  search后面的字符串是被校验的内容
m = pat.search("AACAADDCCAA") #search方法进行比对查找   <re.Match object; span=(0, 2), match='AA'>,只返回第一次出现的位置

# 没有模式对象
m = re.search("asd","bAasd") #前面的字符串是规则(模板),后面的字符串是被校验的对象   <re.Match object; span=(2, 5), match='asd'>

print(re.findall("a","ASDaDFGAa"))  #前面字符串是规则(正则表达式),后面字符串是被校验的字符串  ['a', 'a']


print(re.findall("[A-Z]","ASDaDFGAa"))  #前面字符串是规则(正则表达式),后面字符串是被校验的字符串  ['A', 'S', 'D', 'D', 'F', 'G', 'A']


print(re.findall("[A-Z]+","ASDaDFGAa"))  #前面字符串是规则(正则表达式),后面字符串是被校验的字符串  ['ASD', 'DFGA']


# sub
print(re.sub("a","A","abcdcasd"))   #找到a,用A来替换,在第三个字符串中替换

# 建议在正则表达式中,被比较的字符串前面加r,不用担心转义字符的问题
# a = "\aabd-\'" #abd-'
a = r"\aabd-\'" #\aabd-\'
print(a)
爬虫解析内容


保存数据

写入Excel的相关操作:
创建并写入Excel表:
import xlrd
from xlutils.copy import copy
import xlwt
# 第一次写入并保存
workbook = xlwt.Workbook(encoding="utf-8", style_compression=0)  #创建workbook对象
worksheet = workbook.add_sheet('第一个sheet', cell_overwrite_ok=True)    #创建工作表
worksheet.col(0).width = 5000	#设置第一列的宽度
worksheet.write(0,0,"hello")    #写入数据:第一个参数“行”,第二个参数“列”,第三个参数内容
worksheet.write(0,1,xlwt.Formula('HYPERLINK("https://www.baidu.com";"链接")'))#添加链接
workbook.save('./aiyaowei.xls')	#将数据保存为aiyaowei.xls

# 打开后读取并另行新建sheet并保存
rb = xlrd.open_workbook(r'./aiyaowei.xls', formatting_info=True)
workbook = copy(rb)	#copy之后超链接的单元格会消失????
try:
    #获取第二个sheet对象,如果获取不到则异常,即不存在此sheet名
    sheet = workbook.get_sheet(u'第二个sheet')
except Exception:
    sheet = workbook.add_sheet('第二个sheet', cell_overwrite_ok=True)
    sheet.col(0).width = 20000  # 设置第一列的宽度
sheet.write(0,0,"第二个hello")
workbook.save('./aiyaowei.xls')	#将数据保存为aiyaowei.xls
读取Excel表:
import xlrd

# 得到工作簿对象
data = xlrd.open_workbook(r'./20211015102636微博.xlsx')

# 通过索引顺序获取sheet页
table1 = data.sheets()[0]   #Sheet  0:<微博_激光>  type(table1)=><class 'xlrd.sheet.Sheet'>
table2 = data.sheet_by_index(0)   #Sheet  0:<微博_激光>  type(table2)=><class 'xlrd.sheet.Sheet'>
table3 = data.sheet_by_name(u'微博_激光')   #写全称Sheet  0:<微博_激光>  type(table3)=><class 'xlrd.sheet.Sheet'>

# 获取sheet页的数据的总行数和总列数
print(table1.nrows,table1.ncols)    #17 3(17行,3列)

# 按行获取数据:
for i in range(table1.nrows):
    a = table1.row_values(i)
    print(a)

# 按列获取数据:
for j in range(table1.ncols):
    b = table1.col_values(j)
    print(b)


# 获取单元格数据:
for m in range(table1.nrows):
    for n in range(table1.ncols):
        print(table1.cell_value(m, n))
        print(table1.cell(m, n).value)    # table1.cell(m, n)获取的数据类型是<class 'xlrd.sheet.Cell'>
九九乘法表:
import xlwt
workbook = xlwt.Workbook(encoding="utf-8")  #创建workbook对象
worksheet = workbook.add_sheet('sheet1')    #创建工作表
for m in range(1,10):
    for n in range(1, int(m+1)):
            worksheet.write(int(m-1), int(n-1), "%d*%d=%d"%(m,n,m*n))
workbook.save('student.xls')    #保存数据表
爬取百度贴吧热议榜:
from bs4 import BeautifulSoup #网页解析,获取数据
import re #正则表达式,进行文字匹配
import urllib.request, urllib.error #指定url,获取网页数据
import xlwt #进行Excel操作
import sqlite3 #进行SQLite数据库操作
import random
# 贴吧详情链接的规则
findLink = re.compile(r'<a class="topic-text" href="(.*?)" target="_blank">') #创建正则表达式对象,表示规则(字符串的模式)
# 贴吧序号
findId = re.compile(r'<span class="icon-top-n">(.*?)</span>')
# 贴吧图片的链接规则
findImgSrc = re.compile(r'<img.*src="(.*?)"',re.S) #re.S让换行符包含在字符中
# 贴吧的标题
findTitle = re.compile(r'<a.*?>(.*?)</a>',re.S)
# 贴吧内容条数
findSize = re.compile(r'<span class="topic-num">(.*)个内容</span>')
# 贴吧简介
findDesc = re.compile(r'<p class="topic-top-item-desc">(.*)</p>')
def main():
baseurl = "http://tieba.baidu.com/hottopic/browse/topicList?res_type=1&red_tag=q1542237309"
# 1.爬取网页
datalist = getData(baseurl)
# 2.解析数据getData获取到直接解析
# 3.保存数据
savepath = '.\\贴吧热议榜.xls'
saveData(datalist,savepath)
# 爬取网页
def getData(baseurl):
datalist = []
html = askUrl(baseurl)
soup = BeautifulSoup(html, "html.parser")
i = 1
for item in soup.find_all('li', class_="topic-top-item"): # 查找符合要求的字符串,形成列表
# print(item) #测试,查看贴吧li的详情
data = [] #保存一条贴吧的所有信息
#print(type(item)) #<class 'bs4.element.Tag'>
item = str(item) #先转为字符串!!!
#print(type(item)) #<class 'str'>
# 贴吧详情的链接
link = html.unescape(re.findall(findLink,item)[0]) #re库用来通过正则表达式查找指定的字符串 html.unescape()是将字符串转义为原格式,例&=》&
data.append(link) #添加链接
imgSrc = re.findall(findImgSrc,item)[0] #re库用来通过正则表达式查找指定的字符串
data.append(imgSrc) #添加图片
TbId = '' #前三个没有序号,是图片
try:
TbId = re.findall(findId, item)[0]
except Exception as e:
TbId = i
data.append(TbId) #添加贴吧序号
TbTitle = re.findall(findTitle,item)[0]
data.append(TbTitle) #添加贴吧标题
TbSize = re.findall(findSize,item)[0]
data.append(TbSize) #添加贴吧内容条数
TbDesc = re.findall(findDesc,item)
if len(TbDesc)!=0:
TbDesc = TbDesc[0].replace("。","") #去掉句号
TbDesc = re.sub('<br(\s+)?/>(\s+)?',"",TbDesc) #去掉<br/> \s匹配空格
TbDesc = re.sub(r"\.{3}",'',TbDesc) #替换...
TbDesc = TbDesc.strip() #去掉前后空格
else:
TbDesc = ""
data.append(TbDesc) #添加贴吧简介
# print(data)
datalist.append(data)
i += 1
return datalist
# 得到指定一个url的网页内容
def askUrl(url):
my_headers = [
"Mozilla/5.0 (Windows NT 10.0; Win64; x64) AppleWebKit/537.36 (KHTML, like Gecko) Chrome/92.0.4515.159 Safari/537.36"
"Mozilla/5.0 (Windows NT 10.0; Win64; x64; rv:93.0) Gecko/20100101 Firefox/93.0",
"Mozilla/5.0 (compatible; MSIE 10.0; Windows NT 6.2; Win64; x64; Trident/6.0)"
]
my_ip = [
"223.241.77.45:3256",
"27.205.45.163:9000",
"183.147.223.1:9000",
"124.206.34.115:80",
"221.219.98.141:9000",
"221.122.91.65:80",
]
head_one = random.choice(my_headers)
ip_one = random.choice(my_ip)
head = { #模拟浏览器头部信息,向豆瓣服务器发送消息
"User-Agent": head_one
} #用户代理表示告诉豆瓣服务器,我们是什么类型的机器,浏览器(本质是告诉浏览器,我们可以接收什么水平的文件)
request = urllib.request.Request(url, headers=head, origin_req_host=ip_one)
html = ""
try:
response = urllib.request.urlopen(request) #<http.client.HTTPResponse object at 0x000002030DB49900>
html = response.read().decode('utf-8')
except urllib.error.URLError as e:
if hasattr(e,"code"):
print(e.code)
if hasattr(e,"reason"):
print(e.reason)
return html
# 3.保存数据
def saveData(datalist,savepath):
book = xlwt.Workbook(encoding="utf-8",style_compression=0) # 创建workbook对象 style_compression样式压缩效果
sheet = book.add_sheet('贴吧热议榜单',cell_overwrite_ok=True) # 创建工作表 cell_overwrite_ok覆盖以前内容
col = ("详情链接","图片链接","排名","标题","贴数","简介")
for i in range(0,6): #6是因为有六列,即上面6个菜单
sheet.write(0,i,col[i]) #列名
for i in range(0,len(datalist)):
print("第%d条"%i)
data = datalist[i]
for j in range(0,6): #6是因为有六列,即对应上面6个菜单
sheet.write(i+1, j, data[j]) #数据
book.save(savepath) #保存
if __name__ == "__main__": #当程序执行时
#调用函数
main()
print('爬取完毕')贴吧话题热议榜单(带保存到Excel):tieba.py
豆瓣电影top250(带保存到Excel及数据库):douban.py
获取到的HTML被转义(解决方法):
import html
real_html = html.unescape(html_str)	#html_str是被转义的字符
数据库相关操作:
import sqlite3

# 1.连接数据库
conn = sqlite3.connect("test.db")   #打开或创建数据库文件
print("opened database successfully")


# 2.创建数据表
conn = sqlite3.connect("test.db")   #打开或创建数据库文件
print("成功打开数据库")
c = conn.cursor()   #获取游标
sql = '''
    create table company
        (id int primary key not null,
        name text not null,
        age int not null,
        address char(50),
        salary real);
'''
c.execute(sql)  #执行sql语句
conn.commit()   #提交数据库操作
conn.close()    #关闭数据库连接
print("成功建表")


# 3.插入数据
conn = sqlite3.connect("test.db")   #打开或创建数据库文件
print("成功打开数据库")
c = conn.cursor()   #获取游标
sql1 = '''
    insert into company(id, name, age, address, salary)
    values (1,'张三', 32, "成都", 8000)
'''
sql2 = '''
    insert into company(id, name, age, address, salary)
    values (2,'李四', 25, "重庆", 5000)
'''
c.execute(sql1)  #执行sql语句
c.execute(sql2)  #执行sql语句
conn.commit()   #提交数据库操作
conn.close()    #关闭数据库连接
print('插入数据完毕')


# 4.查询数据
conn = sqlite3.connect("test.db")   #打开或创建数据库文件
print("成功打开数据库")
c = conn.cursor()   #获取游标
sql = "select id,name,address,salary from company"
cursor = c.execute(sql)  #执行sql语句
for row in cursor:
    print("id = ",row[0])
    print("name = ",row[1])
    print("address = ",row[2])
    print("salary = ",row[3],"\n")

conn.close()    #关闭数据库连接
print('查询数据完毕')
创建flask项目:
安装库:jinjia2

开启debug模式:


from flask import Flask,render_template,request
import datetime

app = Flask(__name__)

#路由解析,通过用户访问的路径,匹配相应的函数
# @app.route('/')
# def hello_world():  # put application's code here
#     return '你好!欢迎光临a'+name

@app.route('/index')
def hello():
    return "你好啊"

# 通过访问路径,获取用户的字符串参数
@app.route('/user/<name>')
def welcom1(name):
    return "你好,%s"%name #http://127.0.0.1:5555/user/lisi    你好,lisi

# 通过访问路径,获取用户的整型参数    此外,还有float类型
@app.route('/user/<int:id>')
def welcome2(id):
    return "你好,%d号的会员"%id   #http://127.0.0.1:5555/user/123    你好,123号的会员


#路由路径不能重复,用户通过唯一路径访问特定的函数

# 返回给用户渲染后的网页文件
@app.route('/')
def index2():
    return render_template('index.html')

# 向页面传递一个变量
@app.route('/index3')
def index3():
    time = datetime.date.today()    #普通变量   {
   { var }}
    name = ["小张",'小王','小赵'] #列表类型
    # {% for data in list %} < !-- 用大括号和百分号括起来的是控制结构,还有if -->
    #     <li>{
   { data }}</li>
    # {% endfor %}
    task = {"任务":"打扫卫生", "时间":"3小时"}    #字典类型
    # {% for key,val in task.items() %} <!-- [(key,val),(key,val),(key,val)] -->
    #         {
   { key }}---{
   { val }}
    # {% endfor %}
    return render_template('index.html',var = time, list = name, task=task)


# 表单提交
@app.route('/test/register')
def register():
    # <form action="{
   { url_for('result') }}" method="post">
    return render_template('test/register.html')

# 接收表单提交的路由,需要指定methods为post
@app.route('/result', methods=["POST",'GET'])
def result():
    if request.method == "POST":
        result = request.form
        return render_template('test/result.html', result=result)


if __name__ == '__main__':
    app.run(debug=True)
数据可视化:Echarts
var myChart = echarts.init(document.getElementById('main'));
option = {
title:{
text:'电影评分表'
},
color:['#339BDB'],
xAxis: {
type: 'category',
data: {
{ score|tojson }}
<!--{
{ score }}被转义了['8.3', '8.4', '8.5', '8.6', '8.7', '8.8', '8.9', '9', '9.1', '9.2', '9.3', '9.4', '9.5', '9.6', '9.7'],在后面加|tojson可防转义["8.3", "8.4", "8.5", "8.6", "8.7", "8.8", "8.9", "9", "9.1", "9.2", "9.3", "9.4", "9.5", "9.6", "9.7"]-->
},
yAxis: {
type: 'value'
},
series: [
{
data:{
{ num|tojson }},
type: 'bar',
barWidth:'30%'
}]
};
// 使用刚指定的配置项和数据显示图表。
myChart.setOption(option);echarts:https://echarts.apache.org/examples/zh/index.html#chart-type-bar
wordcloud:
wordcloud:Free online word cloud generator and tag cloud creator - WordClouds.com
文档:WordCloud for Python documentation — wordcloud 1.8.1 documentation
安装库:jieba、matplotlib、wordcloud
安装失败:

解决方法:
pycharm下方Terminal命令行:
升级pip:
pip install pip 或 pip install --upgrade pip下载wordcloud库之后安装
安装:
pip install .\wordcloud-1.8.1-cp310-cp310-win_amd64.whlwww.lfd.uci.edu/~gohlke/pythonlibs/#wordcloud


白底树素材:tree.jpg
STXINGKA.TTF支持中文 BAUHS93.TTF不支持中文,因为豆瓣简介的词都是中文的,引用BAUHS93.TTF会导致中文显示不出来,词云会变成小方块,改为支持中文的字体库即可


做词云项目时,项目文件名不要起“wordcloud.py”,否则会报错:ImportError: cannot import name 'wordcloud' from partially initialized module 'wordcloud' (most likely due to a circular import)
import jieba    #分词
from matplotlib import pyplot as plt    #绘图,数据可视化 点状图、柱状图等,会生成图片
from wordcloud import wordcloud         #词云
from PIL import Image                   #图片处理 pychon默认自带,比如图片虚化,验证码等
import numpy as np                      #矩阵运算
import sqlite3                          #数据库

# 准备词云所需的文字(词)
conn = sqlite3.connect('movie.db')
cur = conn.cursor()
sql = 'select info from movie250'
data = cur.execute(sql)
text = ""
for item in data:
    text = text + item[0]
cur.close()
conn.close()

# 分词
cut = jieba.cut(text)
string = ' '.join(cut)


img = Image.open(r'.\static\assets\images\tree.jpg')  #打开遮罩图片,遮罩必须为白色即白底
img_array = np.array(img)   #将图片转换为数组
wc = wordcloud.WordCloud(
    background_color='white',
    mask=img_array,
    font_path="STXINGKA.TTF" #STXINGKA.TTF支持中文 BAUHS93.TTF不支持中文
)

wc.generate_from_text(string)   #要使用切好的词


# 绘制图片
fig = plt.figure(1)
plt.imshow(wc)
plt.axis('off')     #是否显示坐标轴

# plt.show()  #显示生成的词云图片,执行保存时这一行要去掉,否则图片一片白色

# 输出词云图片到文件
plt.savefig(r'.\static\assets\images\word_tree.jpg', dpi=500)   #dpi指清晰度
解决ModuleNotFoundError: No module named 'pip'问题:
解决ModuleNotFoundError: No module named 'pip'问题_haihonga的博客-程序员宅基地
python -m ensurepip
python -m pip install --upgrade pip
第二个命令接连超时的可以执行这个(没试):
python -m pip install --upgrade pip -i http://pypi.douban.com/simple --trusted-host pypi.douban.com
爬虫返回禁止访问403:
python 爬虫禁止访问解决方法(403)_Nine days-程序员宅基地
在短时间内直接使用Get获取大量数据,会被服务器认为在对它进行攻击,所以拒绝我们的请求,自动把电脑IP封了
my_headers = [
    "Mozilla/5.0 (Windows NT 10.0; Win64; x64) AppleWebKit/537.36 (KHTML, like Gecko) Chrome/92.0.4515.159 Safari/537.36"
    "Mozilla/5.0 (Windows NT 10.0; Win64; x64; rv:93.0) Gecko/20100101 Firefox/93.0",
    "Mozilla/5.0 (compatible; MSIE 10.0; Windows NT 6.2; Win64; x64; Trident/6.0)"
]
my_ip = [
    "223.241.77.45:3256",
    "27.205.45.163:9000",
    "183.147.223.1:9000",
    "124.206.34.115:80",
    "221.219.98.141:9000",
    "221.122.91.65:80",
]
head_one = random.choice(my_headers)
ip_one = random.choice(my_ip)
head = {     #模拟浏览器头部信息,向豆瓣服务器发送消息
    "User-Agent": head_one
}   #用户代理表示告诉豆瓣服务器,我们是什么类型的机器,浏览器(本质是告诉浏览器,我们可以接收什么水平的文件)
request = urllib.request.Request(url, headers=head, origin_req_host=ip_one)
爬取网页内容报编码错误:
UnicodeDecodeError: 'utf-8' codec can't decode byte 0xba in position 354: invalid start byte
浏览器打开网页链接,右键查看源代码,观察头部编码格式,例如:charset=GB2312
<meta http-equiv="Content-Type" content="text/html; charset=GB2312" />
新建flask项目,访问127.0.0.1:5000还是访问的原项目:
删除原flask项目后,重新安装新flask项目,修改文件后,访问原默认链接,内容未修改,重新开启debug也不行,暂时先改了下端口号

正常处理以上问题的方式:
关闭原端口号,任务管理器结束python任务
Windows:
win+R -> cmd -> 查找占用端口的任务:netstat -ano | findstr 5000
查找任务pid的程序:tasklist | findstr 15992
删除该pid进程:taskkill -PID 15992 -F

pycharm安装库包失败:
比如安装matplotlib失败
下载库文件:https://www.lfd.uci.edu/~gohlke/pythonlibs/#matplotlib
根据python版本等来选择适合的文件,比如python3.8选择cp38,python3.10选择cp310,这里我选择的是matplotlib‑3.4.3‑cp310‑cp310‑win_amd64.whl
将下载好的文件放入python安装包的Scripts中,运行cmd命令行,执行
pip install .\matplotlib-3.4.3-cp310-cp310-win_amd64.whl
运行成功后可以从pycharm的File | Settings | Project: 项目名 | Python Interpreter中看到有matplotlib包了
智能推荐
游戏玩家的程序猿之路-程序员宅基地
文章浏览阅读2.9k次,点赞6次,收藏2次。目录一.自我介绍二.编程目标三.学习编程的方法四.分配编程的时间五.最想进入的IT公司一.自我介绍大家好,这里是ONE_KICK,一名一名普通的大二学生,这是我的第一篇blog,现在还是一名编程小白,因为自己对于游戏的热爱决定开始学习基础的编程,来到CSDN,一方面是可以学习到很多的知识,另一方面是想要记录一下自己的学习历程。二.编程目标从零开始学习编程,打算先学习C语言,而后开始学习C++,近期的目标是在一年时间内掌握C++的用法。三.学习编程的方法打算稳扎稳打的学习C++,每天会有固定的时间
VC+API模拟键盘按键(详解篇)_vc模拟键盘输入-程序员宅基地
文章浏览阅读1.6w次。模拟键盘按键━━━━━━━━━━━━━━━━━━━━━━━━以前就想过如何模拟键盘按键向其他程序发送控制命令,但总是无功而返,这次也不例外。模拟按键的方法很多,如PostMessage(不能用SendMessage),SendInput,keybd_event。但最要命的是以上方法基本上都要窗口获取焦点时才有效。也就是想后台模拟键盘按键难度是很高的。当然有些特殊_vc模拟键盘输入
Docer容器客户端在启动的镜像的时候报错Error invoking remote method ‘docker-start-container‘: Error: (HTTP code 500_error invoking remote method 'docker-run-container-程序员宅基地
文章浏览阅读6.7k次,点赞8次,收藏3次。打开docker容器,启动redis镜像,报错:Error invoking remote method 'docker-start-container': Error: (HTTP code 500) server error - Ports are not available: listen tcp 0.0.0.0:2181: bind: An attempt was made to access a socket in a way forbidden by its access per._error invoking remote method 'docker-run-container': error: (http code 400)
数论模板-程序员宅基地
文章浏览阅读64次。组合数 递推void get_C(){ for(int i=0;i<=2005;i++) { C[0][i]=C[i][i]=1; for(int j=1;j<i;j++) { C[j][i]=(C[j-1][i-1]+C[j][i-1])%MOD; ..._inv2 数论
铜仁:实施大数据战略行动 打好经济社会跨越突围战-程序员宅基地
文章浏览阅读100次。近年来,铜仁市抢抓国家大数据战略和网络强国战略机遇,发挥创建大数据综合试验区和扶贫攻坚区域政策的叠加优势,将大数据与大扶贫两大战略融合发展,强化铜仁在武陵山片区的综合竞争力,以建设一个公共数据综合服务平台为核心,以提升产业发展能力、政府治理能力为目的,加快完善产业政策体系、数据标准体系、基础配套体系三大支撑,重点实施数据集聚、智慧铜仁、数据产业、生态文化..._铜仁市公共数据综合服务平台
Android -- Button简单的数字增加,重置_android studio中页面增加重置按钮代码,重置页面全部数据数据-程序员宅基地
文章浏览阅读4.9k次。简单的button 点击增加,点击归零重置功能。_android studio中页面增加重置按钮代码,重置页面全部数据数据
随便推点
将MNIST手写数字数据集导入NumPy数组(《深度学习入门:基于Python的理论与实现》实践笔记)_ubyte.gz用什么打开-程序员宅基地
文章浏览阅读1.2k次,点赞6次,收藏12次。将MNIST手写数字数据集导入NumPy数组下载MNIST数据集(使用urllib.request.urlretrieve()函数)打开下载得到的.gz压缩文件(使用gzip.open()函数)并导入NumPy数组(使用np.frombuffer()函数)完整实例(能直接运行):可能遇到的问题:下载MNIST数据集(使用urllib.request.urlretrieve()函数)os.path.exists(path)可以判断是否存在以path为地址的文件。urllib.request.urlre_ubyte.gz用什么打开
【剧前爆米花--C语言篇】C语言数组底层原理详解_数组的底层逻辑-程序员宅基地
文章浏览阅读1k次,点赞15次,收藏13次。对C语言数组的详细剖析,以及底层理解,相信你一定有所收获_数组的底层逻辑
java--html(6)框架_h|keycount| html-程序员宅基地
文章浏览阅读950次。框架标签:< frameset> < frameset rows=”10%,*”> < frame src=”1.html” name=”top” /> < frameset cols=”30%,*”> < frame src=”2.html” name=”left_h|keycount| html
虚机修改yum源_虚拟机如何优化yum源-程序员宅基地
文章浏览阅读1.1k次,点赞2次,收藏7次。修改yum的下载源_虚拟机如何优化yum源
Jarvis OJ -BASIC-WRITE-UP_jarvisoj - basec - 「-.- 字符串」-程序员宅基地
文章浏览阅读3.8k次。似乎寒假起就没有好好刷过ctf题了,感觉菜的和狗一样。愈发的感觉到无力。所以来JarvisOJ修炼了,写个WP记录一下。BASIC veryeasyquestion:使用基本命令获取flaganswer:放winhex里面看下,没发现什么东西。题目说是基本命令,试了试binwalk,也什么都没有,再试strings。拿到flag。 关于USS Labquestion:USS的英文全称是什么,请全部..._jarvisoj - basec - 「-.- 字符串」
mysql添加外键的时候报错_mysql处理添加外键时 error 150 问题-程序员宅基地
文章浏览阅读163次。当你试图在mysql中创建一个外键的时候,这个出错会经常发生,这是非常令人沮丧的。像这种不能创建一个.frm 文件的报错好像暗示着操作系统的文件的权限错误或者其它原因,但实际上,这些都不是的,事实上,这个mysql报错已经被报告是一个mysql本身的bug并出现在mysql 开发者列表当中很多年了,然而这似乎又是一种误导。在很多实例中,这种错误的发生都是因为mysql一直以来都不能很好的支持的关系..._mysql添加外键时error