【Android】Android布局中实现圆角边框_<corners android:radius="5sp" />-程序员宅基地
技术标签: Android
设置corners_bg.xml
设置边框圆角可以在drawable-mdpi目录里定义一个xml:
1 |
<?xml version="1.0"encoding="utf-8"?> |
2 |
<shapexmlns:android="http://schemas.android.com/apk/res/android"> |
3 |
<solid android:color="#FFFFFF"/> |
4 |
<corners android:topLeftRadius="10dp" |
5 |
android:topRightRadius="10dp" |
6 |
android:bottomRightRadius="10dp" |
7 |
android:bottomLeftRadius="10dp"/> |
8 |
</shape> |
solid的表示填充颜色,为了简单,这里用的是白色。
而corners则是表示圆角,注意的是这里bottomRightRadius是左下角而不是右下角,bottomLeftRadius右下角。
上面的效果也可以像下面一样设置,如下:
1 |
<corners android:radius="5dp" /> |
引用corners_bg.xml
如果想引用这个xml,只需要@drawable/corners_bg.xml即可:
1 |
android:background="@drawable/corners_bg" |
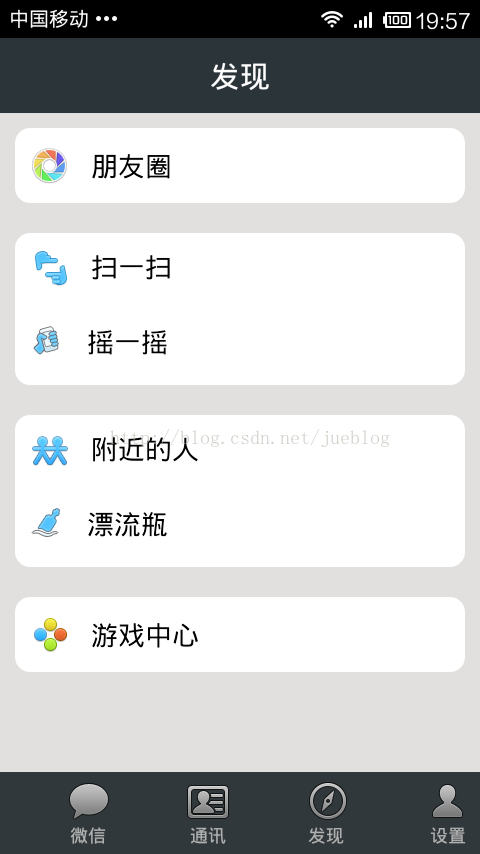
应用范例
001 |
<?xml version="1.0" encoding="utf-8"?> |
002 |
<LinearLayout xmlns:android="http://schemas.android.com/apk/res/android" |
003 |
android:layout_width="match_parent" |
004 |
android:layout_height="match_parent" |
005 |
android:background="#E1E0DE" |
006 |
android:orientation="vertical" > |
007 |
008 |
<TextView |
009 |
android:id="@+id/textView1" |
010 |
android:layout_width="match_parent" |
011 |
android:layout_height="50dp" |
012 |
android:background="#2B3439" |
013 |
android:gravity="center" |
014 |
android:text="发现" |
015 |
android:textColor="#FFFFFF" |
016 |
android:textSize="20sp" /> |
017 |
018 |
<LinearLayout |
019 |
android:id="@+id/login_div" |
020 |
android:layout_width="fill_parent" |
021 |
android:layout_height="50dp" |
022 |
android:layout_margin="10dp" |
023 |
android:background="@drawable/corners_bg" |
024 |
android:gravity="center_vertical" |
025 |
android:padding="10dp" > |
026 |
027 |
<ImageView |
028 |
android:id="@+id/imageView1" |
029 |
android:layout_width="wrap_content" |
030 |
android:layout_height="wrap_content" |
031 |
android:src="@drawable/find_more_friend_photograph_icon" /> |
032 |
033 |
<TextView |
034 |
android:id="@+id/textView2" |
035 |
android:layout_width="wrap_content" |
036 |
android:layout_height="wrap_content" |
037 |
android:layout_marginLeft="14dp" |
038 |
android:text="朋友圈" |
039 |
android:textColor="#000" |
040 |
android:textSize="18sp" /> |
041 |
</LinearLayout> |
042 |
043 |
<LinearLayout |
044 |
android:layout_width="fill_parent" |
045 |
android:layout_height="101dp" |
046 |
android:layout_margin="10dp" |
047 |
android:background="@drawable/corners_bg" |
048 |
android:orientation="vertical" |
049 |
android:padding="10dp" > |
050 |
051 |
<LinearLayout |
052 |
android:layout_width="wrap_content" |
053 |
android:layout_height="50dp" > |
054 |
055 |
<ImageView |
056 |
android:layout_width="wrap_content" |
057 |
android:layout_height="wrap_content" |
058 |
android:src="@drawable/find_more_friend_scan" /> |
059 |
060 |
<TextView |
061 |
android:layout_width="wrap_content" |
062 |
android:layout_height="wrap_content" |
063 |
android:layout_marginLeft="14dp" |
064 |
android:text="扫一扫" |
065 |
android:textColor="#000" |
066 |
android:textSize="18sp" /> |
067 |
</LinearLayout> |
068 |
069 |
<LinearLayout |
070 |
android:layout_width="wrap_content" |
071 |
android:layout_height="50dp" |
072 |
android:layout_centerVertical="true" > |
073 |
074 |
<ImageView |
075 |
android:layout_width="wrap_content" |
076 |
android:layout_height="wrap_content" |
077 |
android:src="@drawable/come_from_shake" /> |
078 |
079 |
<TextView |
080 |
android:layout_width="wrap_content" |
081 |
android:layout_height="wrap_content" |
082 |
android:layout_marginLeft="14dp" |
083 |
android:text="摇一摇" |
084 |
android:textColor="#000" |
085 |
android:textSize="18sp" /> |
086 |
</LinearLayout> |
087 |
</LinearLayout> |
088 |
089 |
<LinearLayout |
090 |
android:layout_width="fill_parent" |
091 |
android:layout_height="101dp" |
092 |
android:layout_margin="10dp" |
093 |
android:background="@drawable/corners_bg" |
094 |
android:orientation="vertical" |
095 |
android:padding="10dp" > |
096 |
097 |
<LinearLayout |
098 |
android:layout_width="wrap_content" |
099 |
android:layout_height="50dp" > |
100 |
101 |
<ImageView |
102 |
android:layout_width="wrap_content" |
103 |
android:layout_height="wrap_content" |
104 |
android:src="@drawable/find_more_friend_near_icon" /> |
105 |
106 |
<TextView |
107 |
android:layout_width="wrap_content" |
108 |
android:layout_height="wrap_content" |
109 |
android:layout_marginLeft="14dp" |
110 |
android:text="附近的人" |
111 |
android:textColor="#000" |
112 |
android:textSize="18sp" /> |
113 |
</LinearLayout> |
114 |
115 |
<LinearLayout |
116 |
android:layout_width="wrap_content" |
117 |
android:layout_height="50dp" |
118 |
android:layout_centerVertical="true" > |
119 |
120 |
<ImageView |
121 |
android:layout_width="wrap_content" |
122 |
android:layout_height="wrap_content" |
123 |
android:src="@drawable/come_from_bottle" /> |
124 |
125 |
<TextView |
126 |
android:layout_width="wrap_content" |
127 |
android:layout_height="wrap_content" |
128 |
android:layout_marginLeft="14dp" |
129 |
android:text="漂流瓶" |
130 |
android:textColor="#000" |
131 |
android:textSize="18sp" /> |
132 |
</LinearLayout> |
133 |
</LinearLayout> |
134 |
135 |
<LinearLayout |
136 |
android:id="@+id/login_div" |
137 |
android:layout_width="fill_parent" |
138 |
android:layout_height="50dp" |
139 |
android:layout_margin="10dp" |
140 |
android:background="@drawable/corners_bg" |
141 |
android:gravity="center_vertical" |
142 |
android:padding="10dp" > |
143 |
144 |
<ImageView |
145 |
android:id="@+id/imageView1" |
146 |
android:layout_width="wrap_content" |
147 |
android:layout_height="wrap_content" |
148 |
android:src="@drawable/more_game" /> |
149 |
150 |
<TextView |
151 |
android:id="@+id/textView2" |
152 |
android:layout_width="wrap_content" |
153 |
android:layout_height="wrap_content" |
154 |
android:layout_marginLeft="14dp" |
155 |
android:text="游戏中心" |
156 |
android:textColor="#000" |
157 |
android:textSize="18sp" /> |
158 |
</LinearLayout> |
159 |
160 |
</LinearLayout> |
智能推荐
攻防世界_难度8_happy_puzzle_攻防世界困难模式攻略图文-程序员宅基地
文章浏览阅读645次。这个肯定是末尾的IDAT了,因为IDAT必须要满了才会开始一下个IDAT,这个明显就是末尾的IDAT了。,对应下面的create_head()代码。,对应下面的create_tail()代码。不要考虑爆破,我已经试了一下,太多情况了。题目来源:UNCTF。_攻防世界困难模式攻略图文
达梦数据库的导出(备份)、导入_达梦数据库导入导出-程序员宅基地
文章浏览阅读2.9k次,点赞3次,收藏10次。偶尔会用到,记录、分享。1. 数据库导出1.1 切换到dmdba用户su - dmdba1.2 进入达梦数据库安装路径的bin目录,执行导库操作 导出语句:./dexp cwy_init/[email protected]:5236 file=cwy_init.dmp log=cwy_init_exp.log 注释: cwy_init/init_123..._达梦数据库导入导出
js引入kindeditor富文本编辑器的使用_kindeditor.js-程序员宅基地
文章浏览阅读1.9k次。1. 在官网上下载KindEditor文件,可以删掉不需要要到的jsp,asp,asp.net和php文件夹。接着把文件夹放到项目文件目录下。2. 修改html文件,在页面引入js文件:<script type="text/javascript" src="./kindeditor/kindeditor-all.js"></script><script type="text/javascript" src="./kindeditor/lang/zh-CN.js"_kindeditor.js
STM32学习过程记录11——基于STM32G431CBU6硬件SPI+DMA的高效WS2812B控制方法-程序员宅基地
文章浏览阅读2.3k次,点赞6次,收藏14次。SPI的详情简介不必赘述。假设我们通过SPI发送0xAA,我们的数据线就会变为10101010,通过修改不同的内容,即可修改SPI中0和1的持续时间。比如0xF0即为前半周期为高电平,后半周期为低电平的状态。在SPI的通信模式中,CPHA配置会影响该实验,下图展示了不同采样位置的SPI时序图[1]。CPOL = 0,CPHA = 1:CLK空闲状态 = 低电平,数据在下降沿采样,并在上升沿移出CPOL = 0,CPHA = 0:CLK空闲状态 = 低电平,数据在上升沿采样,并在下降沿移出。_stm32g431cbu6
计算机网络-数据链路层_接收方收到链路层数据后,使用crc检验后,余数为0,说明链路层的传输时可靠传输-程序员宅基地
文章浏览阅读1.2k次,点赞2次,收藏8次。数据链路层习题自测问题1.数据链路(即逻辑链路)与链路(即物理链路)有何区别?“电路接通了”与”数据链路接通了”的区别何在?2.数据链路层中的链路控制包括哪些功能?试讨论数据链路层做成可靠的链路层有哪些优点和缺点。3.网络适配器的作用是什么?网络适配器工作在哪一层?4.数据链路层的三个基本问题(帧定界、透明传输和差错检测)为什么都必须加以解决?5.如果在数据链路层不进行帧定界,会发生什么问题?6.PPP协议的主要特点是什么?为什么PPP不使用帧的编号?PPP适用于什么情况?为什么PPP协议不_接收方收到链路层数据后,使用crc检验后,余数为0,说明链路层的传输时可靠传输
软件测试工程师移民加拿大_无证移民,未受过软件工程师的教育(第1部分)-程序员宅基地
文章浏览阅读587次。软件测试工程师移民加拿大 无证移民,未受过软件工程师的教育(第1部分) (Undocumented Immigrant With No Education to Software Engineer(Part 1))Before I start, I want you to please bear with me on the way I write, I have very little gen...
随便推点
Thinkpad X250 secure boot failed 启动失败问题解决_安装完系统提示secureboot failure-程序员宅基地
文章浏览阅读304次。Thinkpad X250笔记本电脑,装的是FreeBSD,进入BIOS修改虚拟化配置(其后可能是误设置了安全开机),保存退出后系统无法启动,显示:secure boot failed ,把自己惊出一身冷汗,因为这台笔记本刚好还没开始做备份.....根据错误提示,到bios里面去找相关配置,在Security里面找到了Secure Boot选项,发现果然被设置为Enabled,将其修改为Disabled ,再开机,终于正常启动了。_安装完系统提示secureboot failure
C++如何做字符串分割(5种方法)_c++ 字符串分割-程序员宅基地
文章浏览阅读10w+次,点赞93次,收藏352次。1、用strtok函数进行字符串分割原型: char *strtok(char *str, const char *delim);功能:分解字符串为一组字符串。参数说明:str为要分解的字符串,delim为分隔符字符串。返回值:从str开头开始的一个个被分割的串。当没有被分割的串时则返回NULL。其它:strtok函数线程不安全,可以使用strtok_r替代。示例://借助strtok实现split#include <string.h>#include <stdio.h&_c++ 字符串分割
2013第四届蓝桥杯 C/C++本科A组 真题答案解析_2013年第四届c a组蓝桥杯省赛真题解答-程序员宅基地
文章浏览阅读2.3k次。1 .高斯日记 大数学家高斯有个好习惯:无论如何都要记日记。他的日记有个与众不同的地方,他从不注明年月日,而是用一个整数代替,比如:4210后来人们知道,那个整数就是日期,它表示那一天是高斯出生后的第几天。这或许也是个好习惯,它时时刻刻提醒着主人:日子又过去一天,还有多少时光可以用于浪费呢?高斯出生于:1777年4月30日。在高斯发现的一个重要定理的日记_2013年第四届c a组蓝桥杯省赛真题解答
基于供需算法优化的核极限学习机(KELM)分类算法-程序员宅基地
文章浏览阅读851次,点赞17次,收藏22次。摘要:本文利用供需算法对核极限学习机(KELM)进行优化,并用于分类。
metasploitable2渗透测试_metasploitable2怎么进入-程序员宅基地
文章浏览阅读1.1k次。一、系统弱密码登录1、在kali上执行命令行telnet 192.168.26.1292、Login和password都输入msfadmin3、登录成功,进入系统4、测试如下:二、MySQL弱密码登录:1、在kali上执行mysql –h 192.168.26.129 –u root2、登录成功,进入MySQL系统3、测试效果:三、PostgreSQL弱密码登录1、在Kali上执行psql -h 192.168.26.129 –U post..._metasploitable2怎么进入
Python学习之路:从入门到精通的指南_python人工智能开发从入门到精通pdf-程序员宅基地
文章浏览阅读257次。本文将为初学者提供Python学习的详细指南,从Python的历史、基础语法和数据类型到面向对象编程、模块和库的使用。通过本文,您将能够掌握Python编程的核心概念,为今后的编程学习和实践打下坚实基础。_python人工智能开发从入门到精通pdf