(一)Android基础界面设计_移动开发背景界面设计代码-程序员宅基地
## 第一章 界面设计
1.1控制UI界面
1.1.1 使用XML布局控制UI界面
1.在res/layout目录下编写main.xml布局文件
2.在mainActivity.java文件中使用
setContentView(R.layout.activity_main);
显示布局效果
main.xml
<?xml version="1.0" encoding="utf-8"?>
<androidx.constraintlayout.widget.ConstraintLayout xmlns:android="http://schemas.android.com/apk/res/android"
    xmlns:app="http://schemas.android.com/apk/res-auto"
    xmlns:tools="http://schemas.android.com/tools"
    android:layout_width="match_parent"
    android:layout_height="match_parent"
    tools:context=".MainActivity">
    <!--文字提示-->
    <TextView
        android:layout_width="match_parent"
        android:layout_height="wrap_content"
        android:text="@string/title"
        style="@style/text"
        />
    <!--按钮-->
    <Button
        android:id="@+id/startButton"
        android:layout_gravity="center_vertical|center_horizontal"
        android:text="@string/start"
        android:layout_width="wrap_content"
        android:layout_height="wrap_content"
        style="@style/text"
    />

</androidx.constraintlayout.widget.ConstraintLayout>
res/values/strings.xml 用于定义应用中字符串常量
<resources>
    <string name="title">使用XML布局文件控制UI界面</string>
    <string name="start">单击进入Android...</string>
</resources>
res/values/styles.xml 用于定义组件的样式
<?xml version="1.0" encoding="utf-8"?>
<resources>
    <style name="text">
        <item name="android:textSize">24px</item>
        <item name="android:textColor">#111111</item>
    </style>
</resources>
1.1.2 在代码中控制UI界面(不建议耦合性太高)
1.创建布局管理器
2.创建具体的组件
3.将创建的集体组件添加到布局管理器中
public class MainActivity extends AppCompatActivity {


    public TextView text2;
    @Override
    protected void onCreate(Bundle savedInstanceState) {


        super.onCreate(savedInstanceState);
        //创建布局管理器
        FrameLayout frameLayout=new FrameLayout(this);
        //设置背景
        frameLayout.setBackgroundDrawable(this.getResources().getDrawable(R.drawable.ic_launcher_background));
        //设置在Activity中显示framelayout
        setContentView(frameLayout);

        TextView text1=new TextView(this);
        text1.setText("在代码中控制UI界面");//文字
        text1.setTextSize(TypedValue.COMPLEX_UNIT_PX,24);//文字大小单位像素
        text1.setTextColor(Color.rgb(1,1,1));//文字颜色
        frameLayout.addView(text1);//添加到布局管理中

        text2=new TextView(this);
        text2.setText("单击进入Android...");//文字
        text2.setTextSize(TypedValue.COMPLEX_UNIT_PX,24);//文字大小单位像素
        text2.setTextColor(Color.rgb(1,1,1));//文字颜色
        FrameLayout.LayoutParams params=new FrameLayout.LayoutParams(
                ViewGroup.LayoutParams.WRAP_CONTENT,
                ViewGroup.LayoutParams.WRAP_CONTENT//创建保存布局参数的对象
        );
        params.gravity= Gravity.CENTER_HORIZONTAL|Gravity.CENTER_VERTICAL;//居中显示
        text2.setLayoutParams(params);//设置布局参数
        //按钮的事件监听器
        text2.setOnClickListener(new View.OnClickListener() {


            @Override
            public void onClick(View v) {


                //对话框标题
                new AlertDialog.Builder(MainActivity.this).setTitle("系统提示")
                .setMessage("确定进入吗?")//对话框显示内容
                .setPositiveButton("确定",//确定按钮对应的事件
                        new DialogInterface.OnClickListener(){


                        public void onClick(DialogInterface dialog,int which){


                        Log.i("Android","进入");//输出消息日志
                    }
                }).setNegativeButton("退出",//退出按钮对应的事件
                        new DialogInterface.OnClickListener(){


                    public void onClick(DialogInterface dialog,int which){


                        Log.i("Android","退出");//输出消息日志
                        finish();
                    }
                }).show();
            }
        });

        frameLayout.addView(text2);//text2添加到布局管理器中
    }
}
1.1.3 使用XML和Java代码混合控制UI界面
原则把变化小、行为比较固定的组件放在XML布局文件中,把变化比较多香味控制比较复杂的组件交给Java代码来管理。
layout/activity_main.xml
<?xml version="1.0" encoding="utf-8" ?>
<LinearLayout xmlns:android="http://schemas.android.com/apk/res/android"
    android:layout_width="match_parent"
    android:layout_height="match_parent"
    android:orientation="horizontal"
    android:id="@+id/layout"
   />
MainActivity.java
public class MainActivity extends AppCompatActivity {


    private ImageView[] img=new ImageView[12];//声明一个保存ImageView组件
    private int[] imagePath=new int[]{


            R.drawable.img01,R.drawable.img02,R.drawable.img03,R.drawable.img04
    };
    @Override
    protected void onCreate(Bundle savedInstanceState) {


        super.onCreate(savedInstanceState);
        setContentView(R.layout.activity_main);
        LinearLayout layout=(LinearLayout) findViewById(R.id.layout);//获取XML文件中定义的线性布局
        for (int i=0;i<imagePath.length;i++){


            img[i]=new ImageView(this);//创建ImageView组件
            img[i].setImageResource(imagePath[i]);//为组件指定图片
            img[i].setPadding(5,5,5,5);//组件的内边距
            LinearLayout.LayoutParams params=new LinearLayout.LayoutParams(253,148);//设置图片的宽度和高度
            img[i].setLayoutParams(params);//设置组建的布局参数
            layout.addView(img[i]);//把ImageView组件添加到布局管理器中
        }
    }
}
1.1.4 开发自定义的View
Android中所有的UI界面都是由View类和ViewGroup类及其子类组合而成。View类是所有UI类的基类
![[外链图片转存失败,源站可能有防盗链机制,建议将图片保存下来直接上传(img-HhNgPzaP-1647238680230)(C:\Users\机械师\AppData\Roaming\Typora\typora-user-images\1646879573783.png)]](https://img-blog.csdnimg.cn/320957e159c545768a42d095c90e73b3.png?x-oss-process=image/watermark,type_d3F5LXplbmhlaQ,shadow_50,text_Q1NETiBA5Yid57qn54K85Li55biIWWlreS0tMTIyOQ==,size_14,color_FFFFFF,t_70,g_se,x_16)
Android里的图形界面都是由View和ViewGroup以及他们的子类构成的: View:所有可视化控件的父类,提供组件描绘和时间处理方法 ViewGroup: View类的子类,可以拥有子控件,可以看作是容器 Android UI中的控件都是按照这种层次树的结构堆叠得,而创建UI布局的方式有两种, 自己在Java里写代码或者通过XML定义布局,后者显得更加方便和容易理解! 也是我们最常用的手段!
一般情况下,开发Android应用程序的UI界面都不直接使用View和ViewGroup类,而是使用这两个类的子类。开发者可以根据需要,通过继承View类来开发自己的组件。
自定义View组件
1.创建一个继承android.view.View类的View类,并重写构造方法
2.根据需要重写相应的方法。
3.在项目的活动中,创建并实例化自定义View类,并将其添加到布局管理器中
layout/main.xml
<?xml version="1.0" encoding="utf-8"?>
<FrameLayout xmlns:android="http://schemas.android.com/apk/res/android"
    android:layout_height="match_parent"
    android:layout_width="match_parent"
    android:id="@+id/mylayout"
    />
KiteView.java
public class KiteView extends View {


    public float bitmapX;//风筝的X轴坐标
    public float bitmapY;//风筝的Y轴坐标


    public KiteView(Context context){


        super(context);
        bitmapX=750;//默认显示的X轴坐标
        bitmapY=500;//默认显示的Y轴坐标

    }
    @Override
    protected  void onDraw(Canvas canvas){


        super.onDraw(canvas);
        Paint paint=new Paint();//创建并实例化paint对象
        Bitmap bitmap = BitmapFactory.decodeResource(this.getResources(), R.drawable.kite);//根据图片生成位图
        canvas.drawBitmap(bitmap,bitmapX,bitmapY,paint);//生成风筝
        if (bitmap.isRecycled()){

    //判断是否被强制回收
            bitmap.recycle();//强制回收
        }


    }

}
MainActivity.java
public class MainActivity extends AppCompatActivity {


    @Override
    protected void onCreate(Bundle savedInstanceState) {


        super.onCreate(savedInstanceState);
        setContentView(R.layout.main);
        FrameLayout frameLayout = (FrameLayout) findViewById(R.id.mylayout);//获取帧布局管理器
        final KiteView kite = new KiteView(MainActivity.this);//创建并实例化kite类
        //添加事件监听器
        kite.setOnTouchListener(new View.OnTouchListener() {


            @Override
            public boolean onTouch(View v, MotionEvent event) {


                kite.bitmapX=event.getX();//设置X坐标
                kite.bitmapY=event.getY();//设置Y坐标
                kite.invalidate();//重新绘制图形
                return true;
            }
        });
        frameLayout.addView(kite);//添加到布局管理器中
    }
}
1.2 布局管理器
1.2.1线性布局
在线性布局中,每一行(针对垂直排列)或每一列(针对水平排列)中只能放一个组件,Android的线性布局不会换行,当组件排列到窗体边缘后,后面的组件不会被显示出来。
排列方式由android:orientation控制
对齐方式由android:gravity控制
![[外链图片转存失败,源站可能有防盗链机制,建议将图片保存下来直接上传(img-urWPC08G-1647238547036)(C:\Users\机械师\AppData\Roaming\Typora\typora-user-images\1646899935270.png)]](https://img-blog.csdnimg.cn/c0c7b5321e324659b3e75ec8ed4ce518.png?x-oss-process=image/watermark,type_d3F5LXplbmhlaQ,shadow_50,text_Q1NETiBA5Yid57qn54K85Li55biIWWlreS0tMTIyOQ==,size_20,color_FFFFFF,t_70,g_se,x_16)
![[外链图片转存失败,源站可能有防盗链机制,建议将图片保存下来直接上传(img-rl435TWo-1647238547037)(C:\Users\机械师\AppData\Roaming\Typora\typora-user-images\1646900112099.png)]](https://img-blog.csdnimg.cn/c6efa71f44e445b49b6d7938052c5d5f.png?x-oss-process=image/watermark,type_d3F5LXplbmhlaQ,shadow_50,text_Q1NETiBA5Yid57qn54K85Li55biIWWlreS0tMTIyOQ==,size_20,color_FFFFFF,t_70,g_se,x_16)
线性布局实现4个按钮
layout/main.xml
<?xml version="1.0" encoding="utf-8" ?>
<LinearLayout xmlns:android="http://schemas.android.com/apk/res/android"
    xmlns:tools="http://schemas.android.com/tools"
    android:layout_width="match_parent"
    android:layout_height="match_parent"
    android:orientation="vertical"
    android:id="@+id/layout"
    tools:context=".MainActivity"
   >
    <Button
        android:text="按钮1"
        android:id="@+id/bt1"
        android:layout_width="match_parent"
        android:layout_height="wrap_content"/>
    <Button
        android:text="按钮2"
        android:id="@+id/bt2"
        android:layout_width="match_parent"
        android:layout_height="wrap_content"/>
    <Button
        android:text="按钮3"
        android:id="@+id/bt3"
        android:layout_width="match_parent"
        android:layout_height="wrap_content"/>
    <Button
        android:text="按钮4"
        android:id="@+id/bt4"
        android:layout_width="match_parent"
        android:layout_height="wrap_content"/>


</LinearLayout>
1.2.2表格布局
表格布局以行、列的形式来管理放入其中的UI组件。表格布局使用使用标记定义,在表格布局中,可以添加多个标记,每个 标记占用一行。由于标记也是容器,所以还可在该标记中添加其他组件,每添加一个组件,表格就会增加一列。在表格布局中,列可以被隐藏,也可以被设置为伸展的,从而填充可利用的屏幕空间,还可以设置为强制收缩,直到表格匹配屏幕大小。
如果在表格布局中, 直接向中添加 UI组件,那么该组件将独占一行。
TableLayout继承了LinerLayout,所以它支持后者的全部XML属性
![[外链图片转存失败,源站可能有防盗链机制,建议将图片保存下来直接上传(img-wILHzTfQ-1647238547038)(C:\Users\机械师\AppData\Roaming\Typora\typora-user-images\1646902135057.png)]](https://img-blog.csdnimg.cn/e5c26d2d66a742bda3882033c2e143c1.png?x-oss-process=image/watermark,type_d3F5LXplbmhlaQ,shadow_50,text_Q1NETiBA5Yid57qn54K85Li55biIWWlreS0tMTIyOQ==,size_20,color_FFFFFF,t_70,g_se,x_16)
main.xml
<?xml version="1.0" encoding="utf-8" ?>
<TableLayout xmlns:android="http://schemas.android.com/apk/res/android"
    android:id="@+id/tablelayout"
    android:layout_width="match_parent"
    android:layout_height="match_parent"
    android:orientation="vertical"
    android:gravity="center_vertical"
    android:stretchColumns="0,3"
    >
    <TableRow
        android:id="@+id/tableRow01"
        android:layout_width="wrap_content"
        android:layout_height="wrap_content"
        >
        <TextView/>
            <TextView
                android:text="用户名"
                android:id="@+id/textView1"
                android:textSize="24px"
                android:layout_height="wrap_content"
                android:layout_width="wrap_content"
                />
            <EditText
                android:id="@+id/editText1"
                android:textSize="24px"
                android:layout_height="wrap_content"
                android:layout_width="wrap_content"
                android:minWidth="200px"
                />
        <TextView/>
    </TableRow>

    <TableRow
        android:id="@+id/tableRow02"
        android:layout_width="wrap_content"
        android:layout_height="wrap_content"
        >
        <TextView/>
            <TextView
                android:text="密码"
                android:id="@+id/textView2"
                android:textSize="24px"
                android:layout_height="wrap_content"
                />
            <EditText
                android:id="@+id/editText2"
                android:textSize="24px"
                android:layout_height="wrap_content"
                android:layout_width="wrap_content"
                android:inputType="textPassword"
                />
        <TextView/>
    </TableRow>

    <TableRow
        android:id="@+id/tableRow03"
        android:layout_width="wrap_content"
        android:layout_height="wrap_content"
        >
        <TextView/>
            <Button
                android:text="登录"
                android:id="@+id/btn02"
                android:layout_height="wrap_content"
                android:layout_width="wrap_content"
                />
            <Button
                android:text="退出"
                android:id="@+id/btn01"
                android:layout_height="wrap_content"
                android:layout_width="wrap_content"
                />
        <TextView/>
    </TableRow>

</TableLayout>
1.2.3 帧布局
在帧布局管理器中,每加入一个组件,都将创建一个空白的去与,通常称为一帧,这些帧都会根据gravity属性执行自动对齐。默认情况下,帧布局从屏幕的左上角坐标点开始布局,多个人组件层叠排序,后面的组件覆盖前面的组件。
![[外链图片转存失败,源站可能有防盗链机制,建议将图片保存下来直接上传(img-O8RcG8g1-1647238547039)(C:\Users\机械师\AppData\Roaming\Typora\typora-user-images\1646905096094.png)]](https://img-blog.csdnimg.cn/2fedc25a5ada4120a81c401a969abb87.png)
main.xml
<?xml version="1.0" encoding="utf-8" ?>
<FrameLayout xmlns:android="http://schemas.android.com/apk/res/android"
    android:id="@+id/framelayout"
    android:layout_width="match_parent"
    android:layout_height="match_parent"
    android:foregroundGravity="bottom|right"
    >
    <TextView
        android:text="红色背景的TextView"
        android:id="@+id/textView01"
        android:background="#FFF00000"
        android:layout_gravity="center"
        android:layout_width="400px"
        android:layout_height="400px"/>

    <TextView
        android:text="橙色背景的TextView"
        android:id="@+id/textView02"
        android:background="#FFFF6600"
        android:layout_gravity="center"
        android:layout_width="300px"
        android:layout_height="300px"/>

    <TextView
        android:text="黄色背景的TextView"
        android:id="@+id/textView03"
        android:background="#FFFFEE00"
        android:layout_gravity="center"
        android:layout_width="200px"
        android:layout_height="200px"/>
</FrameLayout>
1.2.4 相对布局
相对布局是指按照组件之间的相对位置来进行布局,如某个组件在另一个组件的左边、右边、上方或下方等。在Android中,可以在XML布局文件中定义相对布局管理器,也可以使用Java代码来创建。推荐使用前者。在XML布局文件中定义相对布局管理器可以使用标记

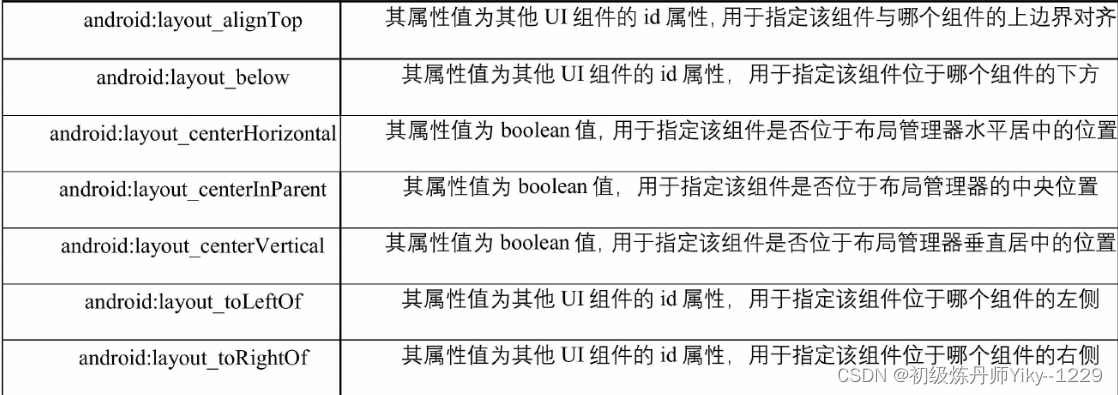
在相对布局管理器中,只有上面介绍的两个属性是不够的,为了更好地控制该布局管理器中各子组件的布局分布,RelativeLayout提供了一个内部类RelativeLayout.LayoutParams,通过该类提供的大量XML属性,可以很好地控制相对布局管理器中各组件的分布方式。
![[外链图片转存失败,源站可能有防盗链机制,建议将图片保存下来直接上传(img-oqHRfzzR-1647238547042)(C:\Users\机械师\AppData\Roaming\Typora\typora-user-images\1646906559924.png)]](https://img-blog.csdnimg.cn/91228cbf6e4d40a9856de08d1e31f177.png?x-oss-process=image/watermark,type_d3F5LXplbmhlaQ,shadow_50,text_Q1NETiBA5Yid57qn54K85Li55biIWWlreS0tMTIyOQ==,size_20,color_FFFFFF,t_70,g_se,x_16)
<?xml version="1.0" encoding="utf-8" ?>
<RelativeLayout xmlns:android="http://schemas.android.com/apk/res/android"
    android:id="@+id/relativelayout"
android:layout_width="match_parent智能推荐
【Phone ECC】紧急号码的管理及客制化方法_sim卡 ecclist-程序员宅基地
文章浏览阅读614次。[Android Version]Android 5.0/5.1 (L)Android 6.0 (M)Android 7.0(N)Android 8.0(O)[DESCRIPTION]L及之后的版本紧急号码Customer的部分改成了在XML文件中来配置,文件的路径: alps\vendor\mediatek\proprietary\external\EccL..._sim卡 ecclist
BCrypt 加密实现_写一个bcrypt-程序员宅基地
文章浏览阅读1.1k次。Bcrypt百度百科:1、 bcrypt,是一个跨平台的文件加密工具。由它加密的文件可在所有支持的操作系统和处理器上进行转移。它的口令必须是8至56个字符,并将在内部被转化为448位的密钥。2、bcrypt算法相对来说是运算比较慢的算法,在密码学界有句常话:越慢的算法越安全。算法越算,黑客破解成本越高.通过salt和const这两个值来减缓加密过程,ta的加密时间(百ms级)远远超过md5(大概1..._写一个bcrypt
LaTeX中的中英文字体设置、混排_latex英文字体-程序员宅基地
文章浏览阅读2.4w次,点赞14次,收藏87次。LaTeX中英文字体设置、混排,ctex宏包引用_latex英文字体
uni-app 消息推送功能UniPush_uniapp消息推送功能-程序员宅基地
文章浏览阅读5.7k次,点赞2次,收藏20次。这里用的是uni-app自带的UniPush1.0(个推服务),所以只针对UniPush1.0介绍实现步骤。当然现在已经出了UniPush2.0(HBuilderX 3.5.1及其以上版本支持),新项目的话还是推荐使用UniPush2.0。如果要使用UniPush2.0,请移步 UniPush 2.0 使用指南。_uniapp消息推送功能
sort与sorted的区别_sort和sorted函数的区别-程序员宅基地
文章浏览阅读1.3w次,点赞41次,收藏217次。一、sort()sort() 函数用于对原列表进行排序,如果指定参数,则使用比较函数指定的比较函数原型:sort(key,reverse=False)key:用来指定一个函数,此函数在每次元素比较时被调用,此函数代表排序的规则,也就是你按照什么规则对你的序列进行排序;reverse:是用来表明是否逆序,默认的False情况下是按照升序的规则进行排序的,当reverse=True时,便会按照降序进行排序。例如:1、list=[2,24,8,6,35,7,22,30]list.sort()pri_sort和sorted函数的区别
Mutual Supervision for Dense Object Detection(ICCV2021)阅读笔记-程序员宅基地
文章浏览阅读299次。同上一篇一样,这边摸鱼笔记也是关于分类和回归分支的权重设计。Mutual Supervision for Dense Object Detection(ICCV2021)阅读笔记_mutual supervision for dense object detection
随便推点
简单理解磁盘结构-程序员宅基地
文章浏览阅读3.6w次,点赞126次,收藏373次。 偶然看到一道笔试题,所以简单整理了一下磁盘的结构。本文主要介绍传统的磁盘结构,包括盘面、磁道、扇区、柱面、读写数据过程的概念,最后给出所遇到的笔试题。磁盘结构 传统的硬盘盘结构是像下图样子的,它有一个或多个盘片,用于存储数据,盘片多采用铝合金材料;中间有一个主轴,所有的盘片都绕着这个主轴转动,一个组合臂上面有多个磁头臂,每个磁头臂上面都有一个磁头,负责读写数据。..._磁盘结构
python数组(list) 求交集、并集、差集_python计算四个数组的交集代码-程序员宅基地
文章浏览阅读1.4w次,点赞7次,收藏16次。两个集合: a = [1,2,3,4,5,6] b = [3,5,7]1.求交集 方式一: intersection = [i for i in a if i in b] intersection = list(set(a).intersection(set(b))) 结果: [3, 5]2.求并集 union= list(set(a).u..._python计算四个数组的交集代码
其他手机可以安装鸿蒙吗,国内其它的手机厂家不想安装鸿蒙吗?-程序员宅基地
文章浏览阅读1.1k次。谷歌在 I/O 2021开幕式的主题演讲中发布了 Android 12系统;目前 Android 12系统可用于谷歌的 Pixel 手机(Pixel3及以上),以及联想、一加、华硕、OPPO、realme、夏普、Tecno、vivo、TCL、小米和中兴等手机,国内的众多手机厂家即将上线,但是还没有荣耀的消息,华为肯定不要考虑,必然是鸿蒙系统。发布的Android 12第一个Beta版本,可以看到用..._微软手机安装鸿蒙
Java架构师Day24-并发编程之锁-程序员宅基地
文章浏览阅读265次。并发编程之锁ReentrantLockReentrantReadWriteLockConditionReentrantLockReentrantReadWriteLockCondition
携程 Apollo 配置中心 | 学习笔记 序章_apollo分布式配置黑马学习笔记-程序员宅基地
文章浏览阅读7.4k次,点赞11次,收藏45次。Apollo 携程Apollo配置中心目录导航 携程 Apollo 配置中心 | 学习笔记(一) | Apollo配置中心简单介绍 携程 Apollo 配置中心 | 学习笔记(二) | Windows 系统搭建基于携程Apollo配置中心单机模式 携程 Apollo 配置中心 | 学习笔记(三) | 自..._apollo分布式配置黑马学习笔记
什么是人工智能(AI)?—— 你需要知道的三件事-程序员宅基地
文章浏览阅读1.1k次,点赞16次,收藏25次。人工智能 (AI) 是对人类智慧行为的仿真。它通常是设计用来感知环境、了解行为并采取行动的一台计算机或一个系统。想想自动驾驶汽车:此类 AI 驱动系统将机器学习和深度学习等 AI 算法集成到支持自动化技术的复杂环境。据麦肯锡预计,到 2030 年,AI 的全球经济价值将高达 13 万亿美元。这是因为在 AI 浪潮的影响下,几乎各行各业乃至每一个应用领域的工程环节都在转型。除了自动驾驶以外,AI 还广泛应用于以下领域:机器故障预测模型,告知何时需要进行机器保养;健康和传感器分析,如病患监护系统;