利用TensorFlow Object Detection API实现图片和视频物体检测_label_map_util-程序员宅基地
技术标签: tensorflow 机器学习 物体检测 物体检测API
TensorFlow Object Detection API介绍
物体检测是检测图片或视频中所出现的全部物体,并用矩形进行标注,物体的类别可以包括多种,比如:人、车、动物等等,即正确的答案可以是多个。
TensorFlow提供了用于检测图片或视频中所包含物体的接口(Object Detection API),具体详情可参考下面链接:
https://github.com/tensorflow/models/tree/master/research/object_detection
这个API是用COCO数据集 (http://cocodataset.org/#home) 训练出来的,是一个大型的、丰富的物体检测,分割和字幕数据集,大约有30万张图像、90种最常见物体。
这个API提供了多种不同的,使用者可以通过设置不同检测边界范围来平衡运行速度和准确率。
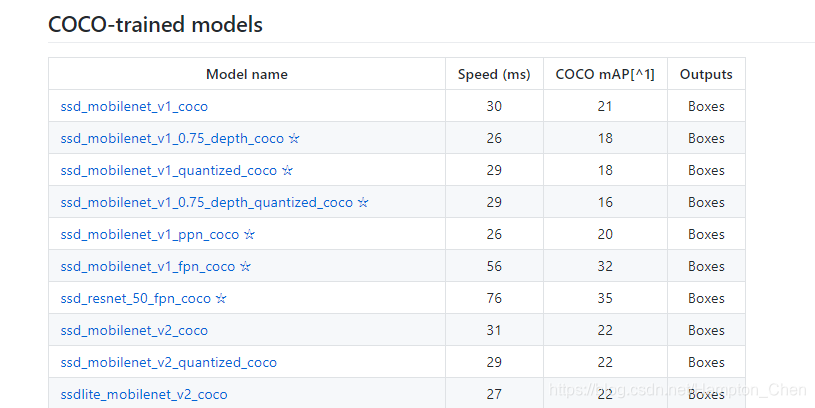
图中的mAP(平均精度)是检测边界框的准确率和召回率的乘积。这是一个很好的混合测度,在评价模型对目标物体的敏锐度和它是否能很好避免虚假目标中非常好用。mAP值越高,模型的准确度越高,但运行速度会相应下降。
实现物体检测
环境
本文代码运行环境:Python3.6、jupyter notebook
首先安装相关依赖包
pip install jupyter
pip install tensorflow
pip install pillow
pip install lxml
pip install matplotlib
pip install numpy
pip install opencv-python
图片物体检测:
1、加载库
import numpy as np
import tensorflow as tf
import matplotlib.pyplot as plt
from PIL import Image
2、从utils模块引入label_map_util和visualization_utils
label_map_util用于后面获取图像标签和类别,visualization_utils用于可视化
from utils import label_map_util
from utils import visualization_utils as vis_util
3、加载预训练好的模型
模型下载地址:
https://github.com/tensorflow/models/blob/master/research/object_detection/g3doc/detection_model_zoo.md
这里我们选用最轻量级的模型(ssd_mobilenet_v1_coco)。
PATH_TO_CKPT = 'ssd_mobilenet_v1_coco_2018_01_28/frozen_inference_graph.pb'
PATH_TO_LABELS = 'data/mscoco_label_map.pbtxt'
NUM_CLASSES = 90

detection_graph = tf.Graph()

with detection_graph.as_default():
    od_graph_def = tf.GraphDef()
    with tf.gfile.GFile(PATH_TO_CKPT, 'rb') as fid:
        od_graph_def.ParseFromString(fid.read())
        tf.import_graph_def(od_graph_def, name='')
4、加载分类标签数据
label_map = label_map_util.load_labelmap(PATH_TO_LABELS)
categories = label_map_util.convert_label_map_to_categories(label_map, max_num_classes=NUM_CLASSES, use_display_name=True)
category_index = label_map_util.create_category_index(categories)
5、核心代码:一个将图片转为数组的辅助函数,以及测试图片路径,使用模型进行物体检测:
def load_image_into_numpy_array(image):
    (im_width, im_height) = image.size
    return np.array(image.getdata()).reshape((im_height, im_width, 3)).astype(np.uint8)

TEST_IMAGE_PATHS = ['test_data/image1.jpg']

with detection_graph.as_default():
    with tf.Session(graph=detection_graph) as sess:
        image_tensor = detection_graph.get_tensor_by_name('image_tensor:0')
        detection_boxes = detection_graph.get_tensor_by_name('detection_boxes:0')
        detection_scores = detection_graph.get_tensor_by_name('detection_scores:0')
        detection_classes = detection_graph.get_tensor_by_name('detection_classes:0')
        num_detections = detection_graph.get_tensor_by_name('num_detections:0')
        for image_path in TEST_IMAGE_PATHS:
            image = Image.open(image_path)
            image_np = load_image_into_numpy_array(image)
            image_np_expanded = np.expand_dims(image_np, axis=0)
            (boxes, scores, classes, num) = sess.run(
                [detection_boxes, detection_scores, detection_classes, num_detections],
                feed_dict={image_tensor: image_np_expanded})
            vis_util.visualize_boxes_and_labels_on_image_array(image_np, np.squeeze(boxes), np.squeeze(classes).astype(np.int32), np.squeeze(scores), category_index, use_normalized_coordinates=True, line_thickness=8)
            plt.figure(figsize=[12, 8])
            plt.imshow(image_np)
            plt.show()
检测结果如下:

视频物体检测
使用cv2读取视频并获取每一帧图片,然后将检测后的每一帧写入新的视频文件。
实现代码
import numpy as np
import tensorflow as tf
import cv2

from utils import label_map_util
from utils import visualization_utils as vis_util

cap = cv2.VideoCapture('test_data/test_video.mp4')
ret, image_np = cap.read()
out = cv2.VideoWriter('output_video.mp4', -1, cap.get(cv2.CAP_PROP_FPS), (image_np.shape[1], image_np.shape[0]))

PATH_TO_CKPT = 'ssd_mobilenet_v1_coco_2018_01_28/frozen_inference_graph.pb'
PATH_TO_LABELS = 'data/mscoco_label_map.pbtxt'
NUM_CLASSES = 90

detection_graph = tf.Graph()
with detection_graph.as_default():
    od_graph_def = tf.GraphDef()
    with tf.gfile.GFile(PATH_TO_CKPT, 'rb') as fid:
        od_graph_def.ParseFromString(fid.read())
        tf.import_graph_def(od_graph_def, name='')

label_map = label_map_util.load_labelmap(PATH_TO_LABELS)
categories = label_map_util.convert_label_map_to_categories(label_map, max_num_classes=NUM_CLASSES, use_display_name=True)
category_index = label_map_util.create_category_index(categories)

with detection_graph.as_default():
    with tf.Session(graph=detection_graph) as sess:
        image_tensor = detection_graph.get_tensor_by_name('image_tensor:0')
        detection_boxes = detection_graph.get_tensor_by_name('detection_boxes:0')
        detection_scores = detection_graph.get_tensor_by_name('detection_scores:0')
        detection_classes = detection_graph.get_tensor_by_name('detection_classes:0')
        num_detections = detection_graph.get_tensor_by_name('num_detections:0')
        while cap.isOpened():
            ret, image_np = cap.read()
            if len((np.array(image_np)).shape) == 0:
                break

            image_np = cv2.cvtColor(image_np, cv2.COLOR_BGR2RGB)
            image_np_expanded = np.expand_dims(image_np, axis=0)

            (boxes, scores, classes, num) = sess.run([detection_boxes, detection_scores, detection_classes, num_detections], feed_dict={image_tensor: image_np_expanded})

            vis_util.visualize_boxes_and_labels_on_image_array(image_np, np.squeeze(boxes), np.squeeze(classes).astype(np.int32), np.squeeze(scores), category_index, use_normalized_coordinates=True, line_thickness=8)
            out.write(cv2.cvtColor(image_np, cv2.COLOR_RGB2BGR))

cap.release()
out.release()
cv2.destroyAllWindows()
检测效果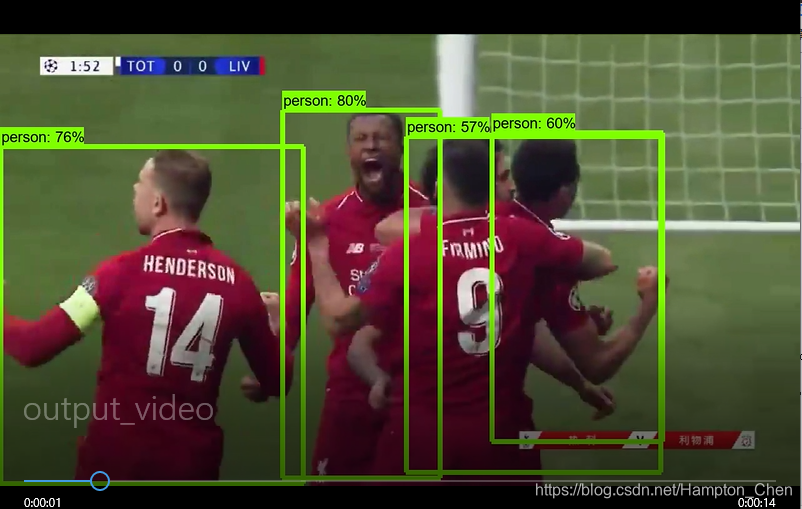
至此我们利用tensorflow提供的物体检测API,实现了图片和视频的物体检测。
完整的代码和检测后的视频,请至github查看:
https://github.com/Hanpeng-Chen/tensorflow-learning
欢迎关注作者的个人博客和微信公众号
个人博客: 代码视界
微信公众号:代码视界

智能推荐
c# 调用c++ lib静态库_c#调用lib-程序员宅基地
文章浏览阅读2w次,点赞7次,收藏51次。四个步骤1.创建C++ Win32项目动态库dll 2.在Win32项目动态库中添加 外部依赖项 lib头文件和lib库3.导出C接口4.c#调用c++动态库开始你的表演...①创建一个空白的解决方案,在解决方案中添加 Visual C++ , Win32 项目空白解决方案的创建:添加Visual C++ , Win32 项目这......_c#调用lib
deepin/ubuntu安装苹方字体-程序员宅基地
文章浏览阅读4.6k次。苹方字体是苹果系统上的黑体,挺好看的。注重颜值的网站都会使用,例如知乎:font-family: -apple-system, BlinkMacSystemFont, Helvetica Neue, PingFang SC, Microsoft YaHei, Source Han Sans SC, Noto Sans CJK SC, W..._ubuntu pingfang
html表单常见操作汇总_html表单的处理程序有那些-程序员宅基地
文章浏览阅读159次。表单表单概述表单标签表单域按钮控件demo表单标签表单标签基本语法结构<form action="处理数据程序的url地址“ method=”get|post“ name="表单名称”></form><!--action,当提交表单时,向何处发送表单中的数据,地址可以是相对地址也可以是绝对地址--><!--method将表单中的数据传送给服务器处理,get方式直接显示在url地址中,数据可以被缓存,且长度有限制;而post方式数据隐藏传输,_html表单的处理程序有那些
PHP设置谷歌验证器(Google Authenticator)实现操作二步验证_php otp 验证器-程序员宅基地
文章浏览阅读1.2k次。使用说明:开启Google的登陆二步验证(即Google Authenticator服务)后用户登陆时需要输入额外由手机客户端生成的一次性密码。实现Google Authenticator功能需要服务器端和客户端的支持。服务器端负责密钥的生成、验证一次性密码是否正确。客户端记录密钥后生成一次性密码。下载谷歌验证类库文件放到项目合适位置(我这边放在项目Vender下面)https://github.com/PHPGangsta/GoogleAuthenticatorPHP代码示例://引入谷_php otp 验证器
【Python】matplotlib.plot画图横坐标混乱及间隔处理_matplotlib更改横轴间距-程序员宅基地
文章浏览阅读4.3k次,点赞5次,收藏11次。matplotlib.plot画图横坐标混乱及间隔处理_matplotlib更改横轴间距
docker — 容器存储_docker 保存容器-程序员宅基地
文章浏览阅读2.2k次。①Storage driver 处理各镜像层及容器层的处理细节,实现了多层数据的堆叠,为用户 提供了多层数据合并后的统一视图②所有 Storage driver 都使用可堆叠图像层和写时复制(CoW)策略③docker info 命令可查看当系统上的 storage driver主要用于测试目的,不建议用于生成环境。_docker 保存容器
随便推点
网络拓扑结构_网络拓扑csdn-程序员宅基地
文章浏览阅读834次,点赞27次,收藏13次。网络拓扑结构是指计算机网络中各组件(如计算机、服务器、打印机、路由器、交换机等设备)及其连接线路在物理布局或逻辑构型上的排列形式。这种布局不仅描述了设备间的实际物理连接方式,也决定了数据在网络中流动的路径和方式。不同的网络拓扑结构影响着网络的性能、可靠性、可扩展性及管理维护的难易程度。_网络拓扑csdn
JS重写Date函数,兼容IOS系统_date.prototype 将所有 ios-程序员宅基地
文章浏览阅读1.8k次,点赞5次,收藏8次。IOS系统Date的坑要创建一个指定时间的new Date对象时,通常的做法是:new Date("2020-09-21 11:11:00")这行代码在 PC 端和安卓端都是正常的,而在 iOS 端则会提示 Invalid Date 无效日期。在IOS年月日中间的横岗许换成斜杠,也就是new Date("2020/09/21 11:11:00")通常为了兼容IOS的这个坑,需要做一些额外的特殊处理,笔者在开发的时候经常会忘了兼容IOS系统。所以就想试着重写Date函数,一劳永逸,避免每次ne_date.prototype 将所有 ios
如何将EXCEL表导入plsql数据库中-程序员宅基地
文章浏览阅读5.3k次。方法一:用PLSQL Developer工具。 1 在PLSQL Developer的sql window里输入select * from test for update; 2 按F8执行 3 打开锁, 再按一下加号. 鼠标点到第一列的列头,使全列成选中状态,然后粘贴,最后commit提交即可。(前提..._excel导入pl/sql
Git常用命令速查手册-程序员宅基地
文章浏览阅读83次。Git常用命令速查手册1、初始化仓库git init2、将文件添加到仓库git add 文件名 # 将工作区的某个文件添加到暂存区 git add -u # 添加所有被tracked文件中被修改或删除的文件信息到暂存区,不处理untracked的文件git add -A # 添加所有被tracked文件中被修改或删除的文件信息到暂存区,包括untracked的文件...
分享119个ASP.NET源码总有一个是你想要的_千博二手车源码v2023 build 1120-程序员宅基地
文章浏览阅读202次。分享119个ASP.NET源码总有一个是你想要的_千博二手车源码v2023 build 1120
【C++缺省函数】 空类默认产生的6个类成员函数_空类默认产生哪些类成员函数-程序员宅基地
文章浏览阅读1.8k次。版权声明:转载请注明出处 http://blog.csdn.net/irean_lau。目录(?)[+]1、缺省构造函数。2、缺省拷贝构造函数。3、 缺省析构函数。4、缺省赋值运算符。5、缺省取址运算符。6、 缺省取址运算符 const。[cpp] view plain copy_空类默认产生哪些类成员函数