Java—基于SpringBootWeb的综合小案例(智能学习辅助系统)_javaweb案例及代码-程序员宅基地
简介:这篇帖子是小编在看哔哩哔哩网课是的一个小案例,来自于黑马程序员,我觉得他们的课讲的很好,而且这个案例很有实用性,就在看视频的基础上,边温故知新,边实现了这个代码,在一些重点、难点和在编码过程中容易出问题的地方上进行了标注、做详解。
一、准备工作
01、需求&环境搭建
需求说明:(如下图)

环境搭建:在这篇帖子中,因为小编主攻的是后端开发工程师,所以前端工程的项目代码这边直接给出了“百度网盘:前端代码”,大家点击下载就好。(如下图)展示的是一个小项目的过程。
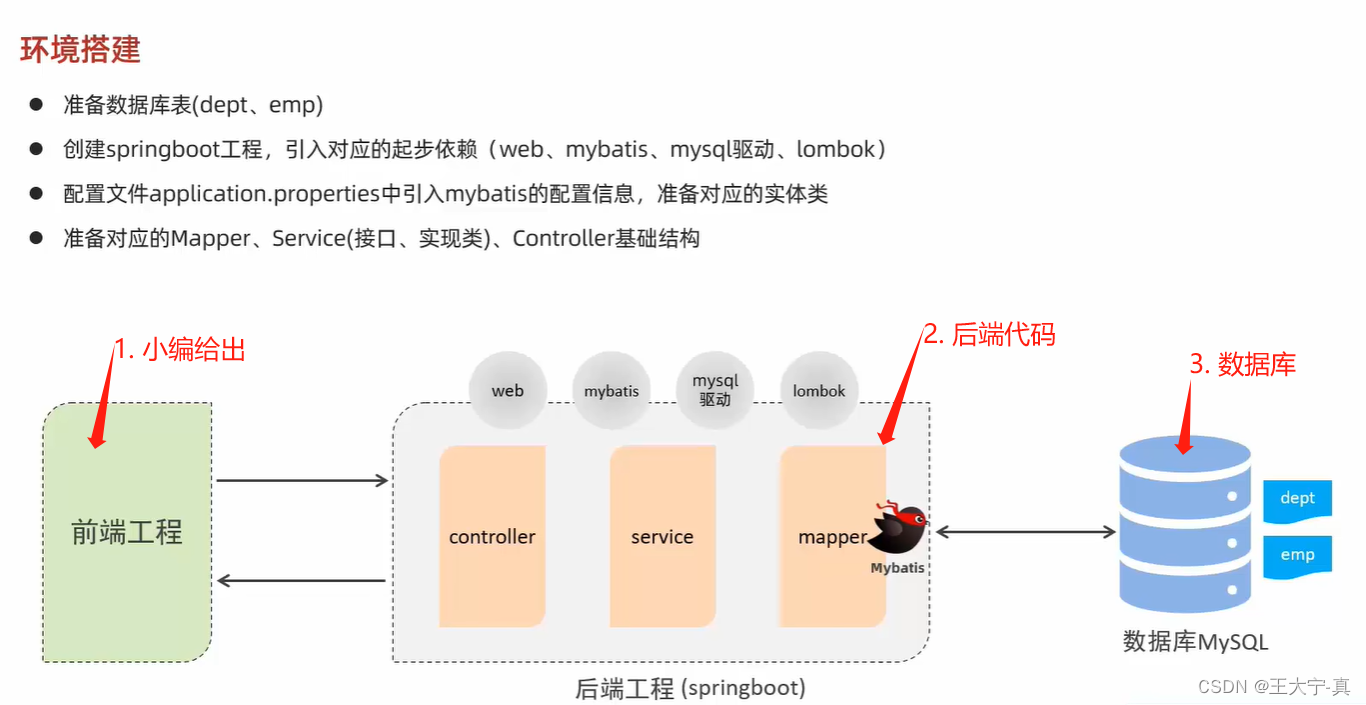
接下来是项目的创建过程:
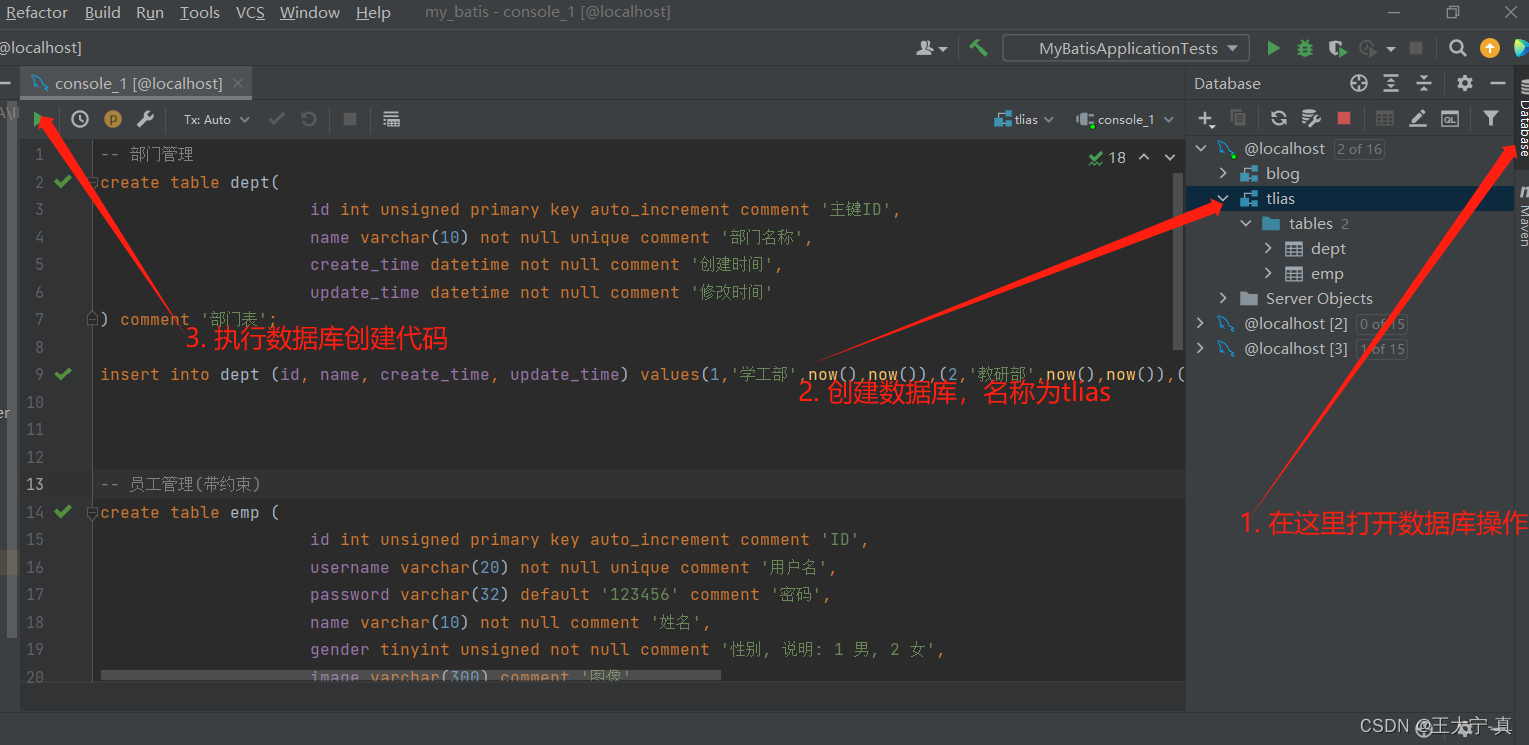
首先第一步是创建数据库表(下图第一张是源代码,第二张时操作引导)
(指导图片:源代码图片)
-- 部门管理
create table dept(
    id int unsigned primary key auto_increment comment '主键ID',
    name varchar(10) not null unique comment '部门名称',
    create_time datetime not null comment '创建时间',
    update_time datetime not null comment '修改时间'
) comment '部门表';

insert into dept (id, name, create_time, update_time) values(1,'学工部',now(),now()),(2,'教研部',now(),now()),(3,'咨询部',now(),now()), (4,'就业部',now(),now()),(5,'人事部',now(),now());


-- 员工管理(带约束)
create table emp (
  id int unsigned primary key auto_increment comment 'ID',
  username varchar(20) not null unique comment '用户名',
  password varchar(32) default '123456' comment '密码',
  name varchar(10) not null comment '姓名',
  gender tinyint unsigned not null comment '性别, 说明: 1 男, 2 女',
  image varchar(300) comment '图像',
  job tinyint unsigned comment '职位, 说明: 1 班主任,2 讲师, 3 学工主管, 4 教研主管, 5 咨询师',
  entrydate date comment '入职时间',
  dept_id int unsigned comment '部门ID',
  create_time datetime not null comment '创建时间',
  update_time datetime not null comment '修改时间'
) comment '员工表';

INSERT INTO emp
	(id, username, password, name, gender, image, job, entrydate,dept_id, create_time, update_time) VALUES
	(1,'jinyong','123456','金庸',1,'1.jpg',4,'2000-01-01',2,now(),now()),
	(2,'zhangwuji','123456','张无忌',1,'2.jpg',2,'2015-01-01',2,now(),now()),
	(3,'yangxiao','123456','杨逍',1,'3.jpg',2,'2008-05-01',2,now(),now()),
	(4,'weiyixiao','123456','韦一笑',1,'4.jpg',2,'2007-01-01',2,now(),now()),
	(5,'changyuchun','123456','常遇春',1,'5.jpg',2,'2012-12-05',2,now(),now()),
	(6,'xiaozhao','123456','小昭',2,'6.jpg',3,'2013-09-05',1,now(),now()),
	(7,'jixiaofu','123456','纪晓芙',2,'7.jpg',1,'2005-08-01',1,now(),now()),
	(8,'zhouzhiruo','123456','周芷若',2,'8.jpg',1,'2014-11-09',1,now(),now()),
	(9,'dingminjun','123456','丁敏君',2,'9.jpg',1,'2011-03-11',1,now(),now()),
	(10,'zhaomin','123456','赵敏',2,'10.jpg',1,'2013-09-05',1,now(),now()),
	(11,'luzhangke','123456','鹿杖客',1,'11.jpg',5,'2007-02-01',3,now(),now()),
	(12,'hebiweng','123456','鹤笔翁',1,'12.jpg',5,'2008-08-18',3,now(),now()),
	(13,'fangdongbai','123456','方东白',1,'13.jpg',5,'2012-11-01',3,now(),now()),
	(14,'zhangsanfeng','123456','张三丰',1,'14.jpg',2,'2002-08-01',2,now(),now()),
	(15,'yulianzhou','123456','俞莲舟',1,'15.jpg',2,'2011-05-01',2,now(),now()),
	(16,'songyuanqiao','123456','宋远桥',1,'16.jpg',2,'2007-01-01',2,now(),now()),
	(17,'chenyouliang','123456','陈友谅',1,'17.jpg',NULL,'2015-03-21',NULL,now(),now());
(知道图片:操作引导)
接下来是创建SpringBoot项目,并且添加相关依赖,操作引导如下图。
(引导图一)
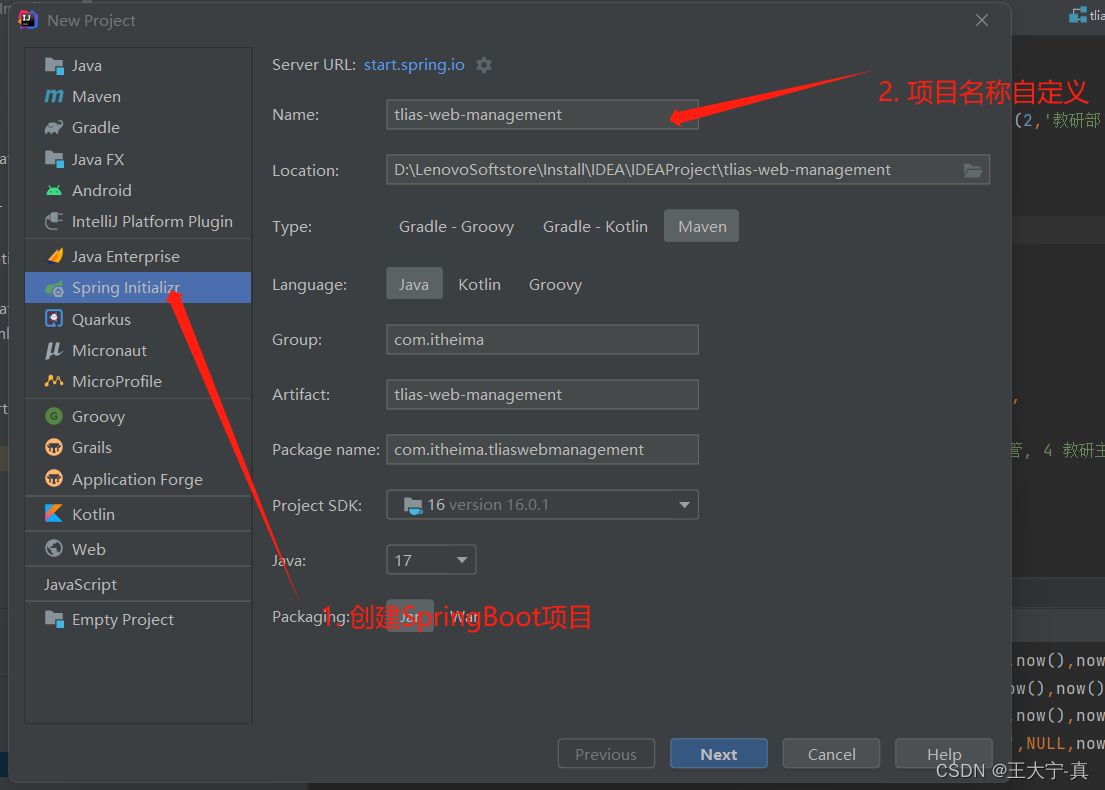
(引导图二)

(引导图三)

(以上图片中对应的项目代码,大家下载后直接导入就好,点击下载。但是注意要把项目中“application.properties”文件的数据库名称和密码换成自己的。)
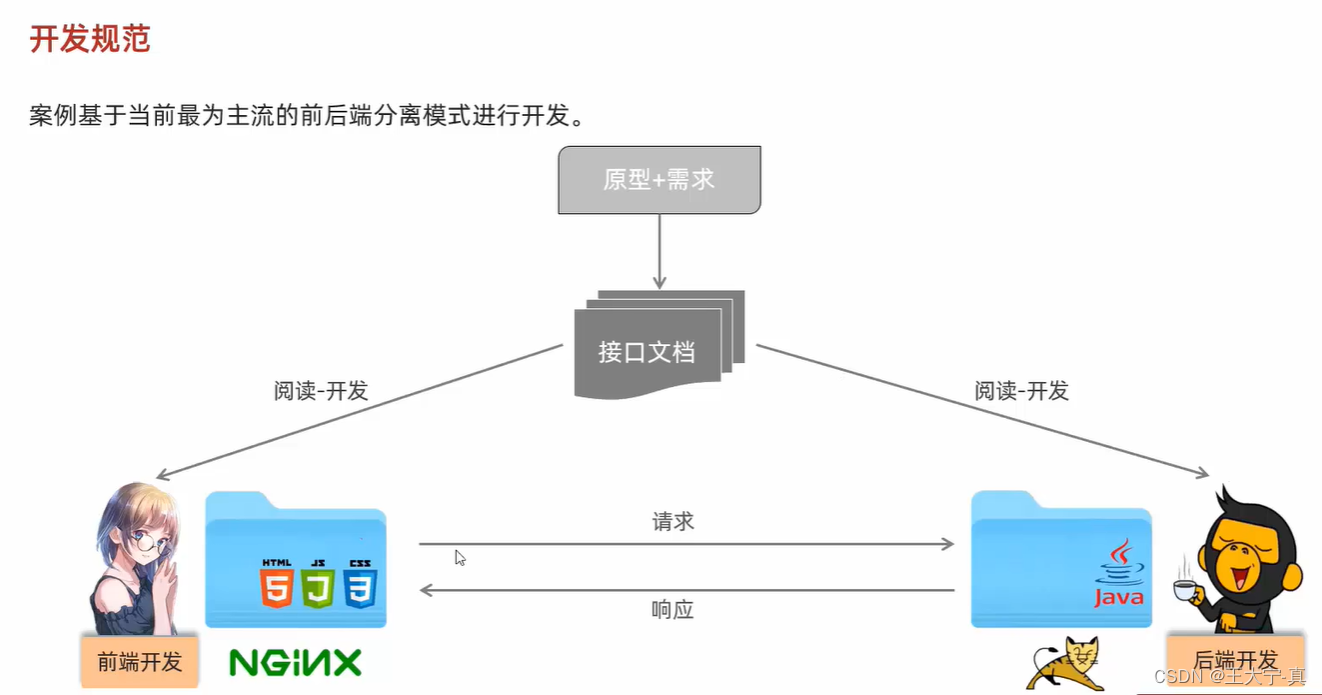
02、开发规范
当前主流的开发规范就是前后端分离开发,前端与后端通过阅读接口文档相互约定规则后进行开发。(如下图所示)
编码规则—ResultFul:(如下图所示)
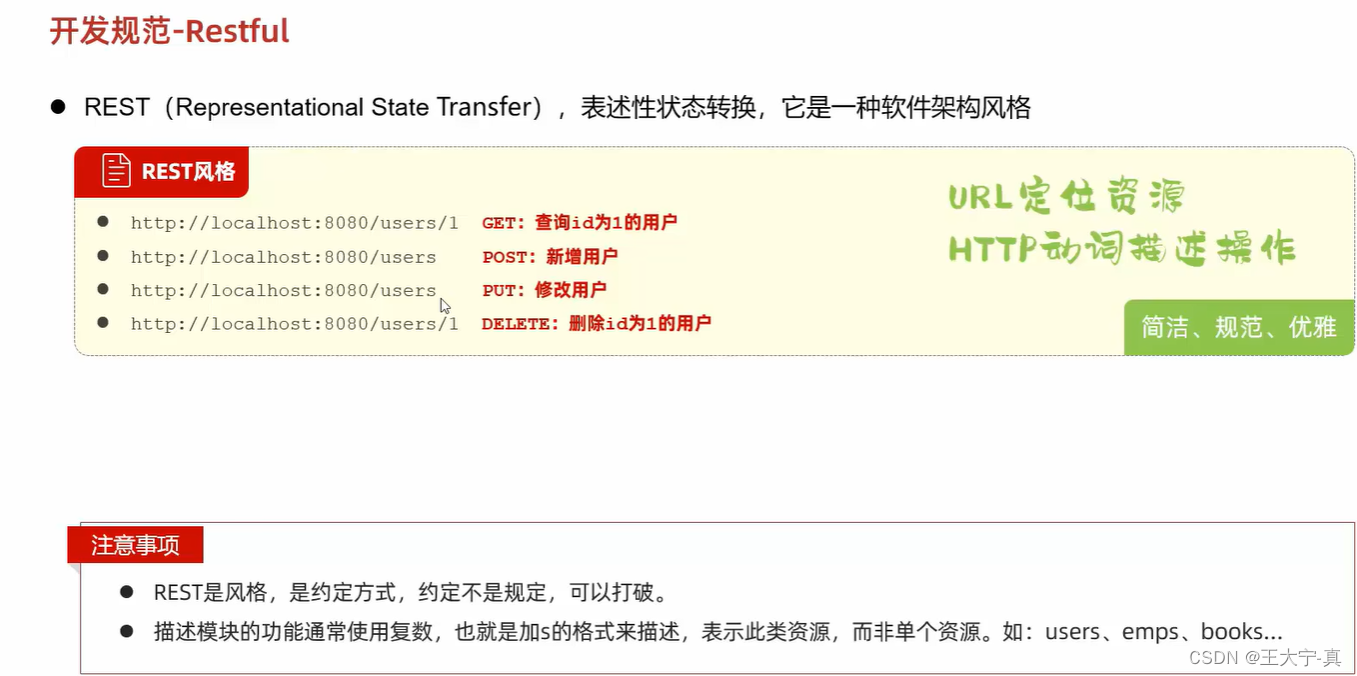
规定一个返回规则:通过定义一个Result类,制定统一的返回结果(如下图所示)

代码详情如下:
package com.itheima.tliaswebmanagement.pojo;

import lombok.AllArgsConstructor;
import lombok.Data;
import lombok.NoArgsConstructor;

@Data
@NoArgsConstructor
@AllArgsConstructor
public class Result {
    private Integer code; //响应码: 1. 代表成功  2. 代表失败
    private String msg; //响应信息: 描述字符串
    private Object data; //返回的数据

    public static Result success(){ // 增删改 成功响应
        return new Result(1, "success", null);
    }
    public static Result success(Object data){ // 查询 成功响应
        return new Result(1, "success", data);
    }
    public static Result error(String msg){ // 失败响应
        return new Result(0, msg, null);
    }
}
二、部门管理
01、查询部门
整体思路“如下图”:首先是浏览器端发送的请求被Controller接收—>将请求发送至Service层进行逻辑处理—>处理后发送到Mapper层访问数据库—>数据库将响应的结果返回给Mapper层—>Mapper层返回给Service层—>Service层返回给Controller层—>Controller层返回给浏览器。

02、前后端联调试
前后端联调指的是将前端工程,后端工程都启动起来,通过前端工程来访问后端工程,进而进行调试。
这边小编已经将前端工程项目上传到我的网盘中,大家(点击下载),并且将其解压缩,然后运行nginx.exe可执行文件就好。

之后使用浏览器访问http://localhost:90。
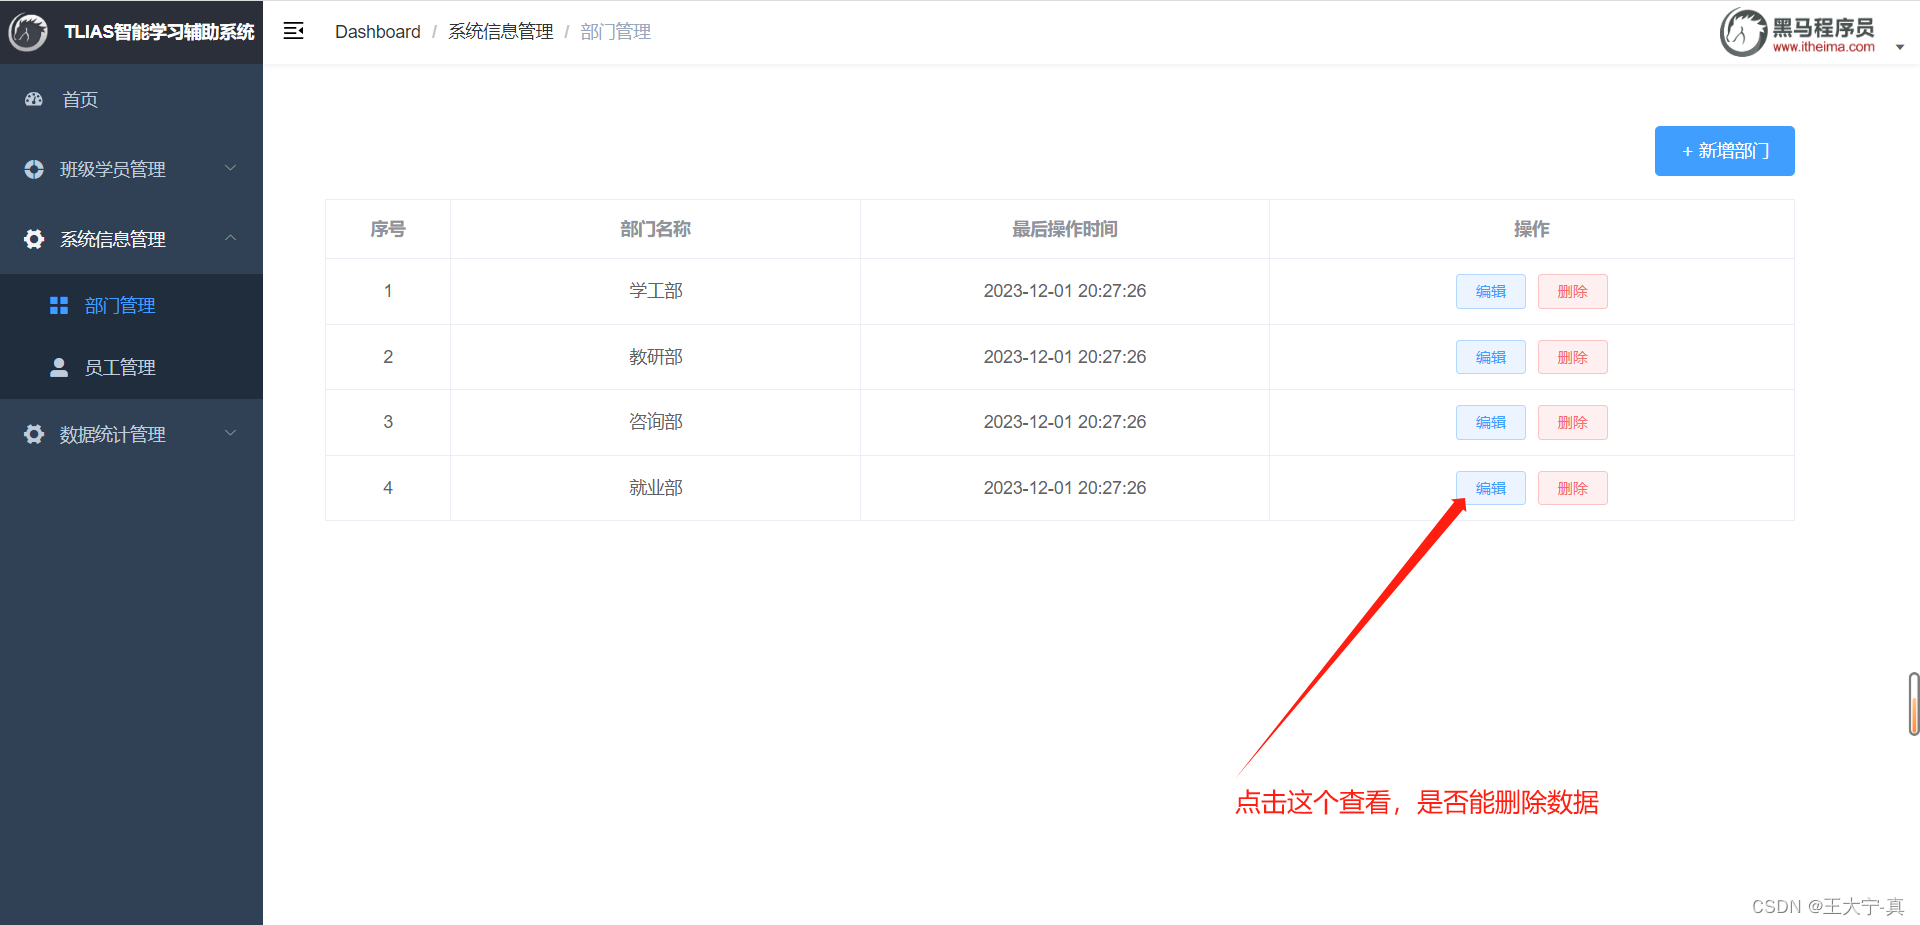
03、删除部门
此功能是通过点击前端的删除部门按钮,将数据库中的对应部门数据删除掉(如下配图)。
04、新增部门
此功能是通过点击前端的新增部门按钮,将数据库中的对应部门数据增加一条(如下配图)

05、部分核心代码展示(详情代码在下面的最终代码展示)
Controller页面
package com.itheima.tliaswebmanagement.controller;

import com.itheima.tliaswebmanagement.pojo.Dept;
import com.itheima.tliaswebmanagement.pojo.Result;
import com.itheima.tliaswebmanagement.service.DeptService;
import lombok.extern.slf4j.Slf4j;
import org.slf4j.Logger;
import org.slf4j.LoggerFactory;
import org.springframework.beans.factory.annotation.Autowired;
import org.springframework.web.bind.annotation.*;

import java.util.List;

@RestController
@Slf4j
// 一个完整的请求路径,应该是类上的@RequestMapping的value属性+方法上的@RequestMapping的value属性。
@RequestMapping("/depts")
public class DeptController {

    @Autowired
    private DeptService deptService;

    // 获取日志对象
    //private static Logger logger = LoggerFactory.getLogger(DeptController.class);

    /*@RequestMapping(value = "/depts", method = RequestMethod.GET)*/
    /**
     * 遍历部门数据
     * @return
     */
    @GetMapping()
    public Result list(){
        /*logger.info("通过日志工厂,获取的日志对象: " + );*/

        log.info("查询全部部门数据");

        List<Dept> deptList = deptService.list();

        return Result.success(deptList);
    }

    /**
     * 根据id删除部门
     * @return
     */
    @DeleteMapping("/{id}")
    public Result deleteByID(@PathVariable Integer id){
        log.info("根据部门ID删除部门:{}", id);
        deptService.deleteByID(id);
        return Result.success();
    }

    /**
     * 向部门插入数据
     * @return Result
     */
    @PostMapping()
    public Result insert(@RequestBody Dept dept){
        log.info("新增部门: {}", dept);
        deptService.insert(dept);
        return Result.success();
    }
}
Service层
package com.itheima.tliaswebmanagement.service.impl;

import com.itheima.tliaswebmanagement.mapper.DeptMapper;
import com.itheima.tliaswebmanagement.pojo.Dept;
import com.itheima.tliaswebmanagement.service.DeptService;
import org.springframework.beans.factory.annotation.Autowired;
import org.springframework.stereotype.Service;

import java.time.LocalDateTime;
import java.util.List;

@Service
public class DeptServiceImpl implements DeptService {

    @Autowired
    private DeptMapper deptMapper;

    @Override
    public List<Dept> list() {
        return deptMapper.list();
    }

    @Override
    public void deleteByID(Integer id) {
        deptMapper.deleteByID(id);
    }

    @Override
    public void insert(Dept dept) {
        //补全Dept表中的时间属性
        dept.setCreateTime(LocalDateTime.now());
        dept.setUpdateTime(LocalDateTime.now());
        deptMapper.insert(dept);
    }

}
Dao层
package com.itheima.tliaswebmanagement.mapper;

import com.itheima.tliaswebmanagement.pojo.Dept;
import org.apache.ibatis.annotations.Delete;
import org.apache.ibatis.annotations.Insert;
import org.apache.ibatis.annotations.Mapper;
import org.apache.ibatis.annotations.Select;

import java.util.List;

/**
 * 部门管理
 */

@Mapper
public interface DeptMapper {

    /**
     * 查询全部部门数据
     * @return
     */
    @Select("select * from dept")
    List<Dept> list();

    /**
     * 通过部门ID删除部门
     * @param id
     */
    @Delete("delete from dept where id = #{id}")
    void deleteByID(Integer id);

    /**
     * 向部门表插入一个数据
     * @param id
     */
    @Insert("insert into dept(name, create_time, update_time ) values(#{name}, #{createTime}, #{updateTime})")
    void insert(Dept dept);
}
三、员工管理
01、分页查询
此功能是通过点击前端的查询员工按钮,将数据库中的对应员工数据按照约定的格式返回给前端(如下配图)

在项目前端中就能看到我们从数据库中查到的员工数据如下。

小结如下:

02、条件分页查询

这里主要的的难点在于将SQL查询语句统一书写到XMl文件中。如下图所示,在这里使用了动态SQL语句,用以实现条件查询。
<?xml version="1.0" encoding="UTF-8" ?>
<!DOCTYPE mapper
        PUBLIC "-//mybatis.org//DTD Mapper 3.0//EN"
        "http://mybatis.org/dtd/mybatis-3-mapper.dtd">
<mapper namespace="com.itheima.tliaswebmanagement.mapper.EmpMapper">

    <select id="list" resultType="com.itheima.tliaswebmanagement.pojo.Emp">

    select * from emp
    <where>
        <if test="name != null and name != '' ">
            name like concat('%', #{name}, '%')
        </if>
        <if test="gender != null">
           and gender = #{gender}
        </if>
        <if test="begin != null and end != null">
            and entrydate between #{begin} and #{end}
        </if>
    </where>
    order by update_time desc
    </select>
</mapper>
03、删除员工
这里主要是通过动态SQL实现批量删除员工表中的员工信息,这里只展示一些核心代码,最终完整项目在文章底部提供链接。
Controller层
package com.itheima.tliaswebmanagement.controller;

import com.itheima.tliaswebmanagement.pojo.PageBean;
import com.itheima.tliaswebmanagement.pojo.Result;
import com.itheima.tliaswebmanagement.service.EmpService;
import lombok.extern.slf4j.Slf4j;
import org.springframework.beans.factory.annotation.Autowired;
import org.springframework.format.annotation.DateTimeFormat;
import org.springframework.web.bind.annotation.*;

import java.time.LocalDate;
import java.util.List;

/**
 * 员工管理类
 */

@Slf4j
@RestController
@RequestMapping("/emps")
public class EmpController {

    @Autowired
    private EmpService empService;

    /**
     * 员工管理-分页查询
     * @param page 页码
     * @param pageSize 每页多少数据
     */
    @GetMapping()
    public Result page(@RequestParam(defaultValue = "1") Integer page, @RequestParam(defaultValue = "10") Integer pageSize,
                       String name, Short gender,
                       @DateTimeFormat(pattern = "yyyy-MM-dd") LocalDate begin,
                       @DateTimeFormat(pattern = "yyyy-MM-dd") LocalDate end){
        PageBean pageBean = empService.page(page, pageSize, name, gender, begin, end);
        log.info("分页查询参数: {},{},{}, {}, {}", page, pageSize, name, gender, begin, end);
        return Result.success(pageBean);
    }

    /**
     * 员工管理-删除员工数据
     * @param
     * @return
     */
    @DeleteMapping("/{ids}")
    public Result deleteById(@PathVariable List<Integer> ids){

        log.info("要删除员工数据id: {}", ids);
        empService.deleteById(ids);
        return Result.success();
    }
}
Service层
package com.itheima.tliaswebmanagement.service;

import com.itheima.tliaswebmanagement.pojo.PageBean;
import org.springframework.format.annotation.DateTimeFormat;

import java.time.LocalDate;
import java.util.List;

/**
 * 员工管理
 */
public interface EmpService {

    /**
     * 分页查询
     * @param page
     * @param pageSize
     * @return
     */
    PageBean page(Integer page, Integer pageSize, String name, Short gender, LocalDate begin, LocalDate end);

    /**
     * 根据id删除用户
     */
    void deleteById(List<Integer> ids);
}
Dao层
package com.itheima.tliaswebmanagement.mapper;

import com.itheima.tliaswebmanagement.pojo.Emp;
import org.apache.ibatis.annotations.Mapper;
import org.apache.ibatis.annotations.Select;

import java.time.LocalDate;
import java.util.List;

/**
 * 员工管理
 */

@Mapper
public interface EmpMapper {

    // 以下代码是使用PageHelper插件进行增删查改的代码。
    /**
     * 查询员工表所有数据
     * @return
     */
/*    @Select("select * from emp")*/
    public List<Emp> list(String name, Short gender, LocalDate begin, LocalDate end);

    /**
     * 根据id删除用户
     */
    void deleteById(List<Integer> ids);


    // 以下代码是不使用PageHelper插件进行增删查改的代码。
    /*    *//**
     * 查询消息记录数
     * @return
     *//*
    @Select("select count(*) from  emp")
    public Long count();

    *//**
     * 分页查询,获取列表数据
     * @return
     *//*
    @Select("select * from emp limit #{page}, #{pageSize}")
    List<Emp> page(Integer page, Integer pageSize);*/
}
XML配置文件。
<?xml version="1.0" encoding="UTF-8" ?>
<!DOCTYPE mapper
        PUBLIC "-//mybatis.org//DTD Mapper 3.0//EN"
        "http://mybatis.org/dtd/mybatis-3-mapper.dtd">
<mapper namespace="com.itheima.tliaswebmanagement.mapper.EmpMapper">

    <select id="list" resultType="com.itheima.tliaswebmanagement.pojo.Emp">

        select * from emp
        <where>
            <if test="name != null and name != '' ">
                name like concat('%', #{name}, '%')
            </if>
            <if test="gender != null">
                and gender = #{gender}
            </if>
            <if test="begin != null and end != null">
                and entrydate between #{begin} and #{end}
            </if>
        </where>
        order by update_time desc
    </select>

    <delete id="deleteById">
        delete from emp
        <where>
            id in
            <foreach collection="ids" item="id" separator="," open="(" close=")">
                #{id}
            </foreach>
        </where>
    </delete>
</mapper>
总结:因为只是一个小项目,而且后面的功能要么就是简单的重复操作,要么就是更深层次的技术点,例如账号管理(注册、登录等),这个小编打算作为单独的一个文章讲解,所以目前为止只提供这么多讲解,如果继续文章就太杂乱了。
这边也建议如果打算想更深层次的学习,可以去哔哩哔哩里面系统的观看他们的网课,然后有不懂得问题或者BUG可以随时给我留言,会非常热心的给出解答,甚至如果出现多人问同一问题,我这边也能在写一篇帖子做解答。
小编的QQ:2917281717
希望大家给个点赞、留言、关注,你的认可就是我坚持下去的动力。
项目的百度链接如下(点击下载)。
智能推荐
攻防世界_难度8_happy_puzzle_攻防世界困难模式攻略图文-程序员宅基地
文章浏览阅读645次。这个肯定是末尾的IDAT了,因为IDAT必须要满了才会开始一下个IDAT,这个明显就是末尾的IDAT了。,对应下面的create_head()代码。,对应下面的create_tail()代码。不要考虑爆破,我已经试了一下,太多情况了。题目来源:UNCTF。_攻防世界困难模式攻略图文
达梦数据库的导出(备份)、导入_达梦数据库导入导出-程序员宅基地
文章浏览阅读2.9k次,点赞3次,收藏10次。偶尔会用到,记录、分享。1. 数据库导出1.1 切换到dmdba用户su - dmdba1.2 进入达梦数据库安装路径的bin目录,执行导库操作 导出语句:./dexp cwy_init/[email protected]:5236 file=cwy_init.dmp log=cwy_init_exp.log 注释: cwy_init/init_123..._达梦数据库导入导出
js引入kindeditor富文本编辑器的使用_kindeditor.js-程序员宅基地
文章浏览阅读1.9k次。1. 在官网上下载KindEditor文件,可以删掉不需要要到的jsp,asp,asp.net和php文件夹。接着把文件夹放到项目文件目录下。2. 修改html文件,在页面引入js文件:<script type="text/javascript" src="./kindeditor/kindeditor-all.js"></script><script type="text/javascript" src="./kindeditor/lang/zh-CN.js"_kindeditor.js
STM32学习过程记录11——基于STM32G431CBU6硬件SPI+DMA的高效WS2812B控制方法-程序员宅基地
文章浏览阅读2.3k次,点赞6次,收藏14次。SPI的详情简介不必赘述。假设我们通过SPI发送0xAA,我们的数据线就会变为10101010,通过修改不同的内容,即可修改SPI中0和1的持续时间。比如0xF0即为前半周期为高电平,后半周期为低电平的状态。在SPI的通信模式中,CPHA配置会影响该实验,下图展示了不同采样位置的SPI时序图[1]。CPOL = 0,CPHA = 1:CLK空闲状态 = 低电平,数据在下降沿采样,并在上升沿移出CPOL = 0,CPHA = 0:CLK空闲状态 = 低电平,数据在上升沿采样,并在下降沿移出。_stm32g431cbu6
计算机网络-数据链路层_接收方收到链路层数据后,使用crc检验后,余数为0,说明链路层的传输时可靠传输-程序员宅基地
文章浏览阅读1.2k次,点赞2次,收藏8次。数据链路层习题自测问题1.数据链路(即逻辑链路)与链路(即物理链路)有何区别?“电路接通了”与”数据链路接通了”的区别何在?2.数据链路层中的链路控制包括哪些功能?试讨论数据链路层做成可靠的链路层有哪些优点和缺点。3.网络适配器的作用是什么?网络适配器工作在哪一层?4.数据链路层的三个基本问题(帧定界、透明传输和差错检测)为什么都必须加以解决?5.如果在数据链路层不进行帧定界,会发生什么问题?6.PPP协议的主要特点是什么?为什么PPP不使用帧的编号?PPP适用于什么情况?为什么PPP协议不_接收方收到链路层数据后,使用crc检验后,余数为0,说明链路层的传输时可靠传输
软件测试工程师移民加拿大_无证移民,未受过软件工程师的教育(第1部分)-程序员宅基地
文章浏览阅读587次。软件测试工程师移民加拿大 无证移民,未受过软件工程师的教育(第1部分) (Undocumented Immigrant With No Education to Software Engineer(Part 1))Before I start, I want you to please bear with me on the way I write, I have very little gen...
随便推点
Thinkpad X250 secure boot failed 启动失败问题解决_安装完系统提示secureboot failure-程序员宅基地
文章浏览阅读304次。Thinkpad X250笔记本电脑,装的是FreeBSD,进入BIOS修改虚拟化配置(其后可能是误设置了安全开机),保存退出后系统无法启动,显示:secure boot failed ,把自己惊出一身冷汗,因为这台笔记本刚好还没开始做备份.....根据错误提示,到bios里面去找相关配置,在Security里面找到了Secure Boot选项,发现果然被设置为Enabled,将其修改为Disabled ,再开机,终于正常启动了。_安装完系统提示secureboot failure
C++如何做字符串分割(5种方法)_c++ 字符串分割-程序员宅基地
文章浏览阅读10w+次,点赞93次,收藏352次。1、用strtok函数进行字符串分割原型: char *strtok(char *str, const char *delim);功能:分解字符串为一组字符串。参数说明:str为要分解的字符串,delim为分隔符字符串。返回值:从str开头开始的一个个被分割的串。当没有被分割的串时则返回NULL。其它:strtok函数线程不安全,可以使用strtok_r替代。示例://借助strtok实现split#include <string.h>#include <stdio.h&_c++ 字符串分割
2013第四届蓝桥杯 C/C++本科A组 真题答案解析_2013年第四届c a组蓝桥杯省赛真题解答-程序员宅基地
文章浏览阅读2.3k次。1 .高斯日记 大数学家高斯有个好习惯:无论如何都要记日记。他的日记有个与众不同的地方,他从不注明年月日,而是用一个整数代替,比如:4210后来人们知道,那个整数就是日期,它表示那一天是高斯出生后的第几天。这或许也是个好习惯,它时时刻刻提醒着主人:日子又过去一天,还有多少时光可以用于浪费呢?高斯出生于:1777年4月30日。在高斯发现的一个重要定理的日记_2013年第四届c a组蓝桥杯省赛真题解答
基于供需算法优化的核极限学习机(KELM)分类算法-程序员宅基地
文章浏览阅读851次,点赞17次,收藏22次。摘要:本文利用供需算法对核极限学习机(KELM)进行优化,并用于分类。
metasploitable2渗透测试_metasploitable2怎么进入-程序员宅基地
文章浏览阅读1.1k次。一、系统弱密码登录1、在kali上执行命令行telnet 192.168.26.1292、Login和password都输入msfadmin3、登录成功,进入系统4、测试如下:二、MySQL弱密码登录:1、在kali上执行mysql –h 192.168.26.129 –u root2、登录成功,进入MySQL系统3、测试效果:三、PostgreSQL弱密码登录1、在Kali上执行psql -h 192.168.26.129 –U post..._metasploitable2怎么进入
Python学习之路:从入门到精通的指南_python人工智能开发从入门到精通pdf-程序员宅基地
文章浏览阅读257次。本文将为初学者提供Python学习的详细指南,从Python的历史、基础语法和数据类型到面向对象编程、模块和库的使用。通过本文,您将能够掌握Python编程的核心概念,为今后的编程学习和实践打下坚实基础。_python人工智能开发从入门到精通pdf